
Unfortunately too often an update of the firmware of branded devices happens many month after it is released by Microsoft … and this it is not nice, especially if the new version solves some known bugs and/or improve the device performance! Is it true that now Microsoft decided to directly distribute its operating system just to avoid that known problem, but a firmware update is still dependent on the provider …
So may be you may want to make your device not branded anymore … as I did after waiting for more than two month for an update.
The procedure is not difficult for a technician but may be it could be for a generic customer: take care that you can loose the warranty (unless you rollback to the original version) and all the actual device configuration may be lost.
In the following I will provide a step-by-step procedure using most of the instructions you can also find in a WindowsBlogItalia post: Guida facile per sbrandizzare, resuscitare e fare downgrade di Lumia 950, 950 XL e 550. There again, it is clearly stated that you must be aware that you can loose your warranty … even though you can always recover your original firmware using the Windows Device Recovery tool.
=============================================
STEP 1
First of all force a backup of your data using the proper function available in the Setting -> System section: in this way you’ll be able to use that last backup when you ‘ll have to configure the device (with the same wizard procedure that you followed when you bought it.
STEP 2
Just in case, you better install in your PC the last version of the Windows Device Recovery tool: if you find problems in that installation due to some Microsoft Visual C++ 2012 Redistributable problems (as it happened to me), please uninstall that package from Programs & Features and reinstall it downloading from the proper MS page. If you will need, see also this page for more information on how to use that tool.
STEP 3
Then you have to download the Windows Phone Image Designer (LumiaFlashTools.rar) from here that, once unzipped, contains also some drivers that needs to be installed manually.
STEP 4
However to make that drivers installation, you need to disable the driver signature and, to do that, you have to restart your PC after having set an Advanced Startup: in Windows 10 this can be done going to All Settings -> Update & Security -> Recovery and press the Restart now button available in the Advanced startup (IT: Avvio avanzato) section.

Once rebooted in Advanced mode, please click on Troubleshoot (IT: Risoluzione dei problemi) and then on Advanced options (IT: Opzioni avanzate) and finally to Startup settings (IT: Impostazioni di avvio). Next screen will show you the list of all the available options that you will have after the restart of the PC. Then, click on Restart and, at the next start, you can disable the signature for that driver clicking the number 7 on the keyboard (that is, the option related to “Disable driver signature enforcement“).
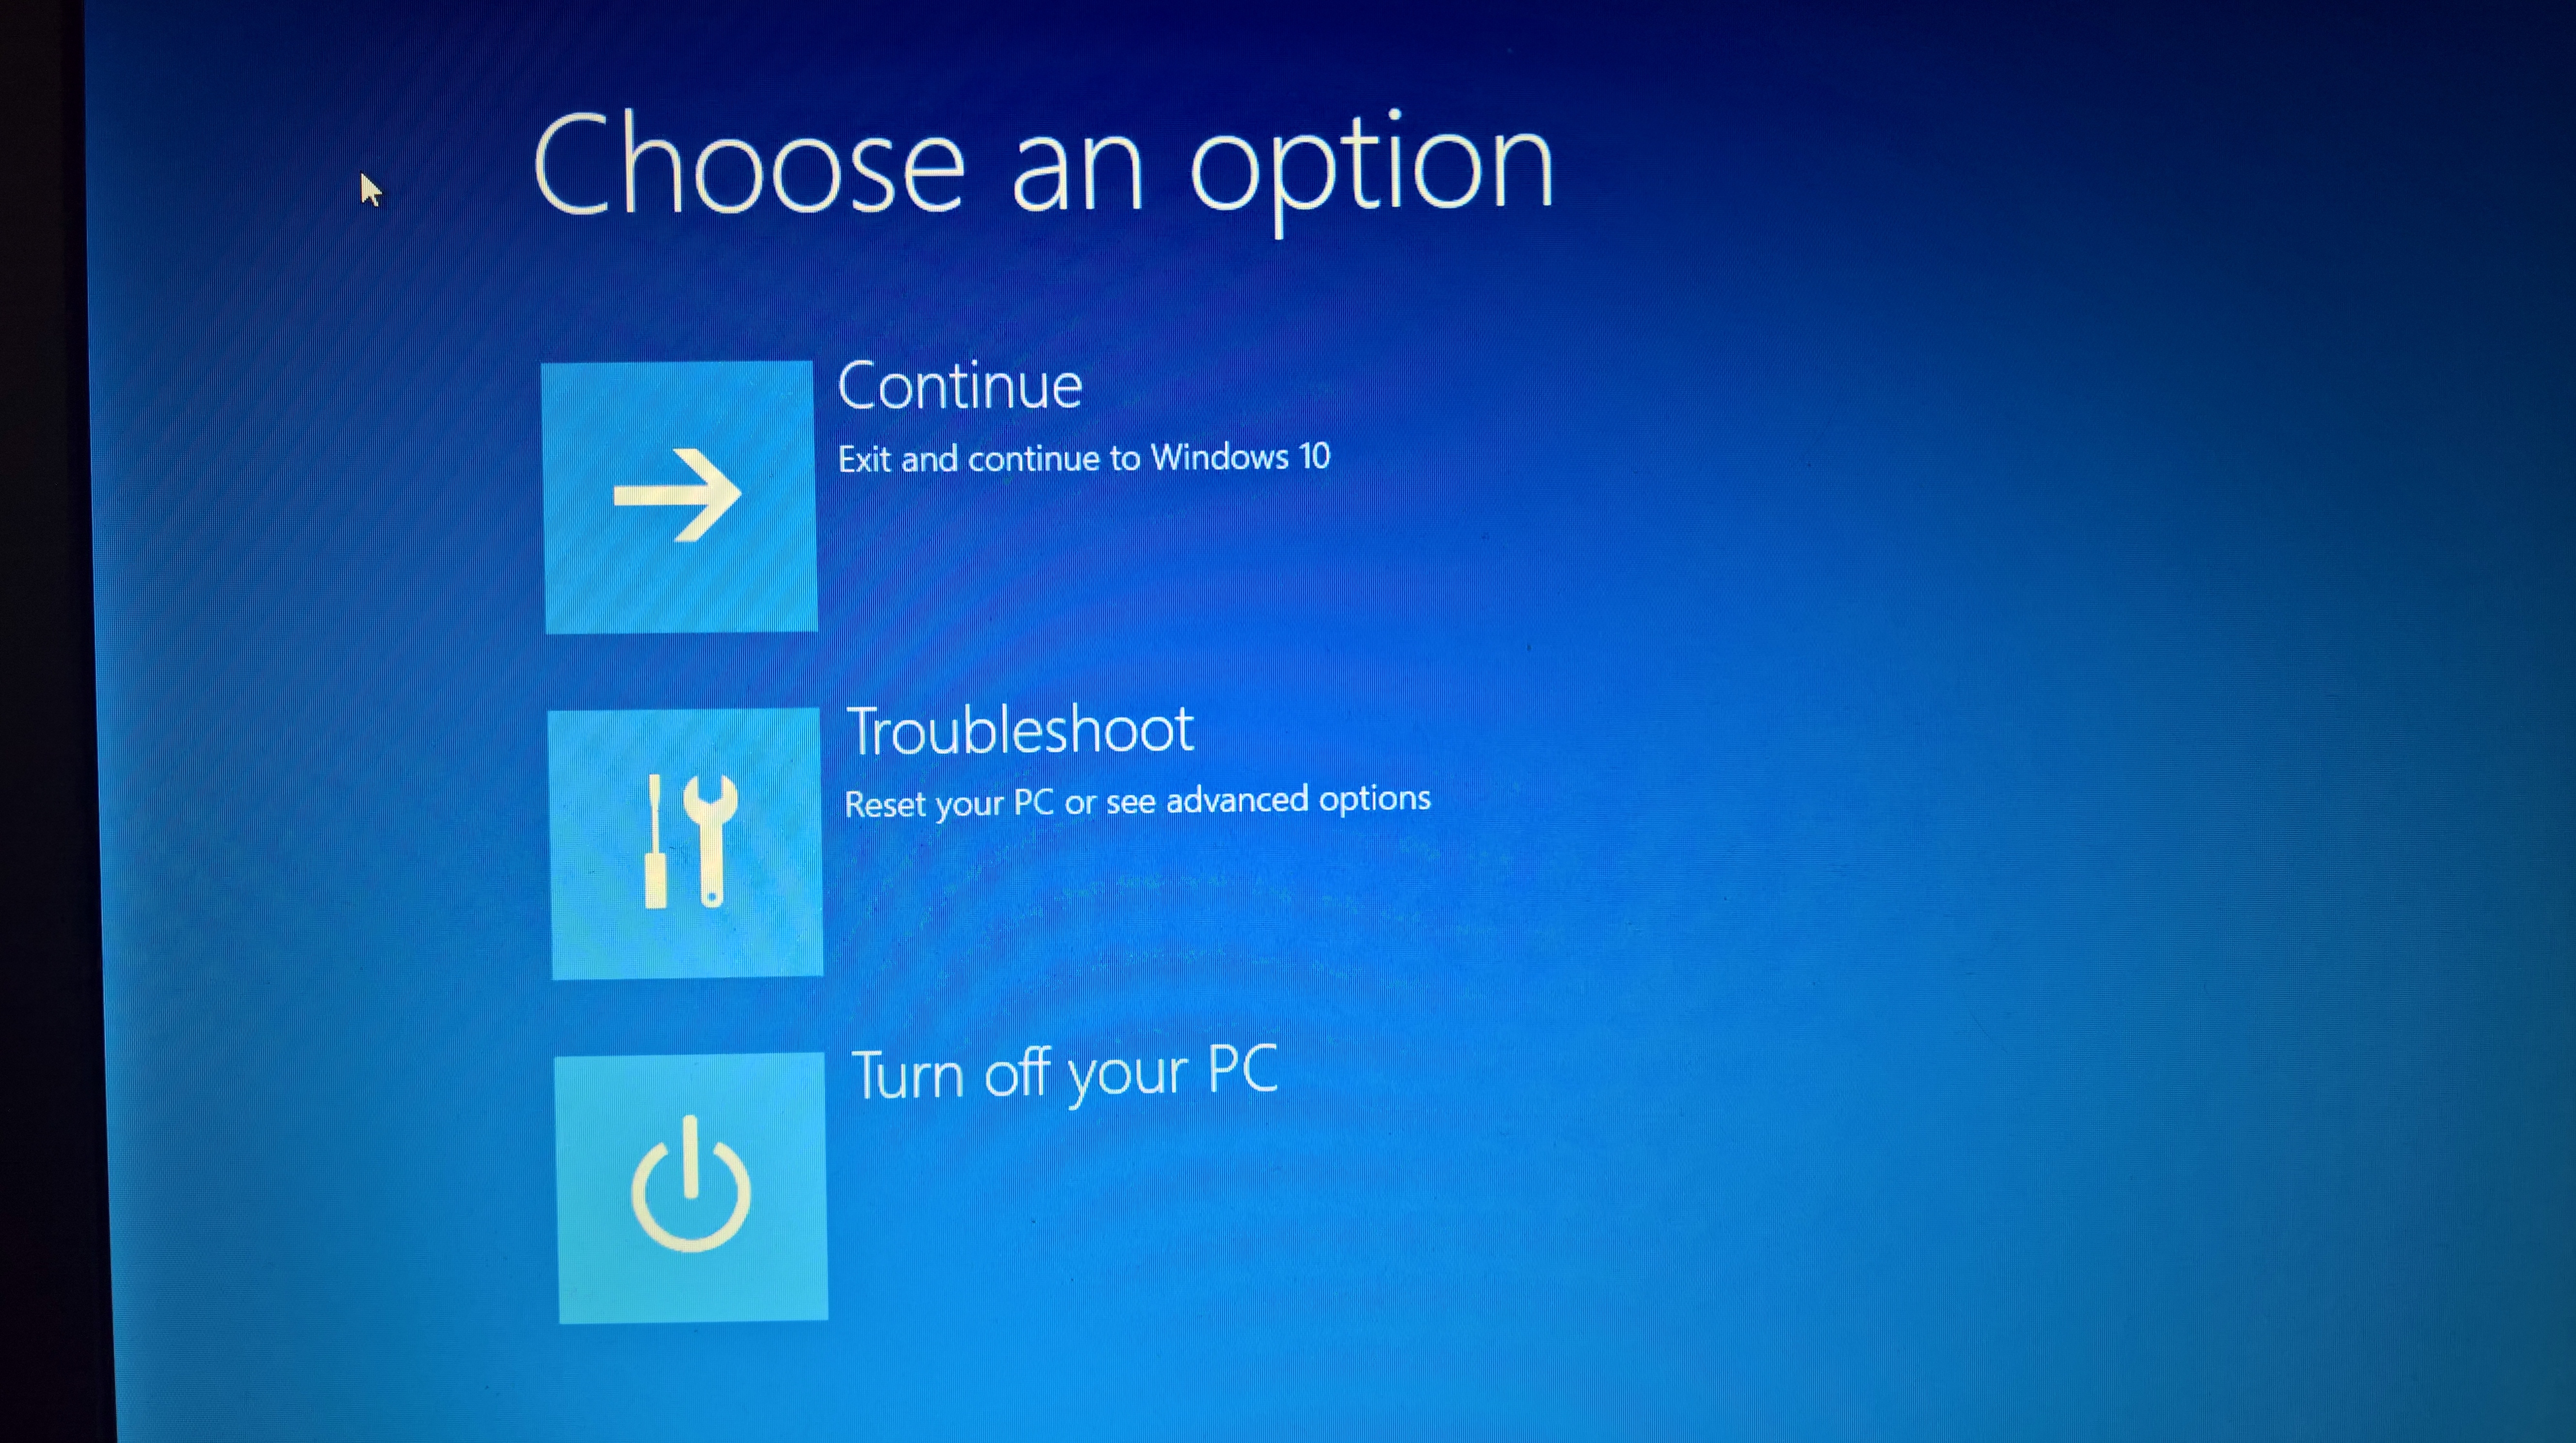
Troubleshoot
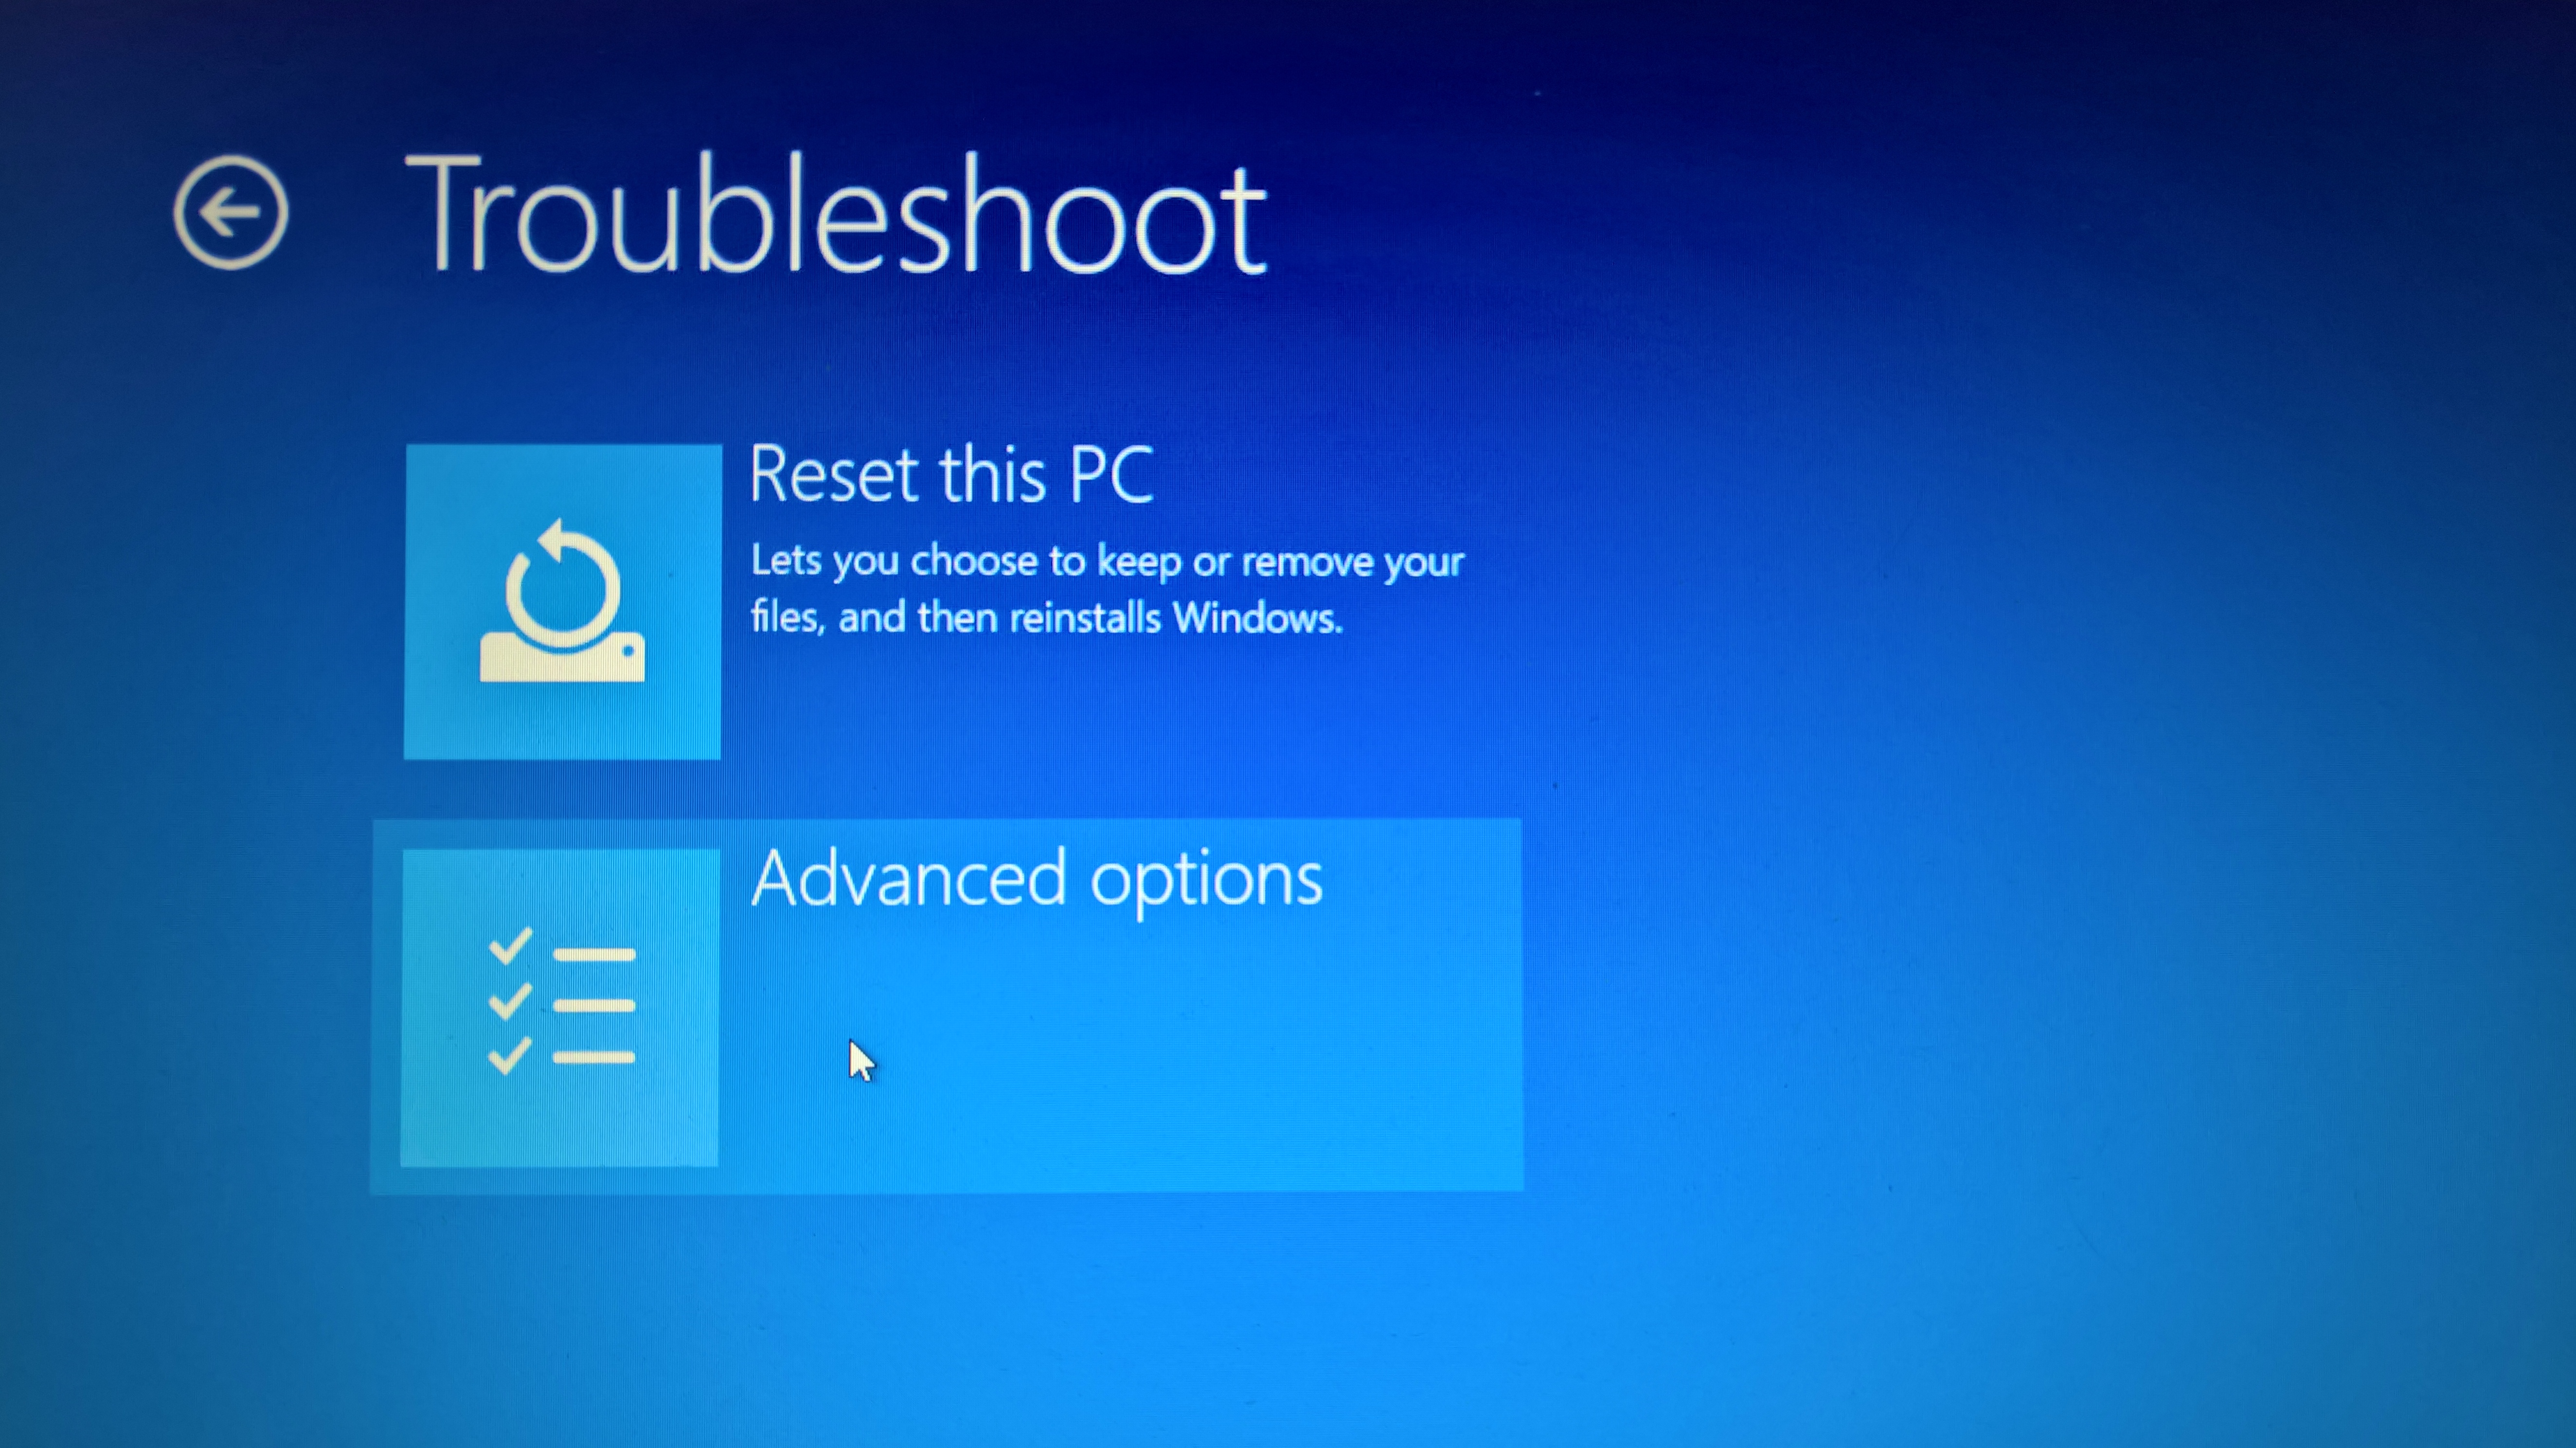
Advanced options
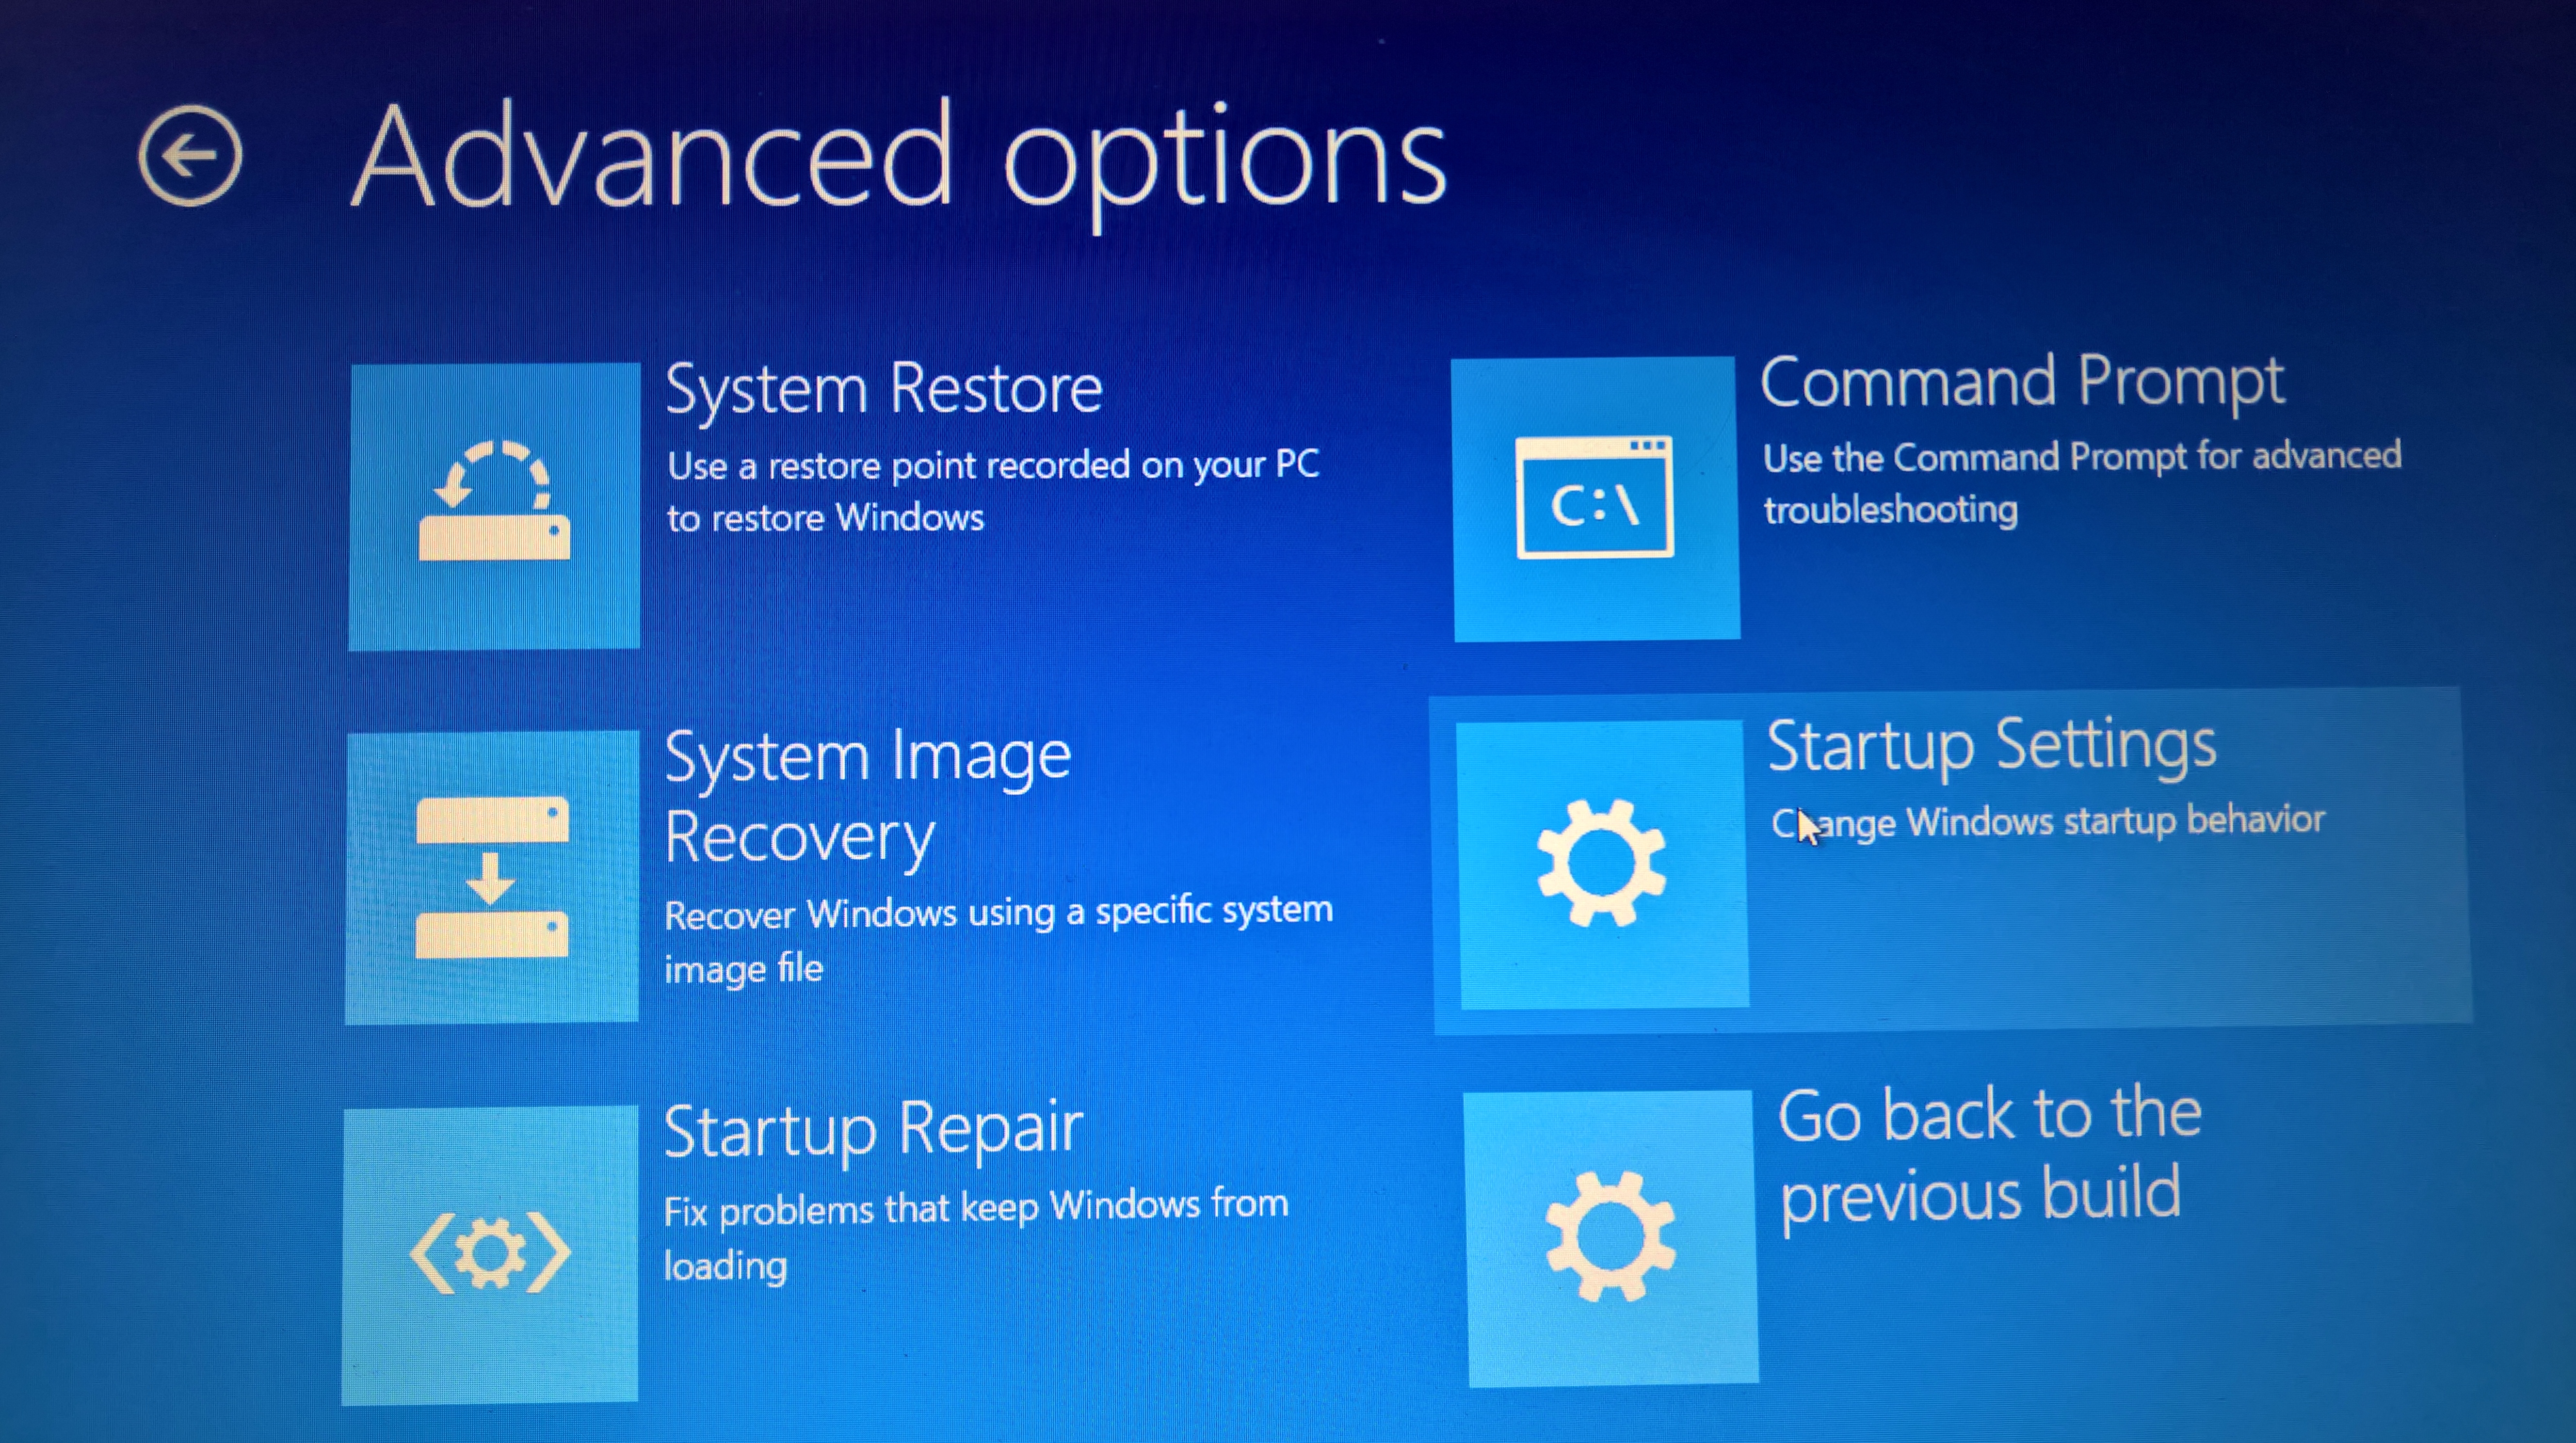
Startup Settings

Startup Settings

Press 7 to “Disable driver signature enforcement“
Once disabled and restarted, you can install those drivers clicking on the Install.bat file, available in the LumiaFlashTools\Driver directory.

Install.bat
STEP 5
Then you have to download the firmware ROM specific for the model of your device. For some devices it is available in Navifirm, for some others it can be downloaded from the following link made available by WindowsBlogItalia (note – all that rar files need the following psw to be uncompressed: windowsblogitalia-nprtcvmb):
For older devices you can read this other post.
PS: See also the post Come sbrandizzare o riparare il proprio Lumia where it written how to download the firmware from the Cholens’ portal (for free): http://www.lumiafirmware.com
Details at the end of this post …
Once you downloaded it, unraring it, you can find the proper .ffu file that will be needed next during the device flash procedure.
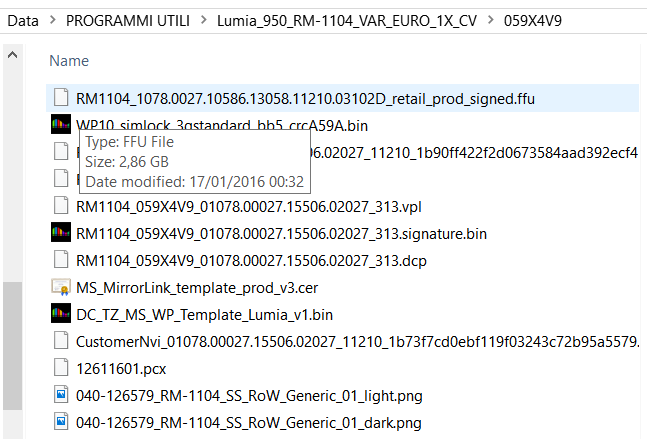
ffu file
STEP 6
Now you need to restart your Lumia in Download mode to flash its firmware: to do so,
- Switch the device off;
- Maintain pressed both Volume up and Power hardware buttons;
- As soon as the device start up, release the Power button while maintaining pressed the Volume up one.
- After some seconds it will be displayed an lightning icon: at this point you can release the Volume up button too.
STEP 7
Now that the device is in Microsoft FFU mode, connect via USB the device to your Windows PC and click on the Start.bat file available in the LumiaFlashTools/WPID directory.

LumiaFlashTools: Start.bat
The Windows Phone Image Designer program will run: you have to select the option Flash a Windows Phone image onto your phone and press Next button (on the bottom right).

Your device should appear in the combobox Flashable Devices (otherwise press the refresh icon on the right).

Click on the Change link (just above the combobox) and select, from the file selection dialogue that will be displayed, the .ffu file (related to your device model) you downloaded in the previous step.
Finally press the Flash button.
The process will take some minutes … and finally you’ll receive a Congratulations page!!


Wait that the all the process ends and, when the device will restart, disconnect it from the PC.
Your Lumia will show the startup configuration wizard stating from the language selection: remind to use your previously backup when asked in order to have recovered your previous device configuration…

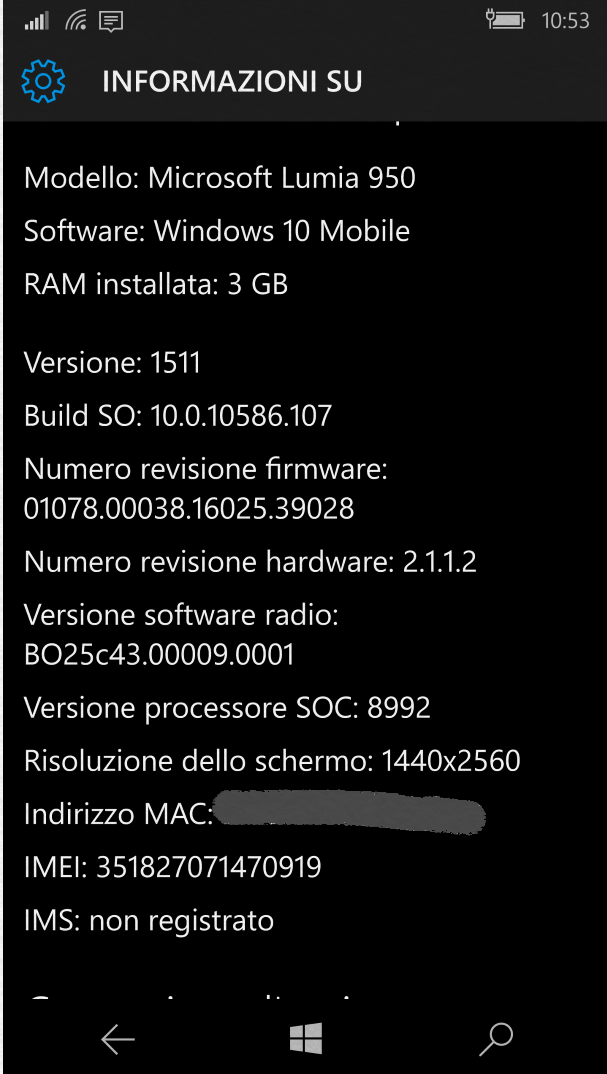
Now I have the last version released by Microsoft of both firmware and operating system 😉
That’s all folks!!!
=============================================
PS: from the post Come sbrandizzare o riparare il proprio Lumia (where it written how to download the firmware from the Cholens’ portal – for free: http://www.lumiafirmware.com
NOTA – Selezionate la versione più recente del vostro modello che indichi IT (se desiderate la versione italiana): ad esempio per il Lumia 1020 l’ultima versione IT è la 875, anche se per altre nazioni ne esistono di più recenti (i.e. 876, 877).
Scaricare il firmware per il vostro modello:
Microsoft Lumia 435 (RM-1071 VAR EURO IT CV)
● Nokia Lumia 520 (RM-914 VAR EU IT CV)
● Nokia Lumia 530 (RM-1017 VAR EURO IT CV)
● Microsoft Lumia 532 (RM-1031 VAR EURO IT CV)
● Microsoft Lumia 535 (RM-1089 VAR EURO IT CV)
● Microsoft Lumia 540 (RM-1141 VAR EURO IT CV)
● Microsoft Lumia 550 (RM-1127 VAR EURO 1X CV)
● Nokia Lumia 620 (RM-846 VAR EU ITALY IT CV)
● Nokia Lumia 625 (RM-941 VAR EURO IT CV)
● Nokia Lumia 630 (RM-976 VAR EURO IT CV)
● Nokia Lumia 635 (RM-974 VAR EURO IT CV)
● Microsoft Lumia 640 (RM-1075 VAR EURO IT CV)
● Microsoft Lumia 640 LTE (RM-1072 VAR EURO IT CV)
● Microsoft Lumia 640 XL (RM-1066 VAR EURO IT CV)
● Microsoft Lumia 640 XL LTE (RM-1062 VAR EURO IT CV)
● Microsoft Lumia 640 XL Dual SIM (RM-1067 VAR EURO IT CV)
● Microsoft Lumia 650 Nero (VAR EURO 1X CV BLK_DR)
● Microsoft Lumia 650 Bianco (VAR EURO 1X CV WHT_LG)
● Microsoft Lumia 650 Dual SIM Nero (VAR EURO 1X CV BLK_DR)
● Microsoft Lumia 650 Dual SIM Nero (VAR EURO 1X CV WHT_LG)
● Nokia Lumia 720 Ciano (RM-885 VAR IT CV CYAN)
● Nokia Lumia 720 Giallo (RM-885 VAR IT CV YELLOW)
● Nokia Lumia 720 Rosso (RM-885 VAR IT CV RED)
● Nokia Lumia 720 Nero (RM-885 VAR IT CV BLACK)
● Nokia Lumia 720 Bianco (RM-885 VAR IT CV WHITE)
● Nokia Lumia 730 (RM-1038 VAR EURO IT CV)
● Nokia Lumia 820 (RM-825 VAR EU IT CV)
● Nokia Lumia 830 Bianco (RM-984 VAR EURO IT CV SLV)
● Nokia Lumia 830 Verde (RM-984 VAR EURO IT CV SLV)
● Nokia Lumia 830 Arancio (RM-984 VAR EURO IT CV SLV)
● Nokia Lumia 830 Nero (RM-984 VAR EURO IT CV D GREY)
● Nokia Lumia 920 Giallo (RM-821 VAR EU IT CV YELLOW)
● Nokia Lumia 920 Rosso (RM-821 VAR EU IT CV RED)
● Nokia Lumia 920 Bianco (RM-821 VAR EU IT CV WHITE)
● Nokia Lumia 920 Nero (RM-821 VAR EU IT CV BLACK)
● Nokia Lumia 925 Grigio (RM-892 VAR IT CV GREY)
● Nokia Lumia 925 Bianco (RM-892 VAR IT CV WHITE)
● Nokia Lumia 925 Nero (RM-892 VAR IT CV BLACK)
● Nokia Lumia 930 Nero (RM-1045 VAR EURO IT CV BLACK)
● Nokia Lumia 930 Verde (RM-1045 VAR EURO IT CV BR_GRE)
● Nokia Lumia 930 Arancio (RM-1045 VAR EURO IT CV BR_ORA)
● Nokia Lumia 930 Bianco (RM-1045 VAR EURO IT CV WHITE)
● Microsoft Lumia 950 (RM-1104 VAR EURO 1X CV)
● Microsoft Lumia 950 Dual SIM (RM-1118 VAR EURO 1X CV)
● Microsoft Lumia 950 XL Nero (RM-1085 VAR EURO 1X CV BLACK)
● Microsoft Lumia 950 XL Bianco (RM-1085 VAR EURO 1X CV WHITE)
● Microsoft Lumia 950 XL Dual SIM (non disponibile)
● Nokia Lumia 1020 Giallo (RM-875 VAR EURO IT CV YELLOW)
● Nokia Lumia 1020 Bianco (RM-875 VAR EURO IT CV WHITE)
● Nokia Lumia 1020 Nero (RM-875 VAR EURO IT CV BLACK)
● Nokia Lumia 1320 (RM-994 VAR EURO IT CV)
● Nokia Lumia 1520 Nero (RM-937 VAR EURO IT CV BLACK)
● Nokia Lumia 1520 Bianco (RM-937 VAR EURO IT CV WHITE)
● Nokia Lumia 1520 Giallo (RM-937 VAR EURO IT CV YELLOW)
- Trovate il vostro smartphone nell’elenco qui sopra e cliccate il relativo link.
- Si aprirà una nuova pagina, nella quale potrete accedere ai file necessari cliccando sulla versione del firmware (scegliete sempre la più recente)

Click on the link
Verranno generati i link (validi per un ora). Dovrete scaricare soltanto il file .ffu
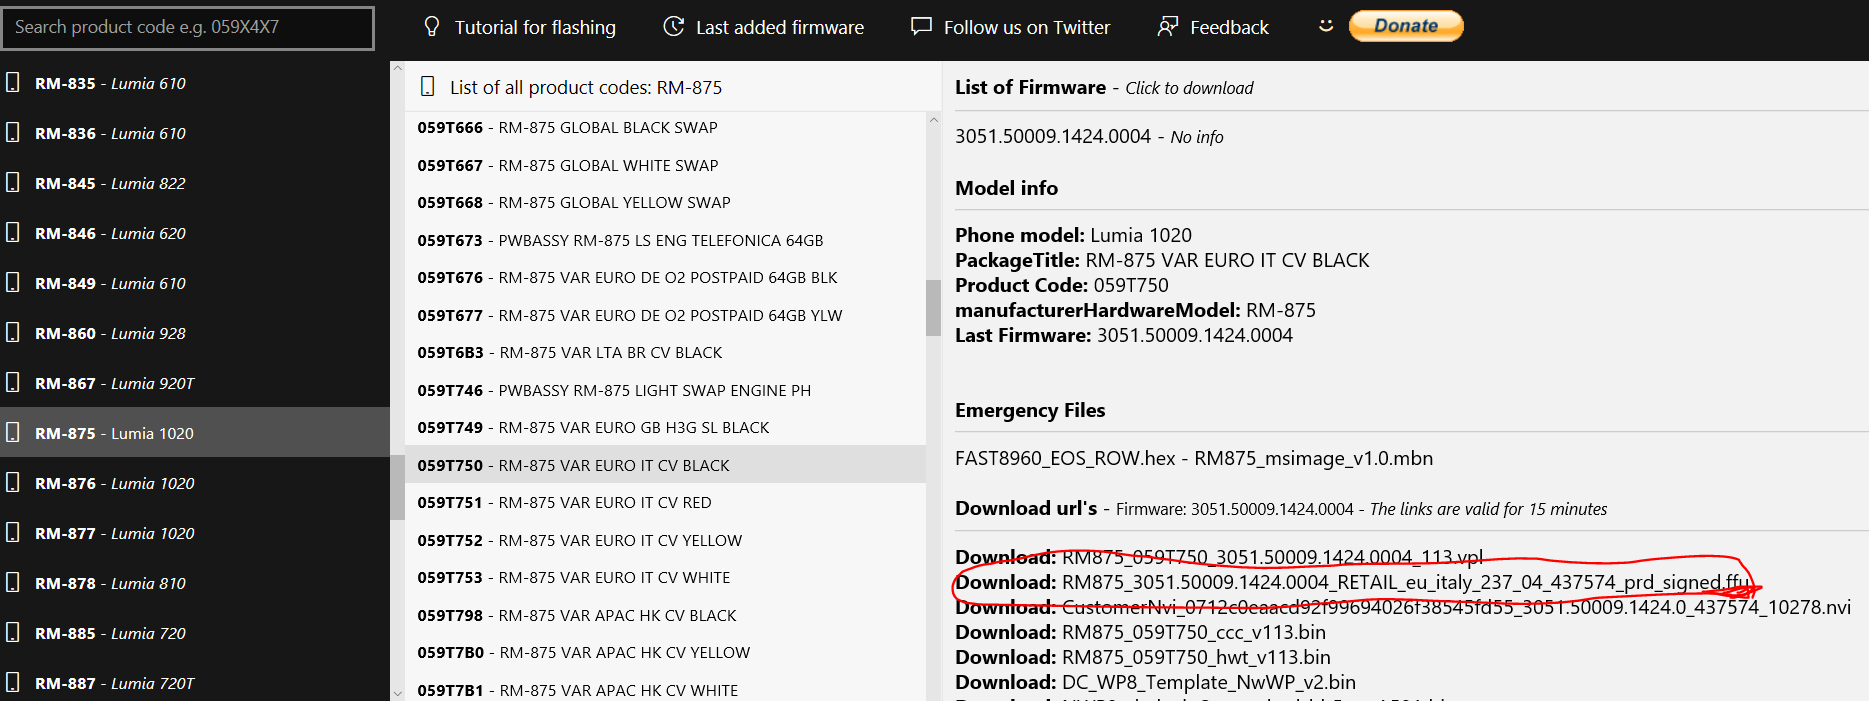
Download only the ffu file
Avete scaricato il firmware? Avete installato Windows Device Recovery Tool? Se sì, possiamo continuare.
- Aprite un Prompt dei comandi come amministratore: per farlo digitate cmd in Cortana, clic col destro sul primo risultato e poi su “Esegui come amministratore”
- Digitate cd “C:\Program Files (x86)\Microsoft Care Suite\Windows Device Recovery Tool” e premete INVIO
- Se vi da errore, provate con cd “C:\Program Files\Microsoft Care Suite\Windows Device Recovery Tool”
- Connettete lo smartphone al PC con l’apposito cavo e attendete qualche secondo
- Ora andate in Download (o nella cartella dove avete scaricato il firmware) e prendete nota del nome del file .ffu e del suo percorso
- Se il nome del file è complicato da ricordare o da scrivere, potete anche rinominarlo e la procedura dovrebbe funzionare ugualmente
- Ora tornate al Prompt dei comandi e digitate thor2 -mode uefiflash -ffufile “[INSERITE IL PERCORSO DEL FILE FFU]” -do_full_nvi_update -do_factory_reset
- Al posto di [INSERITE IL PERCORSO DEL FILE FFU] dovrete scrivere l’intero percorso. Ad es C:\Users\Franc\Download\RM-1172_Firmware.ffu
- Se avete scritto tutto correttamente, alla pressione di INVIO dovrebbero apparire tante scritte poco comprensibili ed il telefono entrerà in modalità Flashing
Durante questa fase è IMPORTANTISSIMO che non disconnettiate il telefono, che non si spenga il PC o vada in standby e che non scoppi una bomba elettromagnetica nelle vicinanze (ok questa è rara). Altrimenti il telefono non funzionerà più.
Termine della procedura
La schermata rossa con una barra di completamento, sarà sostituita da una verde al termine della procedura. A questo punto:
- Tornate al Prompt dei comandi e digitate thor2 -mode rnd -bootnormalmode
- Il telefono dovrebbe riavviarsi in una decina di secondi e al termine dell’avvio potrete staccarlo dalla USB
- La procedura è terminata
Avrete di nuovo il vostro telefono funzionante, oppure senza brand dell’operatore e potrete cominciare la configurazione iniziale!


Pingback: How to do tethering with the TELECOMITALIA employee APN using a Windows 10 Mobile device | Enzo Contini Blog