
This is ongoing post where I will put any tips & tricks I will find related to MS Word 2016 and other SW products, possibly with some reference links I found interesting
😉
- How to use different orientations of pages/sections within the same document
- How to update cross-referencing in footnotes
- How to create a new style from existing formatted text
- How to enable/disable field codes
- How to avoid having a different first page every time you have a new section
- How to insert a section break (and then possibly create a two column section)
- How to write E or A with the accent (i.e. È À)
- How to remove text highlight/background in MS Office when pasted (if it is not possible using the related menù voice)
- How to edit the text of a received or already sent email in MS Outlook
- Tablet mode tail is not enabled in the Notification Centre
_____________________________________________________________
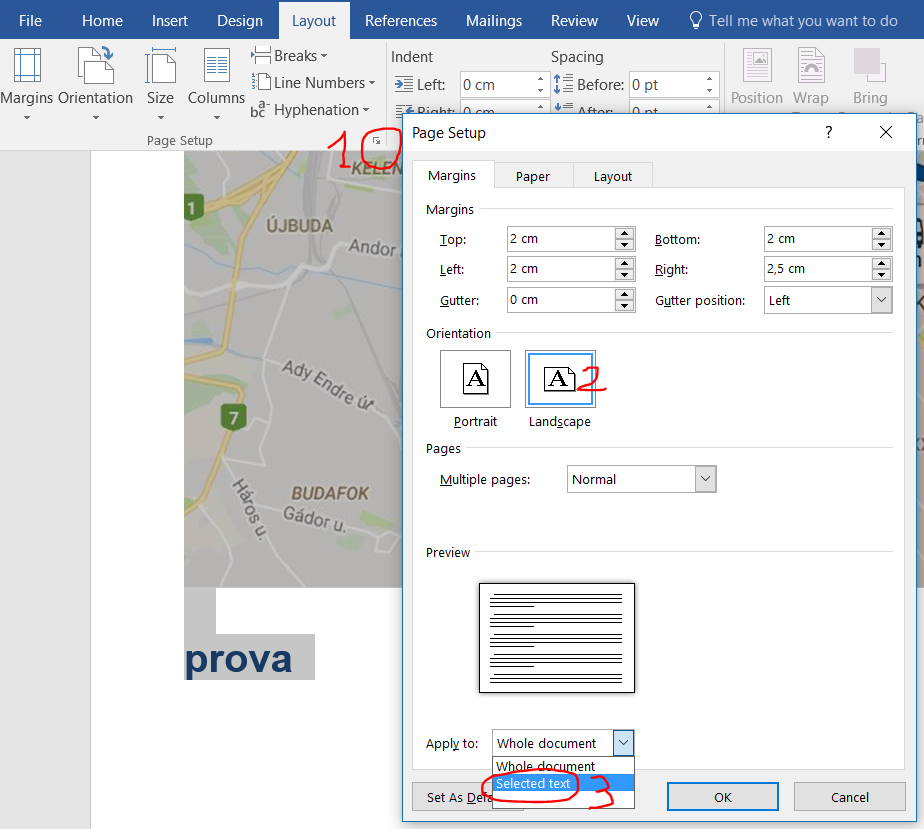
How to use different orientations of pages/sections within the same document
See the following screenshot that shows each step:
First of all select the section you want to change the orientation (e. g. set landscape)
- Open the Layout Page setup popup window
- Select the Orientation (e.g. Landscape)
- Select Apply to: Selected text
- Confirm clicking the OK button
See also this for more details.
_____________________________________________________________
How to update cross-referencing in footnotes
To update all the cross-references in a Word document it is sufficient to follow the following steps:
- Click on whatever part of the text,
- Press cntl+a to select all the document body text,
- Right-click on the selected text,
- Choose Update Field,
- Choose Update entire table if you want to update all.
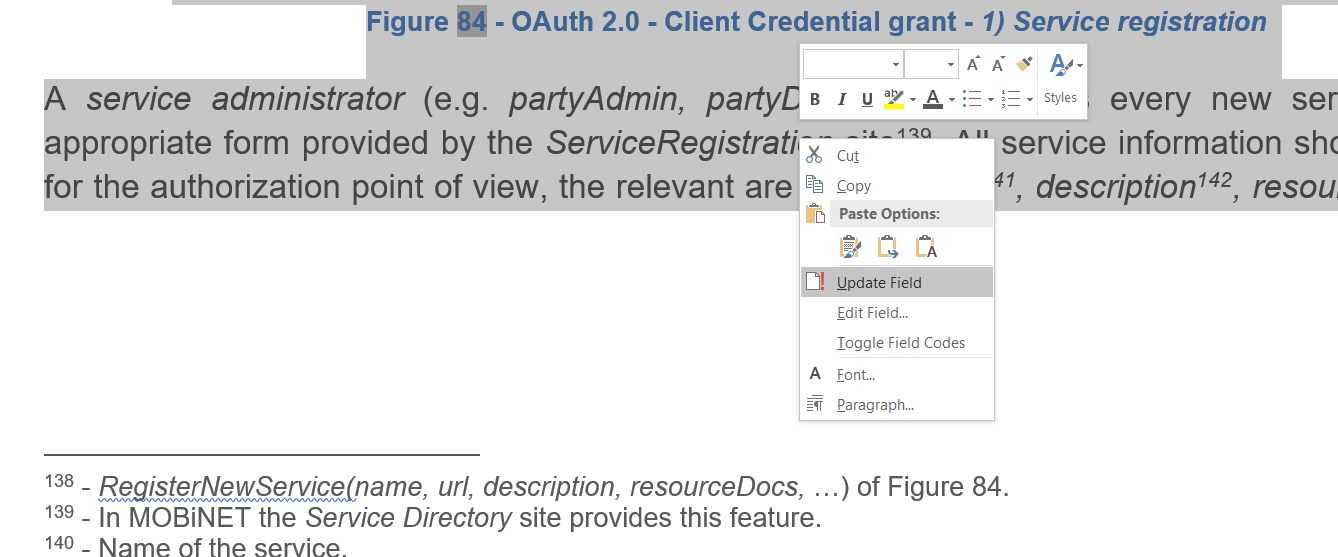
Cross-reference update in the body text (1)
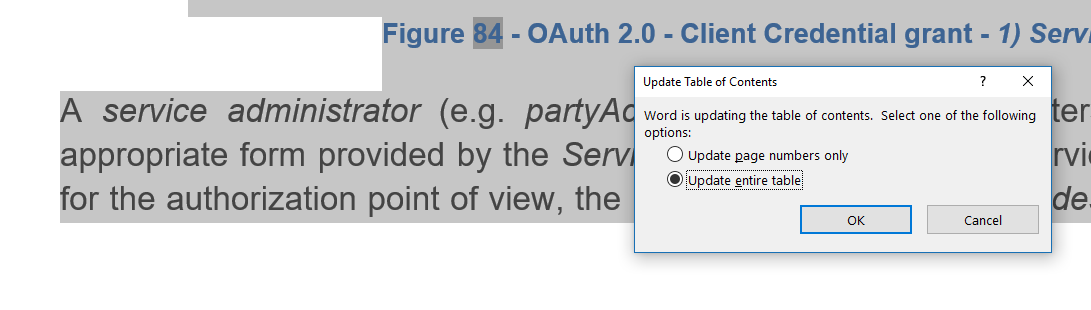
Cross-reference update in the body text (2)
However you will notice that no updates will be done to all the possible cross-references available in the footnotes: in fact, you could also notice that when you did the cntl+a, only the body text was selected and not the footnotes! However, if you try to use the same procedure with the footnote section, you can see that the Update Field item is missing right-clicking on the all selected footnotes! However you can succeed doing that update too using the short-cut F9: so after the first 3 steps (step one and 2 this time should refer to the footnote text) you have to press the F9 short key. A scary popup saying that this action cannot be undo will appear … don’t care and press OK to have even the cross-references in the footnotes updated 😉
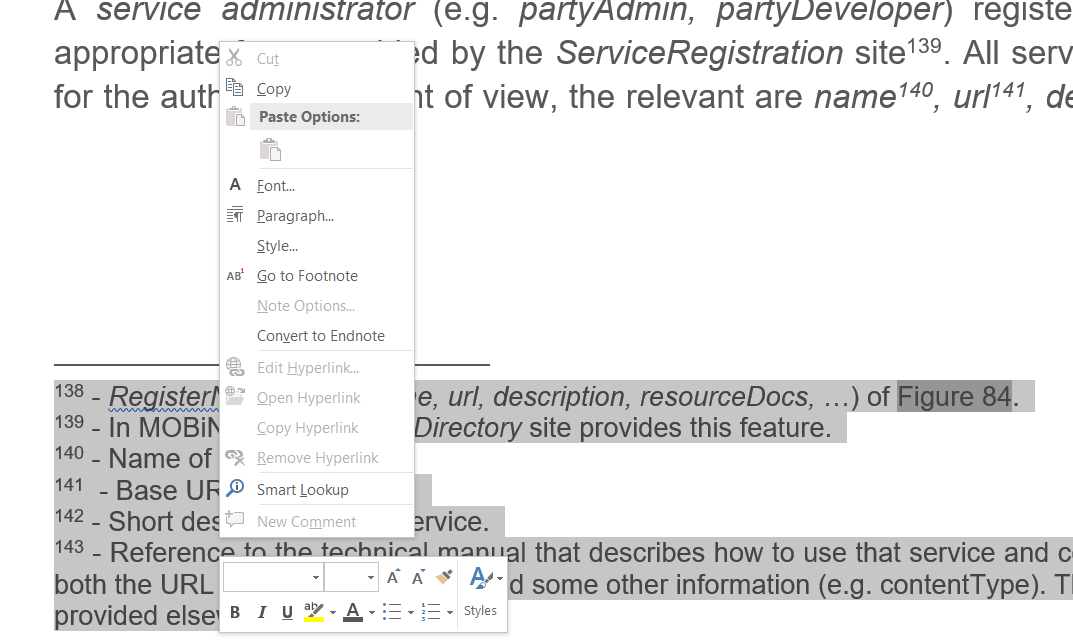
Cross-reference update in the footnote text (1): no Update Field item available

Cross-reference update in the footnote text (1): scary popup after F9 pressed … press OK
See also:
_____________________________________________________________
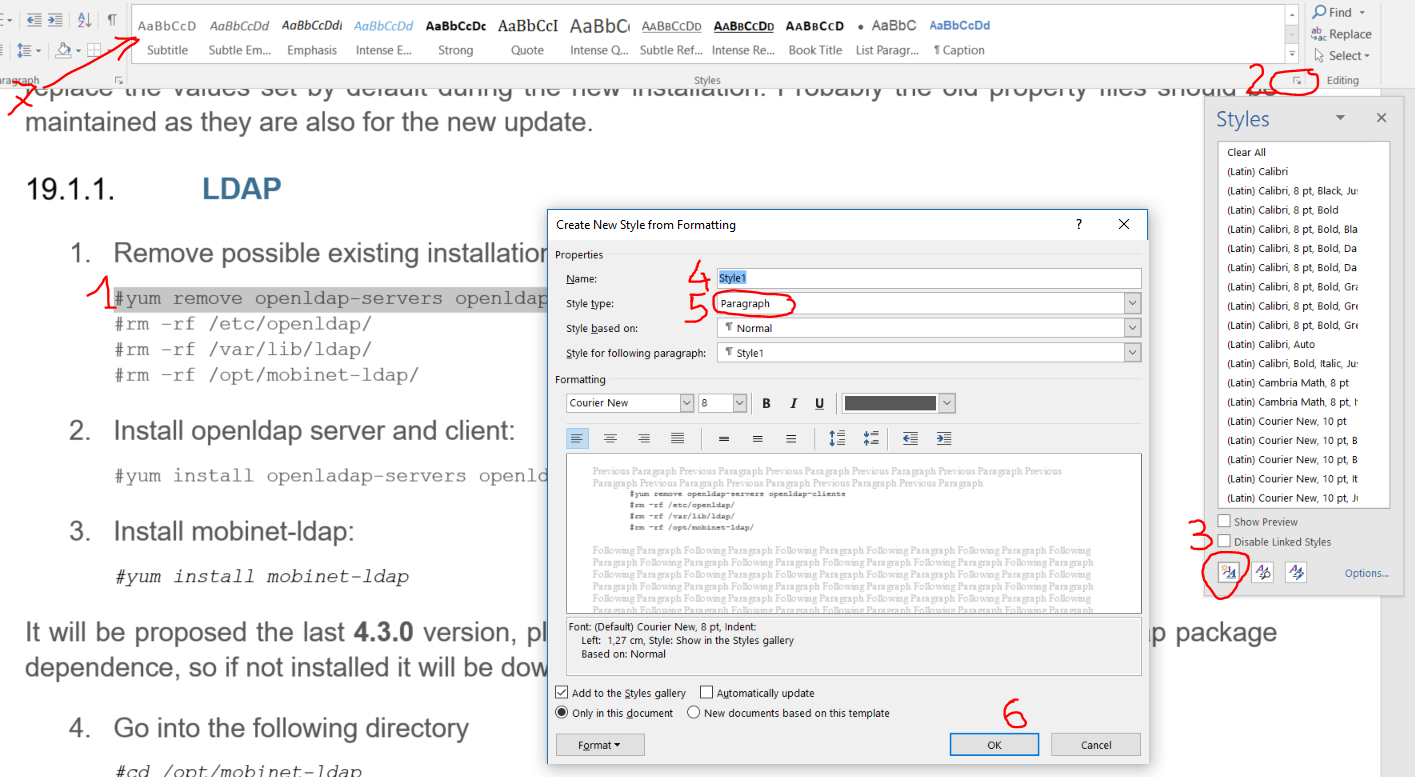
How to create a new style from existing formatted text
- Select the paragraph you want to create a style from.
- expand the Style menu popup window.
- Click on the New style icon.
- Write the new style name.
- Be sure that the Style type is Paragraph (otherwise click on the Format button on the lest bottom and select Paragraph).
- Confirm the creation.
- You will see the new style appear in the list of the available ones.
How to create a style from existing formatted text
See also: Word 2016 for dummies
_____________________________________________________________
How to enable/disable field codes
It may happen that you see codes such as “{ HYPERLINK “mailto:user@mail.com” }” and “{ DATE @ “MMMM d, yyyy” }” in your document. This problem is due to “Field Codes” being somehow toggled on, may be for error (e.g. pressing Alt+F9).

Field Codes enabled
If the problem is with a single document, toggle the field codes off or on by first selecting the entire document with (cntl+a) and then toggle the field codes off or on with (shift-F9). (Alt-F9) also toggled the field codes off and on from the machine I was using.
If the problem is with all documents, then the “Show field codes instead of their values” option has been selected under the “Show document content” section of File -> Options -> Advanced:

“Show document content” section of File -> Options -> Advanced
If the field codes are not showing up on the screen, but show up in print preview and they are printing on all documents instead of the actual data, then the “Print field codes instead of their values” option has been selected under “Print” section of File -> Options -> Advanced:

“Print” section of File -> Options -> Advanced
See also this post.
_____________________________________________________________
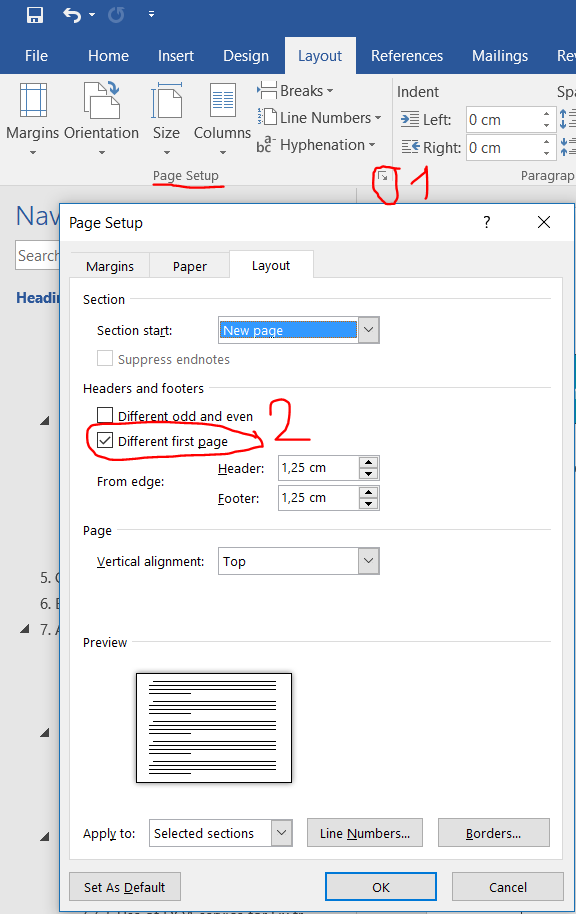
How to avoid having a different first page every time you have a new section
Sometime in a same document, you need to create different sections (e.g. to have page landscape and other portrait). If you have a style with a different first page (e.g. with a background picture), this one will be visible at every first page of a new section.
To avoid it I found two ways:
Solution 1
Click on the Header (IT: Intestazione pagina) of the first page of the new created section.
In the Navigation tab of the menù, select Link to Previous (IT: Collega a precedente)

Solution 1
Solution 2
Select the page body of the new page section and open the Page Setup popup window (clicking on the little bottom right arrow of the Page Setup section of the menu).
Deselect the checkbox Different first page.
Solution 2
_____________________________________________________________
How to insert a section break (and then possibly create a two column section)
_____________________________________________________________
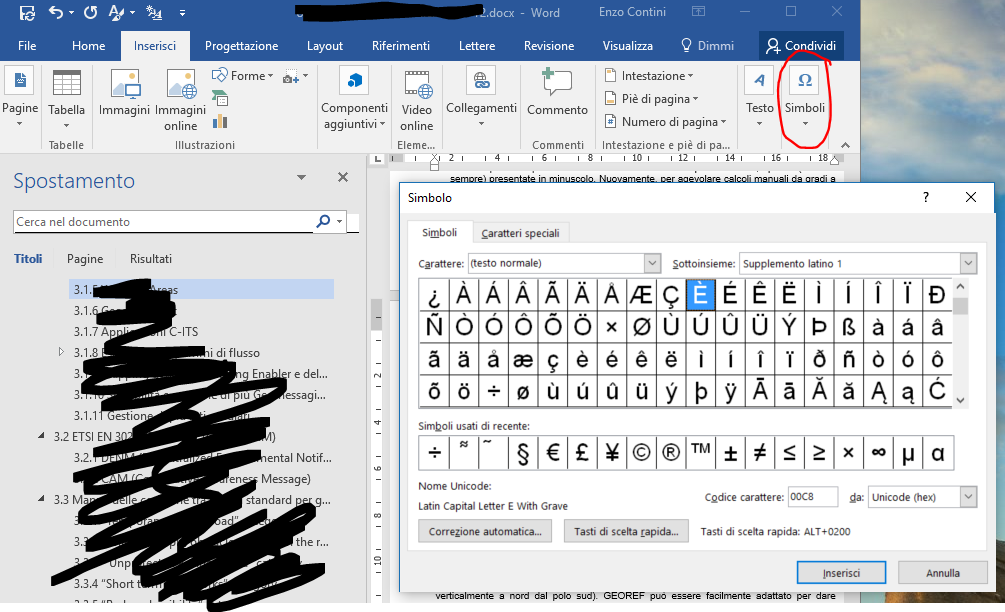
How to write E or A with the accent (i.e È À)
In Word you can simply press the key “è” and then press the space bar and, if you are at the beginning of a phrase, it will automatically become an “È“: the same to obtain other accented letters (À Ì Ò Ù), even thought much less common ..
Always in Word you can force that change selecting, for example, the letter è and then type Shift +F3, that is the short command to make UPCASE any selected letter.
As possible alternatives, to find even more special letters, you can use ther following method:
- Use the shortcuts for international characters : e.g.
à, è, ì, ò, ù CTRL+` (grave accent), letter become À, È, Ì, Ò, Ù
á, é, í, ó, ú, ý CTRL+’ (apostrophe), letter become Á, É, Í, Ó, Ú, Ý
- ALT + Unicode with the numeric keypad [and then release the ALT key to have the character to be displayed (e.g. ALT+0200 : È )] – This solution works everywhere, also with the WordPress editor …
- Use the Character map:


- In Word, use the Insert -> Symbols :


_____________________________________________________________
How to remove text highlight/background in MS Office when pasted (if it is not possible using the related menù voice)
Select the text and then cntl + space.
_____________________________________________________________
How to edit the text of a received or already sent email in MS Outlook
Actions -> Edit message.
_____________________________________________________________
Tablet mode tail is not enabled in the Notification Centre
Be careful that tablet mode is disabled when you are using more displays and you are extending those displays.
Please suggest me more ….


Magari molto utile nel mio lavoro…grazie per la tua perspicacia, Enzo!
"Mi piace""Mi piace"