
In this post, I will provide a step to step description on how to configure a Gmail account in Outlook. I will also give some detailed information about possible problems that may occur with whatever email client when you try to configure Gmail or possibly any app that uses Google authentication. In fact, there are several possible tips & tricks that could be taken into account because of the security configuration you may have activated with your Google account.
Let see, first of all, a clean and simple configuration that, in many cases, is the only one you have to do, leaving in a later section the handling of possible problems you may arise and how to solve them 😉
_____________________________
INDEX
- The basic configuration of Gmail in Outlook
- How to manage email credentials in Windows 10 on PC level
- Google profile and security settings that may affect how Outlook Gmail account works
___________
The basic configuration of Gmail in Outlook
If you have any Outlook client installed on your PC (e.g. Outlook 365 or Outlook 2019) you can go in configuring one or more email accounts clicking on File (first item in the upper menu) and then navigating into the Informations [IT: Informazioni] section: here you can find the + Add account [IT: + Aggiungi account] button:
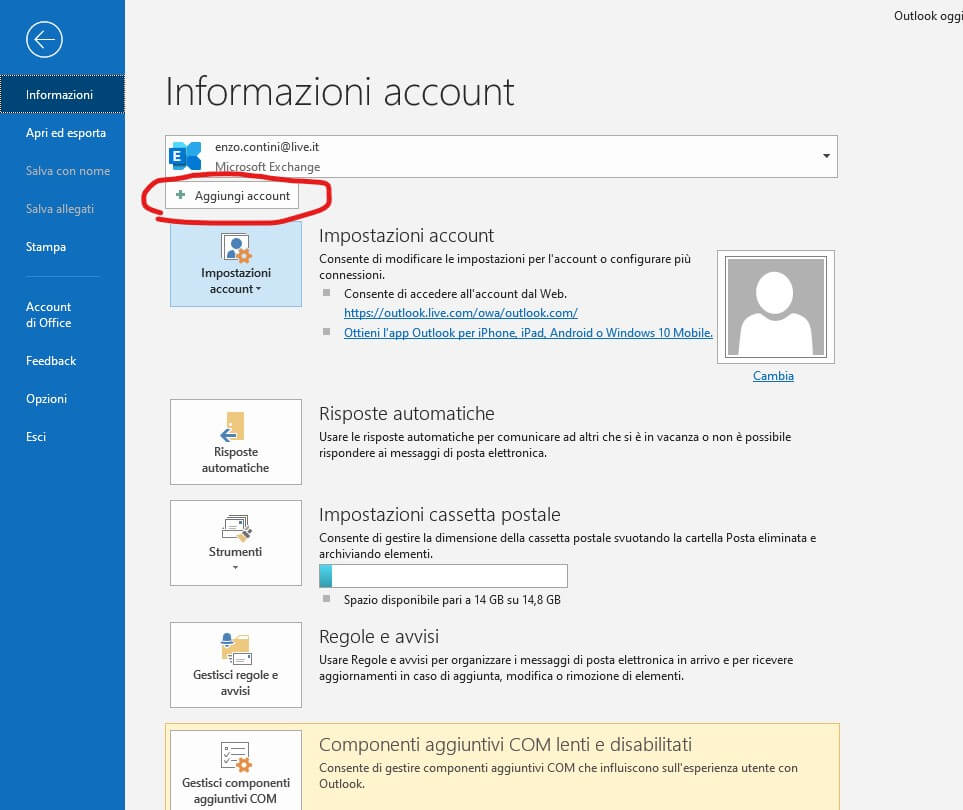
Adding a new account in Outlook
The first square button Accounts settings [IT: Impostazioni account] then will allow to see all configured accounts and possibly make some changes or set some preferences on some of them (e.g. set to download emails up to a certain period in the past, like one month).
When, from Outlook Informations [Informazioni] section, you click + Add account , you are proposed to write the email address you want to add: usually from the @ [at] section, Outlook should already understand what email server he has to connect, but anyway you can check the underlying Advanced options -> Allow manual account setup [IT: Opzioni avanzate -> Consenti la configurazione manuale dell’account], in order to better specify it. So I’m used too in order to apply possible changes to the default settings 😉

Write the email address you want to add
Since you want to add a Gmail account, you have to select the Google icon because the authentication is provided by a Google server:
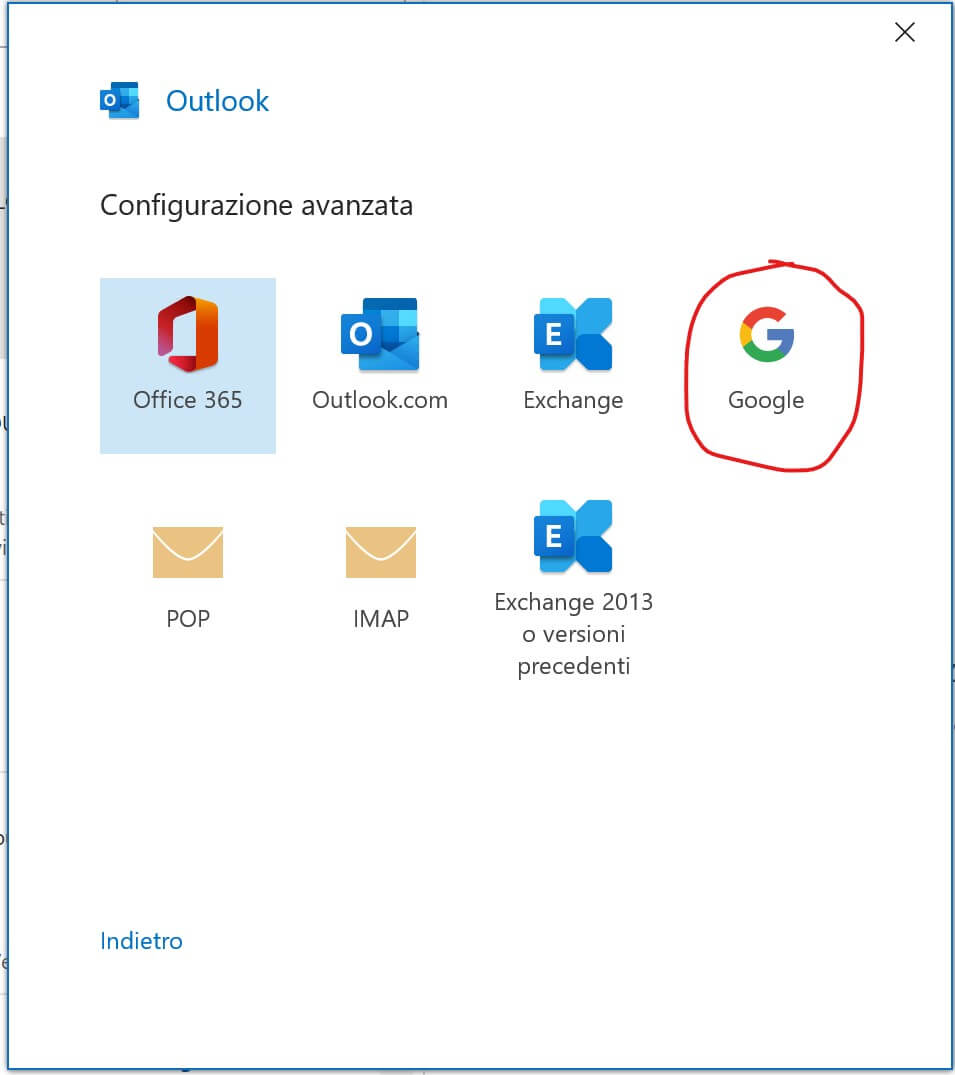
A Google server authentication is requested to connect to a Gmail account
Then you are asked to insert your Google credentials:

Enter your Google credential
If the inserted Google credential is correct, you are asked if you want Microsoft apps & services (e.g. Outlook) be authorized to read/write/send/delete your emails on Gmail, associate your personal information on Google, see your personal information and your email address. To proceed, you must select Allow [IT: Consenti] button:
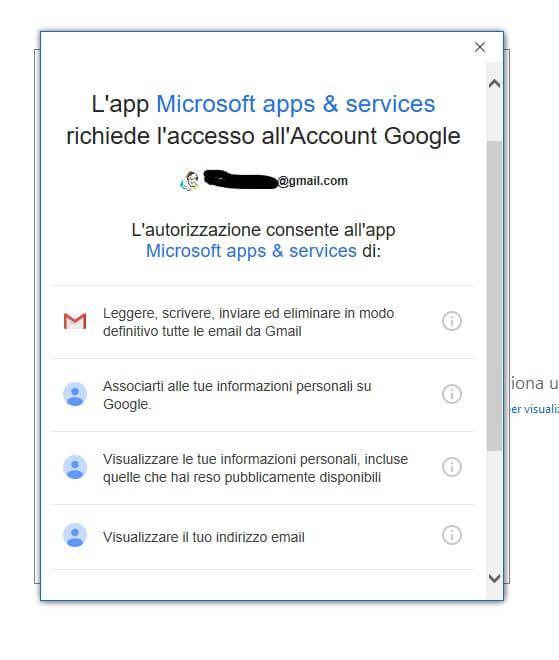
Authorization request for Microsoft apps & services related to your Google account (1)

Authorization request for Microsoft apps & services related to your Google account (2)
Depending on your security setting on your Google account, you may be requested on your smartphone (that is the one you associate to your Google account) to confirm if you are really the one requesting that authorization. Possibly you will receive an email on your Gmail account like it happened to me: obviously, you must reply that Yes, it was me [IT: Sì, ero io]:

For security reason, Google may ask you on your Gmail account and/or on your smartphone if it was you requesting that authorization
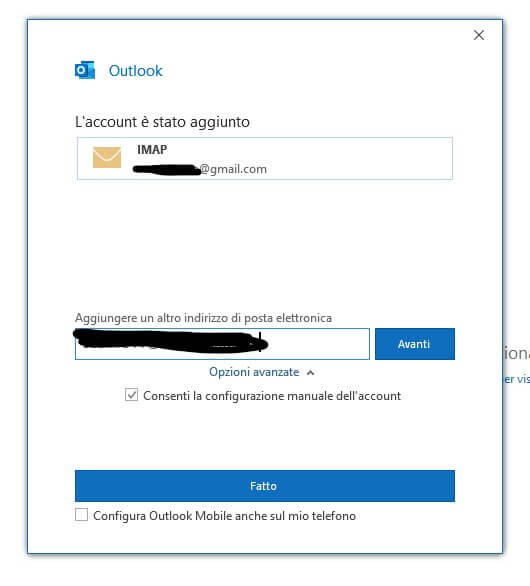
Then a new Gmail account is created in Outlook and the following window is shown saying that a new IMAP has been added.
NOTE that you may need to repeat this authorization procedure several times before it succeeds and having the following window appear: last time I configured a Gmail account in Outlook I had to repeat it four times before it successfully ended!! The reason for that is unknown to me, … maybe some timeout on the Google server-side or maybe on the Outlook client-side.
You are asked if you want to add another email address too, … but possibly it is not your case so you have only to press the Done [IT: Fatto] button.
Success notification of that Gmail account creation in Outlook
Once successful, it is worth it to better configure that new email account in order to properly set the time you want the emails even offline and possibly uncheck the option Do not save copy of sent email [IT: Non salvare copie della posta inviata]. This can be done from Outlook going into File -> Informations [IT: Informazioni] -> Accounts settings [IT: Impostazini account] section: select the new email account and choose Change… [IT: Cambia…].

It is worth to better configure that new email account going into the Change… [IT: Cambia…] section related to the new email account just created
Even though that information is inserted automatically by Outlook once you say that you want to connect to a Gmail account, in the following I show, just in case, the Google Mail server address and port for both incoming and outcoming email: note that you can set the timeout for outgoing email (e.g. one minute).
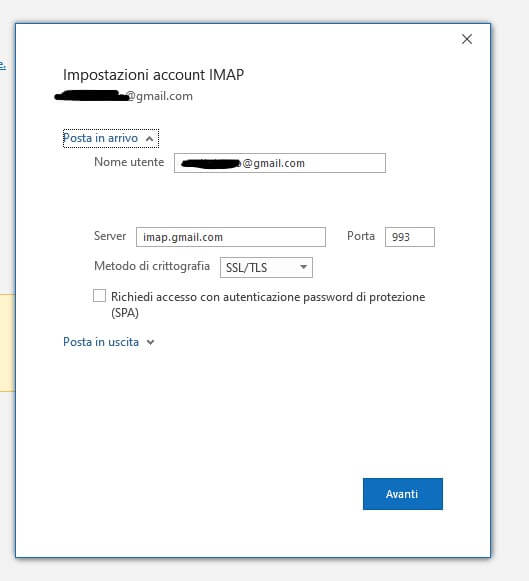
Incoming mail
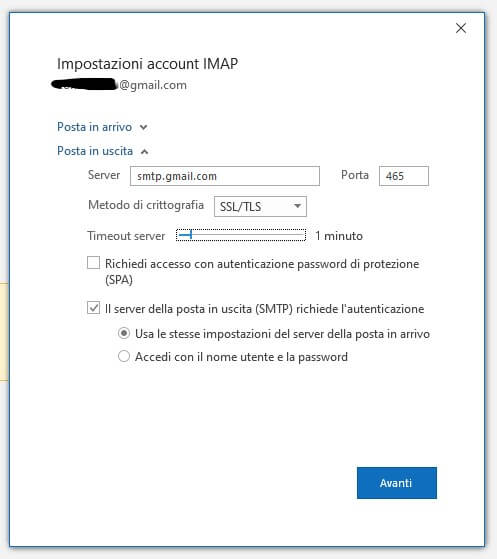
Outgoing mail
In the following you can find manual settings for both an IMAP and a POP3 configuration, just in case:
________
IMAP
- Incoming mail server (IMAP): imap.gmail.com
- Port: 993
- SSL required: yes
- Authentication required: yes
- Outgoing mail server (SMTP): smtp.gmail.com
- Port: 465 o 587
- SSL required: yes
- Authentication required: yes
- Full Name or shown name: [Your name]
- Username: your Gmail (es. name.surname@gmail.com)
- E-mail address: your Gmail (es. name.surname@gmail.com)
- Password: the password that was chosen when you create your Gmail account
________
POP3
- Incoming mail server (IMAP): pop.gmail.com
- Port: 995
- SSL required: yes
- Authentication required: yes
- Outgoing mail server (SMTP): smtp.gmail.com
- Port: 465 or 587
- SSL required: yes
- Authentication required: yes
- Full Name or shown name: [Your name]
- Username: your Gmail (es. name.surname@gmail.com)
- E-mail address: your Gmail (es. name.surname@gmail.com)
- Password: the password that was chosen when you created your Gmail account
_______
Selecting some folders of the new email account (e.g. Incoming mail [IT: Posta in arrivo]/Sent mail [IT Posta inviata]), you can then force synchronization by applying the Update folder [IT: Aggiorna cartella] item in the Send/Receive [IT: Invia/Ricevi] tab.

Force synchronization of both Incoming mail [IT: Posta in arrivo] and Sent mail [IT Posta inviata]
BE CAREFUL: note that the Sent mail [IT: Posta inviata] and other folders (e.g. Trash, Drafts, Spam) are into an inner folder called [Gmail].
Moreover, it is misleading the presence of another folder called Sent mail [IT: Posta inviata] at the same level of Incoming mail [IT: Posta in arrivo] that is always empty even when you send a new email!!! So you may think that the Sent email folder is not synchronized.

Sent mail [IT: Posta inviata] and other folders (i.e. Trash, Drafts, Spam) are into another folder called [Gmail]. It is misleading the presence of another always empty folder called Sent mail [IT: Posta inviata] at the same level of Incoming mail [IT: Posta in arrivo]
Therefore it is worth to delete that misleading second Sent email [IT: Posta inviata] folder … that is always empty! 😉
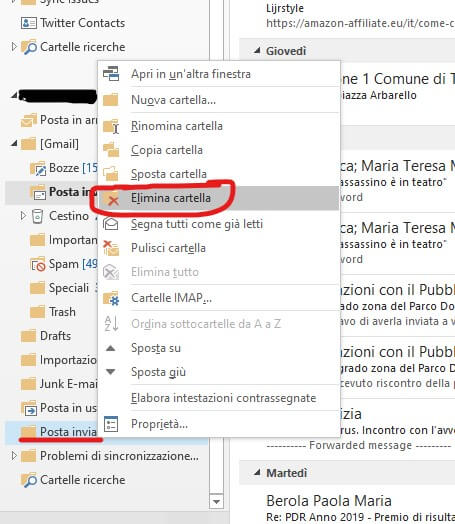
It is worth to delete that misleading second (always empty) Sent email [IT: Posta inviata] folder
Lastly, you may want to have this new email account to be the first in the list of all the configured ones. In that case, you can drag & drop it in the first position:

Moving in the first position the new email account (1)

Moving in the first position the new email account (2)
___________
That would be enough for you in configuring Gmail in Outlook … but in the next sections, I will give you some further advice and information, because something may have gone wrong in the procedure I previously described because of some configuration you may have on your Google account, so we must check there to solve possible problems you may come across.
But first of all, in the following, I will give you an in-depth note about several other ways you can use to manage email credentials in Windows 10.
___________
How to manage email credentials in Windows 10 on PC level
You can even configure email credentials in other ways, both in the Windows 10 Settings or in the Windows 10 Control Panel: in this last one, you can have even more options and capabilities. In these two sections, you can manage emails/accounts at the PC level so for all applications/apps.
To open Windows 10 Settings you can press the Windows + I keys simultaneously or you can click on the rightmost icon in the bottom application toolbar (available only in the main display if you have multiple displays): click Notifications [IT: Notifiche] icon and then the typical gear icon of All settings [IT: Tutte le impostazioni] section. From there you can find an Account section and then an Email and account [IT: Posta elettronica e account] menu item:

Email and account [IT: Posta elettronica e account] section in Windows 10 Settings
Related to Control Panel, currently, it is no more available in the Start Windows 10 menu, but you can easily find it typing Control Panel (IT: Pannello di controllo) in the Search box at the bottom application taskbar. Note that, if you like, right-clicking on the searched app (see next screenshot), you can always choose to add a shortcut to Control Panel in Start [IT: Aggiungi a Start] or in the application taskbar [IT: Aggiungi all barra delle applicazioni].

Search for Control Panel
Here you can find a Mail section, once you choose an Icon [IT: Icone grandi] view, instead of the default Categories [IT: Categorie] one:

Choose an Icon view (not the default categories one) to find the Email section
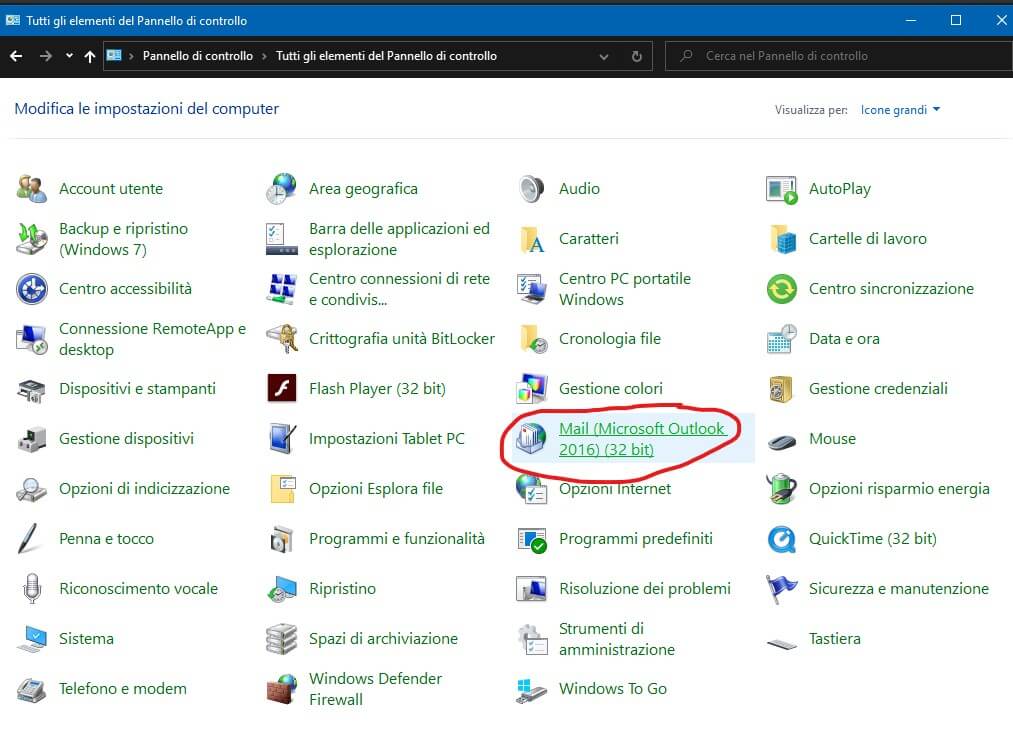
Email accounts manage section can be reached from that link
To manually update an existing Outlook profile, follow these steps (e.g. to Encrypt data between Microsoft Office Outlook and Microsoft Exchange):
- In Control Panel, open the Mail item
- Select Show Profiles
- Select your profile, and then click Properties
- Select E-mail Accounts
- Select Microsoft Exchange (send from this account by default) account -> Change.
- In the dialog box that contains your mailbox server and user name, select More Settings
- In the Microsoft Exchange dialog box, select the Security tab.
- Select Encrypt data between Microsoft Office Outlook and Microsoft Exchange –> OK
- Select Next –> Finish
- Select Close -> Close -> OK
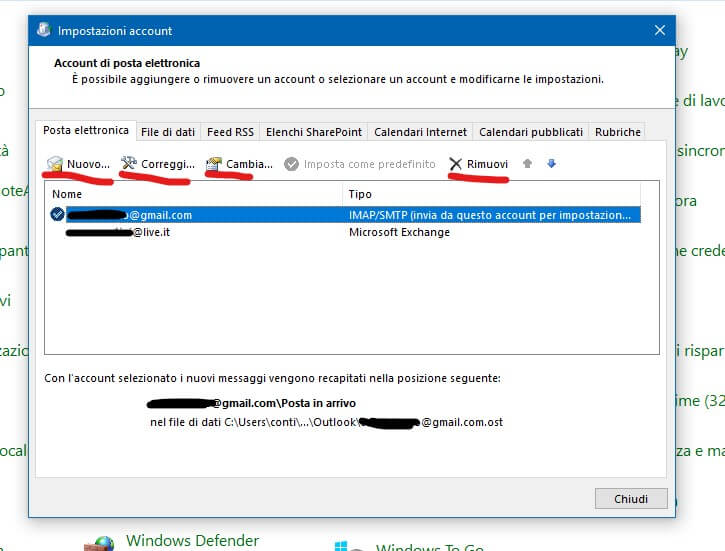
In the following window, you can completely manage email accounts (i.e. add, modify, delete).
If something wrong happens to some of the already defined accounts, the best way to solve problems is to go into this section, delete that account and then create it again from zero. In fact, it may happen that the rules of the email server changed during the time (e.g. new authentication verifications requirement through a smartphone) and so the best procedure to make that account work again is to start over a new configuration.
You have to select the desired email account and then choose the action you want to apply (Correct… [IT: Correggi…]; Change… [IT: Cambia…]; Delete [IT: Rimuovi]):
Email accounts manager section (1)

Email accounts manager section (2) – Change account window
___________
Google profile and security settings that may affect how Outlook works
Google has several security options and depending on how you choose the configuration of an external application/client that uses Google authentication may change, so also an email client that wants to access your Gmail account.
First of all, to access to your Google profile and make the appropriate changes, go to https://www.google.it, then click on the upper right logo associated with your account (if not available, you have to login to Google). Then press the Manage your Google Account (IT: Gestisci il tuo Account Google) button.
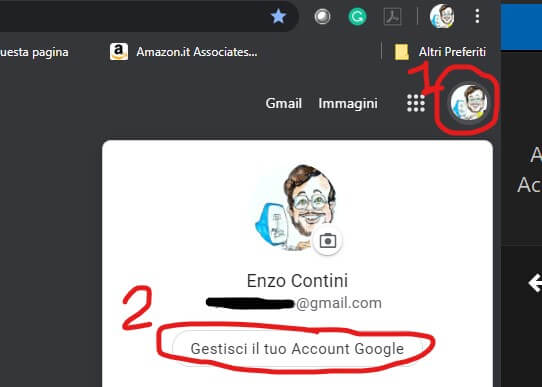
Enter into your Google account to possibly make some changes in its security section
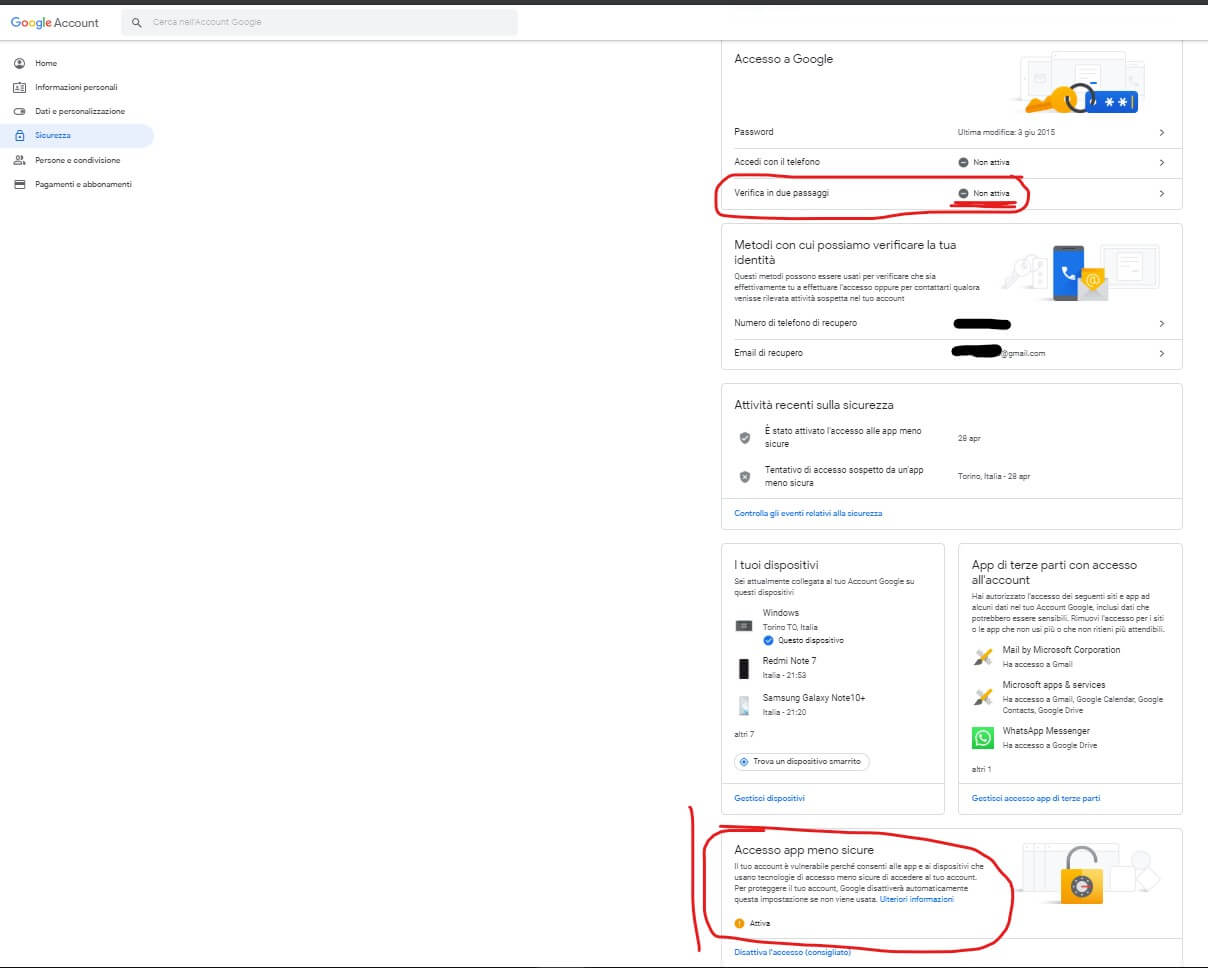
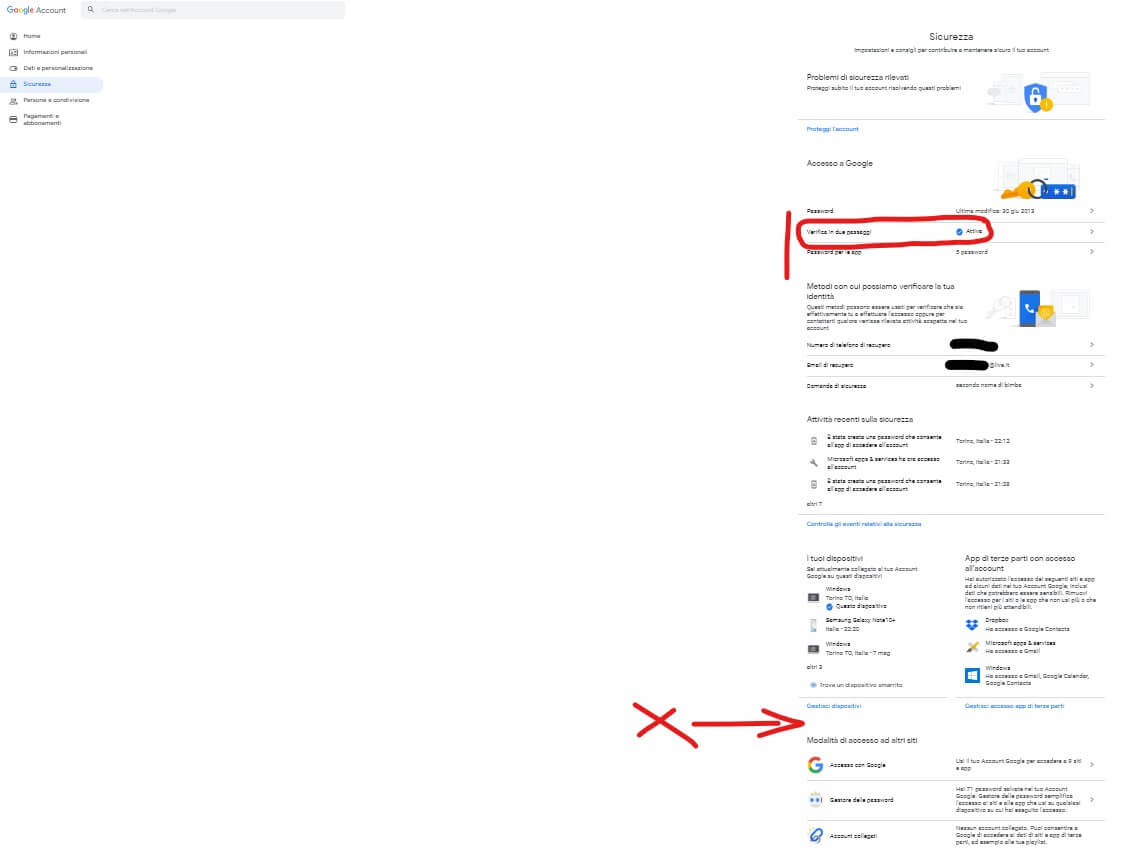
In the Security [IT: Sicurezza] section, there could be two main situations depending on if you agreed to a two-step authentication or not.
- If you do not have a two-step authentication, the configuration is like the following one where you can see a section called Access to less secure app [IT: Accesso app meno secure]

Google security page if two-step authentication is not activated

ccess to less secure app [IT: Accesso app meno secure] section (1)

Access to less secure app [IT: Accesso app meno secure] section (2) – Set to ON
In this case, you may need to enable that option Allow less secure apps [IT: Consenti app meno secure] because of some apps (like possibly at least some version of Outlook) are considered by Google to be a “less secure application” because they do not meet the latest security standards for accessing inboxes.
- If you have the two-step authentication enabled, the configuration is like the following one where you cannot find any more a section called Access to less secure app [IT: Accesso app meno secure]:

Google security page if two-step authentication is activated
Instead, you can create a specific password for any specific app that wants to use a Google authentication: that specific password must be replaced to the Google one in that app configuration:

Creation of an app-specific password (1)

Creation of an app-specific password (2)

Creation of an app-specific password (3)


That’s all folks!!
____________________
You may be interested in these posts:
- App Posta di Windows 10: come risolvere problemi con account di Gmail (i.e. mancata visualizzazione della presenza di allegati in mail ricevute, non presenza di mail inviate)
- How to add an email read receipt in Gmail and in Outlook email client
- Configurare la posta elettronica nell’app Posta per Windows 10


Pingback: Useful Outlook specific features: request for delivery/read receipt, modification of received/sent emails | Enzo Contini Blog
Pingback: How to add an email read receipt in Gmail and in Outlook email client | Enzo Contini Blog
Pingback: App Posta di Windows 10: come risolvere problemi con account di Gmail (i.e. mancata visualizzazione della presenza di allegati in mail ricevute, non presenza di mail inviate) | Enzo Contini Blog