
It may happen that for any reason no user on a PC have anymore administrator rights. It could be because of an incorrect procedure in changing user rights … as it happened to me! 😦
Usually as soon as I have a new Windows PC, I create an admin_local user with administrator rights while I delete those rights for the default user I have logging with my Microsoft account, the default one that I usually will use to access the PC. This procedure makes the PC safer from virus/malware attack, because if something new wants to be installed when you are logged with your account with only user rights, a popup will appear asking for logging with a user with administration rights.
It happened to me to create an admin_local user and, after adding the admin role in the rules list, I misses to click on Apply or OK button before going to my Microsoft user and take it away from Administrators!! So I stayed with two users that have only Users rights!! … and so no new program could be installed 😦
Now I learned that before deleting the administrator rights to your current microsoft user it is anyway better to login with the new created user with the administrator rights so you are sure that it has got those rights in order to do that!!
Note that in the Computer Management window it is available the Local Users and Groups section only if the O.S. is Windows 10 Pro (there is not in the Home edition)
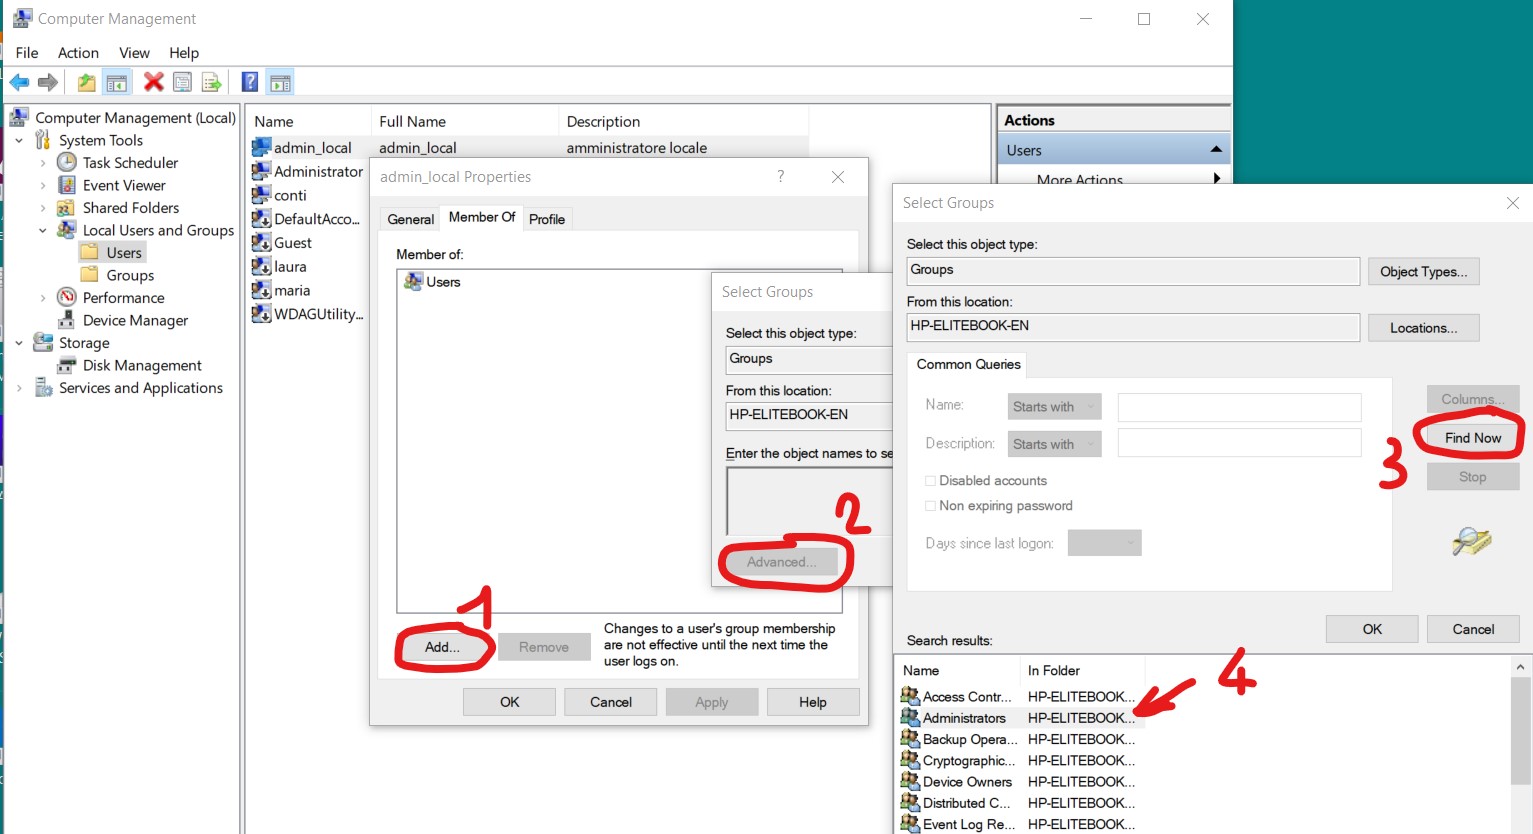
Add Administrator rights to a user (1)
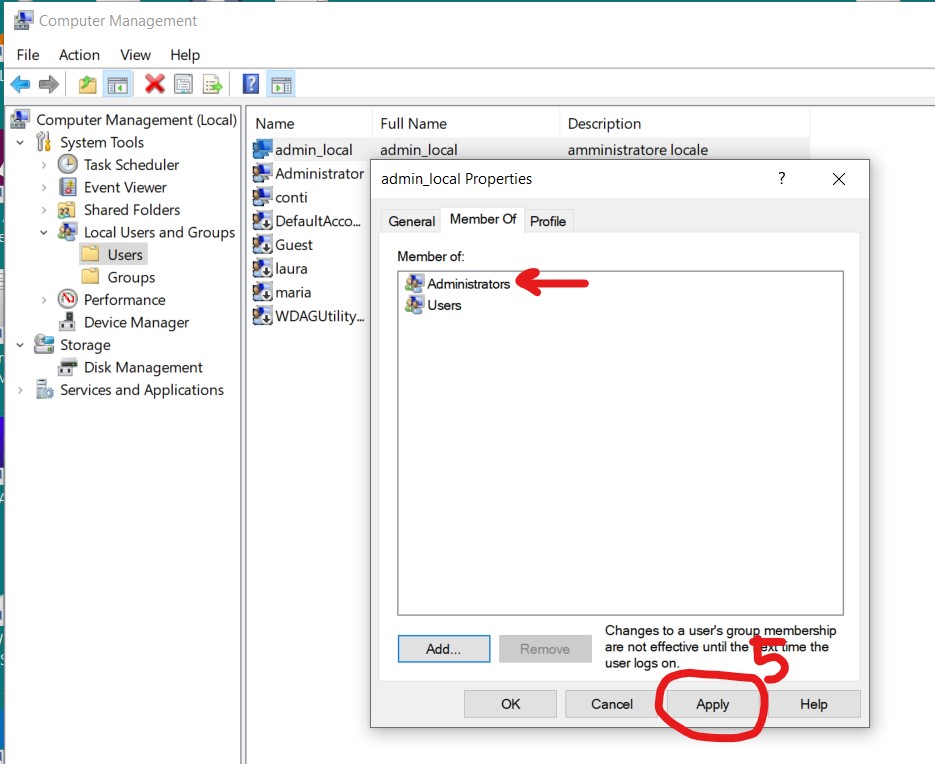
Add Administrator rights to a user (2)
Note that there is always a embedded built-in administrator user BUT, for security reasons, it is not active by default so it is not listed among possible users when you are asked to login. Therefore, it is anyway convenient to let the built-in administrator user be available and there are several ways to do it using a user with administrator rights: the easiest one is to open Windows PowerShell (Admin) and then run:
net user Administrator /active:yes
and then:
net user Administrator <Password>
substituting in the command <Password> with the actual password you want to use to sign in to the built-in Administrator account with) to set his password.
Note: if your Windows uses a different language than English, then you would need to substitute Administrator in the command below with the translation for your language instead.
You can even set the password for that user directly using:
net user Administrator <Password> /active:yes

Anyway I searched for a solution in Internet and I found the following interesting video, that seemed to tech me what I wanted to do (I had already set a proper password to the built-in Administrator user even though I still didn’t activate it): How to unlock the built in Administrator with any account on Windows 10. The instructions are clear and deals with a change, running regedit from a command prompt of some bit in the configuration of the HKEY_LOCAL_MACHINE of the current Windows 10 installation. To do that you have to have a USB Windows 10 installation and run it pressing shift hardware key while choosing the reboot option from the Start menu. However, when I tried to navigate on the C: disk, where Windows 10 was installed, I received this alert: “The drive where Windows is installed is locked“. I found on Internet several suggestions how to unlock it but I did not want to proceed with my new Surface before calling Microsoft support on that product. So I called the italian Microsoft Surface Support call center (+39 0238591444) and I asked for help. They suggest me to reinstall the image of my Surface so doing a full recovery. Even if in this way I had to reinstall all, being that Surface new, it was quite easy for me to save the few data I had!!
In the following, the instructions (in italian) they sent me:
1) Scaricare un file immagine di ripristino:
Accedi al link : https://support.microsoft.com/it-it/surfacerecoveryimage
Scegli il modello del Surface e inserisci il numero seriale del tuo dispositivo(Il numero seriale è un codice di 12 cifre che può essere trovato sotto il computer, vicino al logo Microsoft.
Se possiede un Surface Pro o un Surface Go si troverà sotto l’aletta che utilizzi per appoggiarlo)
2) Formattare l’unità USB:
Inserire la chiavetta USB
Computer/Questo PC -> Tasto destro sull’unità USB -> Formatta -> Assicurati che sia impostata su FAT32 e che sia selezionata “Formattazione rapida” -> Avanti.
3) Copiare i file nella chiavetta formattata:
Il file che hai scaricato è un file compresso. Quindi bisogna aprire il file.zip contenente l’immagine di ripristino > Seleziona tutti i file > Trascinali nell’unità USB.
4) Crea e usa l’immagine di ripristino:
“Come ripristinare il tuo Surface alle condizioni di fabbrica usando un’immagine di ripristino precedentemente scaricata”.
1. Assicurati che il tuo Surface sia spento e collegato all’alimentatore.
2. Entra nella schermata UEFI premendo il tasto volume più e cliccare una volta il tasto di accensione sempre tenendo premuto il tasto volume più.
Il dispositivo dovrebbe mostrare il logo Surface e dovresti vedere dei puntini rotanti di caricamento. Dopo il logo Surface, il dispositivo dovrebbe entrare in UEFI.
3. Boot configuration -> Trascina l’unità USB all’inizio della lista -> Inserisci l’unità USB nel tuo Surface -> Exit -> Clicca Riavvia.
4. Quando richiesto, seleziona la lingua e il layout della tastiera che preferisci.
5. Seleziona “Troubleshoot”, e poi seleziona “Ripristina da un’unità”. Se richiesta una chiave di ripristino, seleziona “Salta questa opzione” in basso allo schermo.
Nota: Assicurati di selezionare l’opzione “Troubleshoot” sullo schermo. Non selezionare l’opzione “Usa un dispositivo”. Se selezioni l’opzione “Usa un dispositivo”, il tuo Surface ripartirà dall’unità di ripristino USB ed il processo di ripristino comincerà di nuovo.
6. Seleziona l’opzione “Pulisci completamente l’unità”.
7. Seleziona Ripristina – Il Surface si riavvierà e mostrerà il logo Surface mentre completerà il processo di ripristino. Questa operazione può richiedere diversi minuti
Nota: Surface Pro 4, Surface Book e i modelli più recenti mostrano la schermata Surface UEFI come una schermata bianca con diverse opzioni sul lato sinistro. I dispositivi meno recenti (Surface Pro 3, Surface 3 e precedenti) mostrano la schermata American Megatrends UEFI come una schermata nera e solo con alcune opzioni.
______________________
See also:
- How to format and create a bootable USB flash drive (e.g. stick/pen/USB drive, memory stick)
- How to create a Windows 10 installation USB


Pingback: How to delete your personal data from a Windows 10 PC/tablet | Enzo Contini Blog