This is an on-going post … so it will be updated in the near future in order to provide more info on this topic 😉
See also Gestire le notifiche push di una Universal Windows app con i Notification Hub di Azure by Matteo Pagani.
There are two ways to have push notifications from a backend to client instances on a mobile device (whatever, Windows Phone 8.1, Windows 10 Mobile, iOS, Android):
- Use directly the Windows Push Notification Service [WNS] that is a Microsoft cloud service able to send notifications to all the app clients installed in on different devices. Also other notification servers provided for client platforms other than Windows can be used, e.g. Google Cloud Messaging [GCM] for Android, Apple Push Notification Service [APNS] for Apple but also Amazon Device Messaging for Amazon, Baidu Notification.
- Use the Microsoft Azure Notification Hub: it is just a service, no VMs to configure or need to scale throughput … you can be sure that the message broadcast will be done very fast to all the registered clients .
The second one is the more easy to implement (especially from the server side) and it is also more flexible and scalable being based on an infrastructure that can be managed from the Azure porta: it is a multiplatform and scaled-out push infrastructure. You don’t have to have you server running in the Azure cloud to use this Azure service
In the following I am going to go deeper in this second way but if you are interested in the first one you can get useful information from Matteo Pagani’s book More_Windows_8_1_Succintly (chapter 6) and Daniele Bochicchio’s Sviluppare Universal App per Windows e Windows Phone con XAML e C# book (chapter 16).
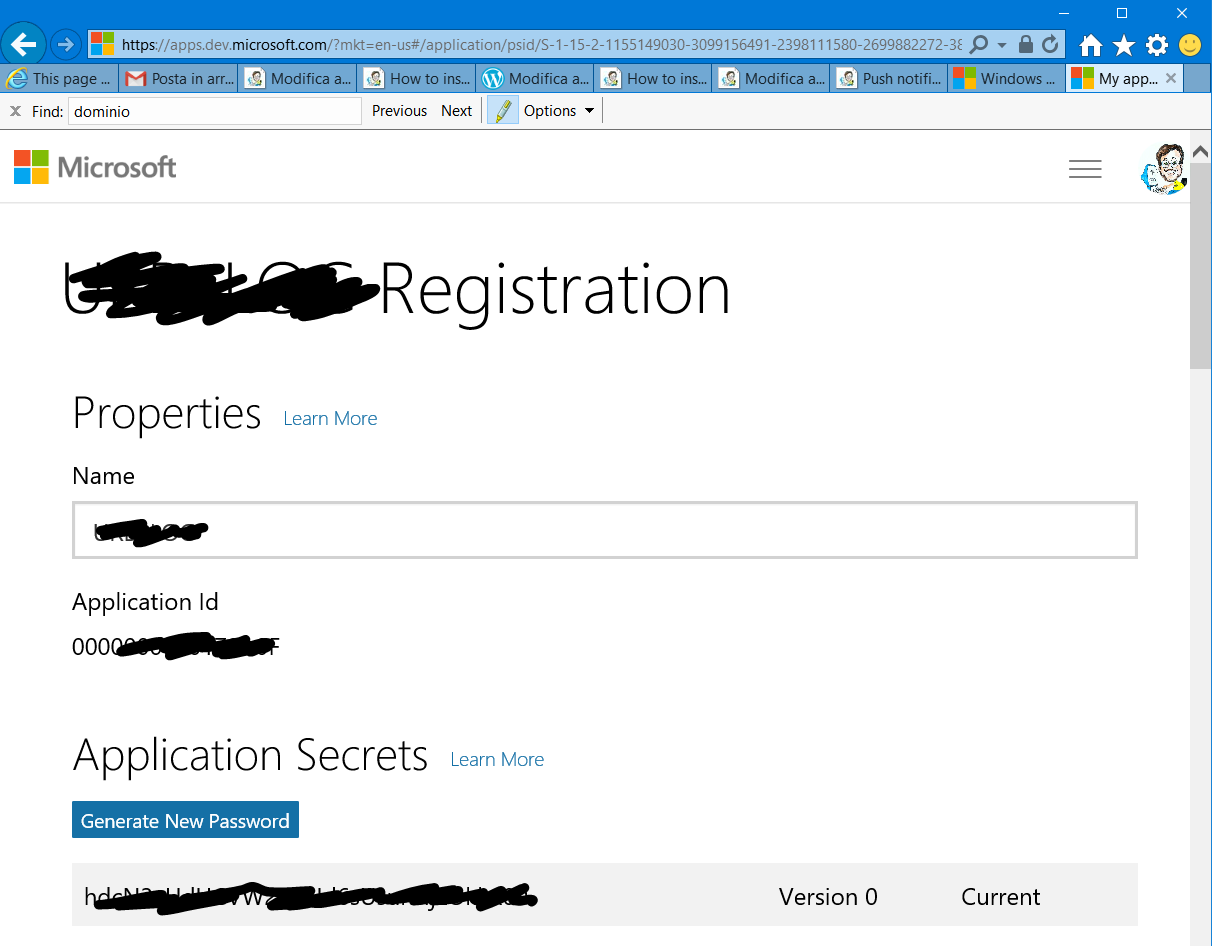
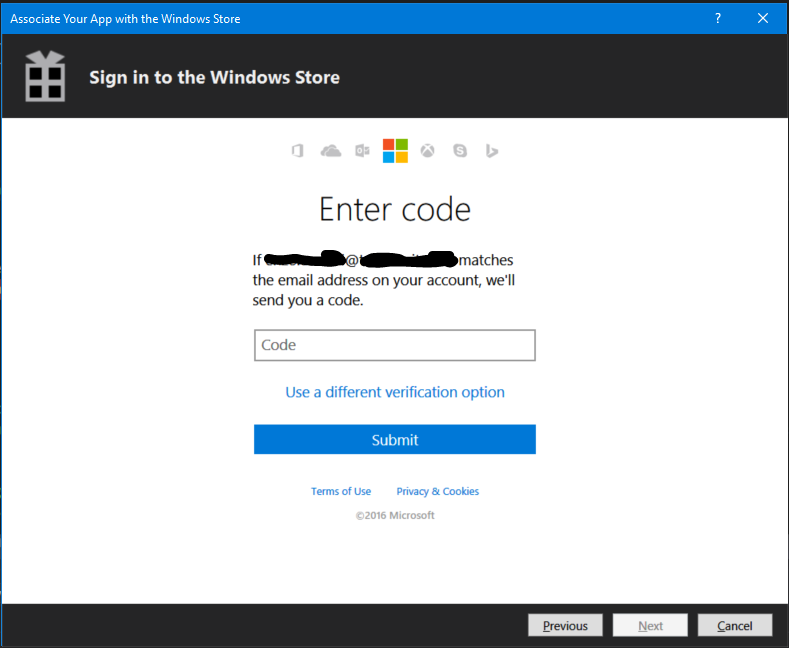
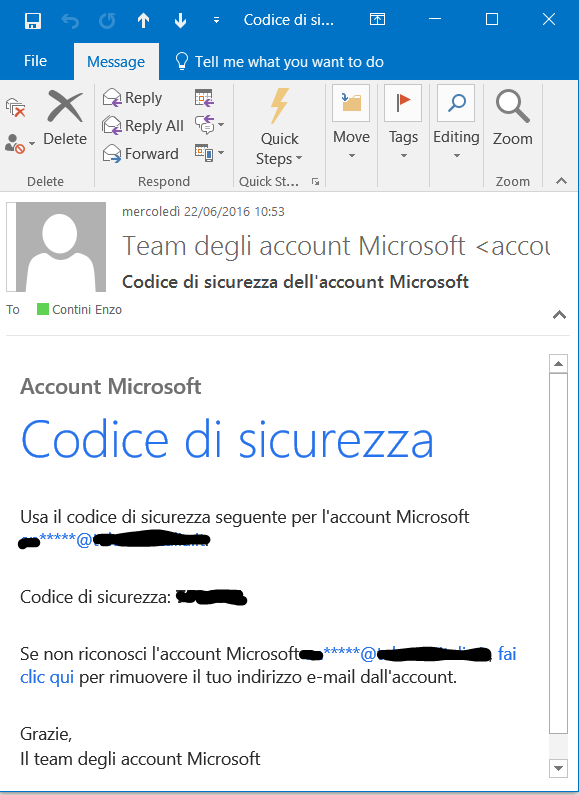
In any case, the first think to do is to register the new app in the store in order to get the Client ID and Client secret associated to that app.
During the registration of your app in the Microsoft Store (from https://dev.windows.com/en-us/dashboard) you can register it in order your app can use Push Notification services (and possibly Maps services too).
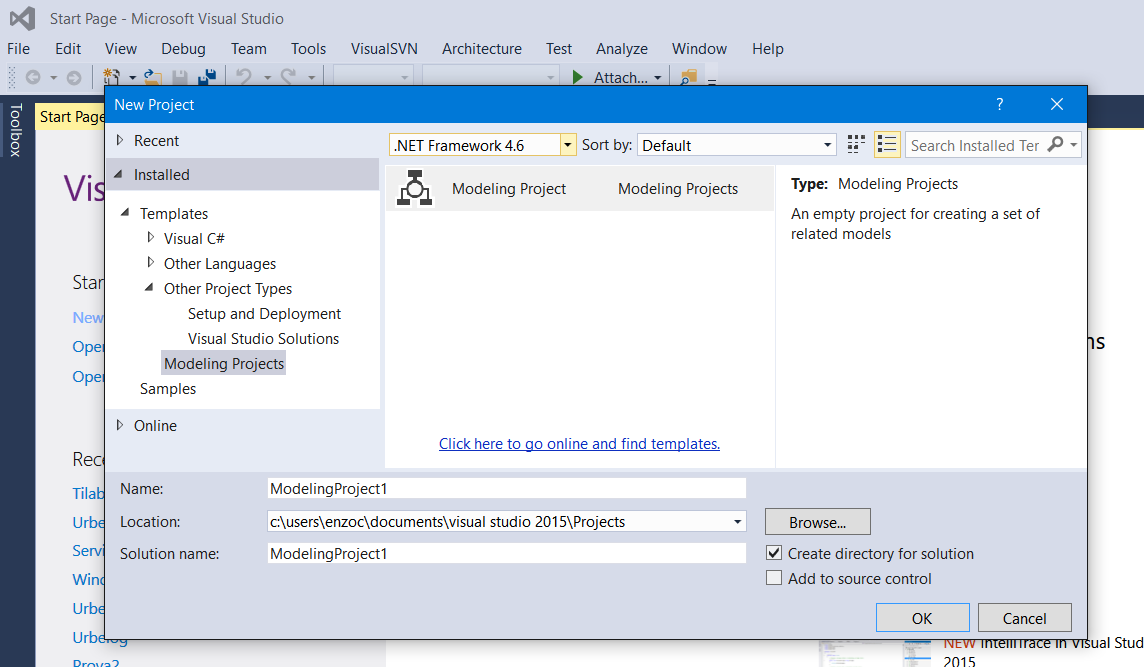
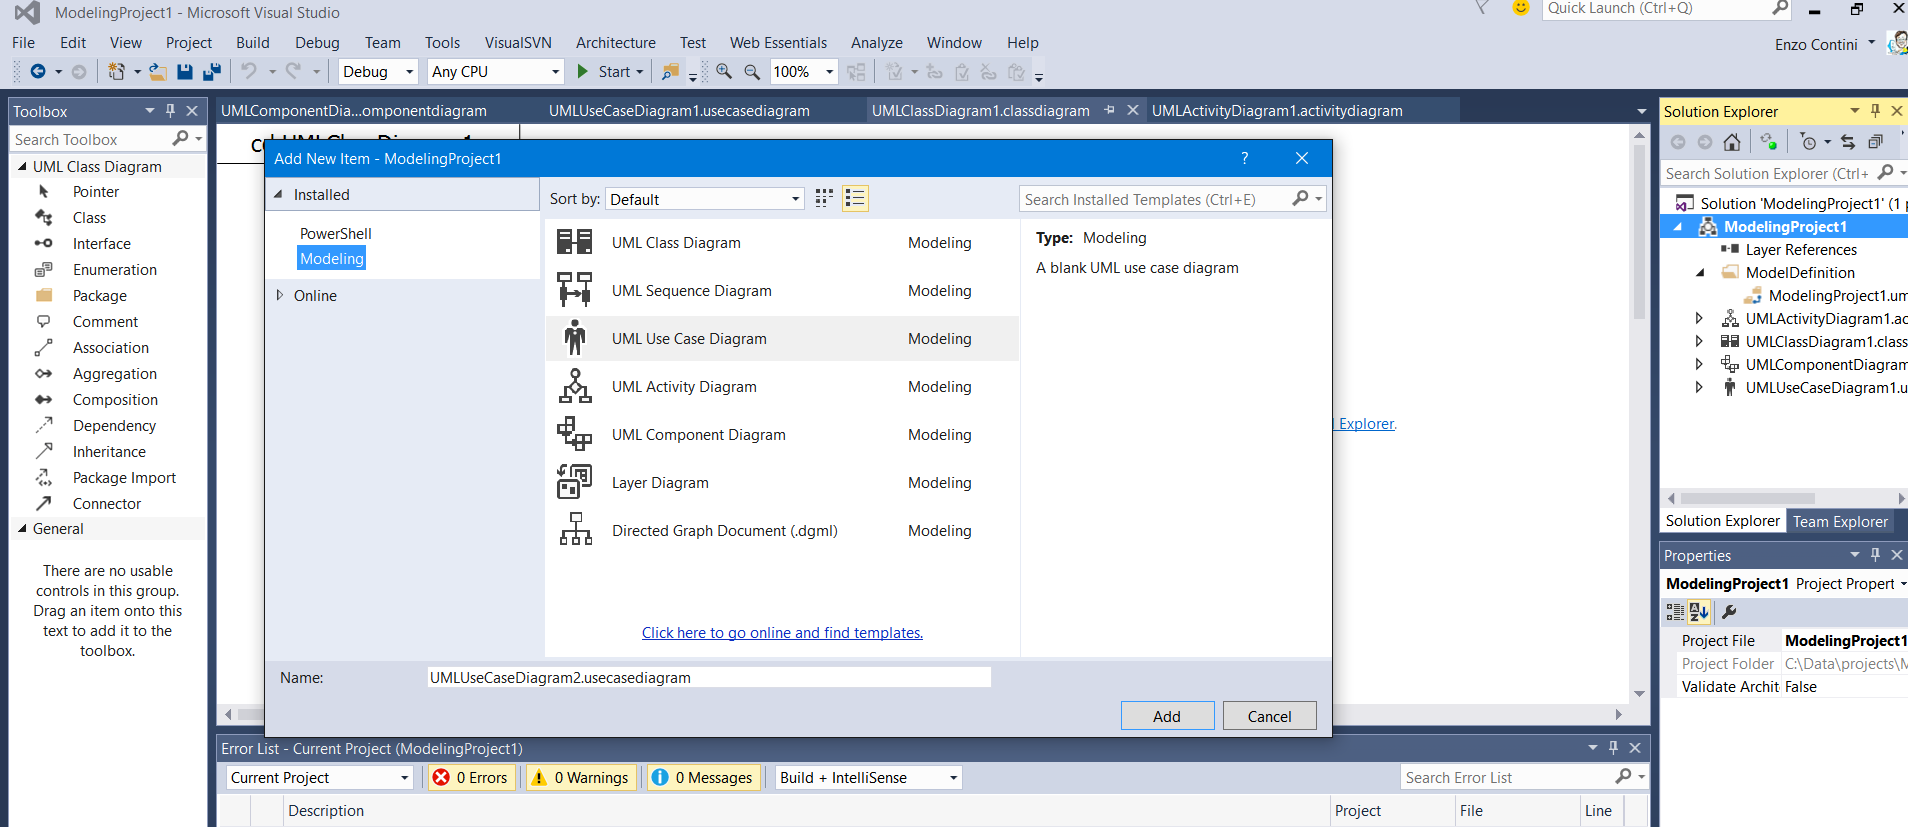
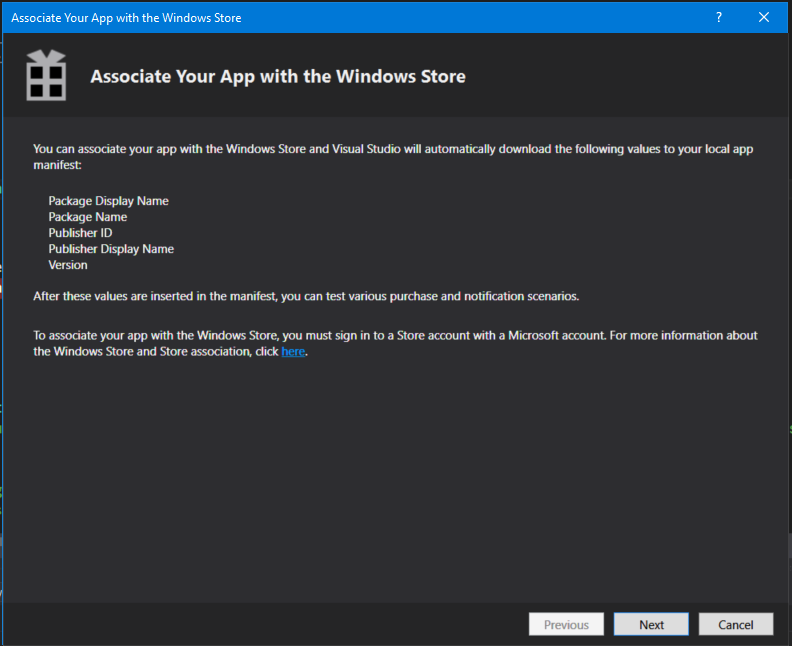
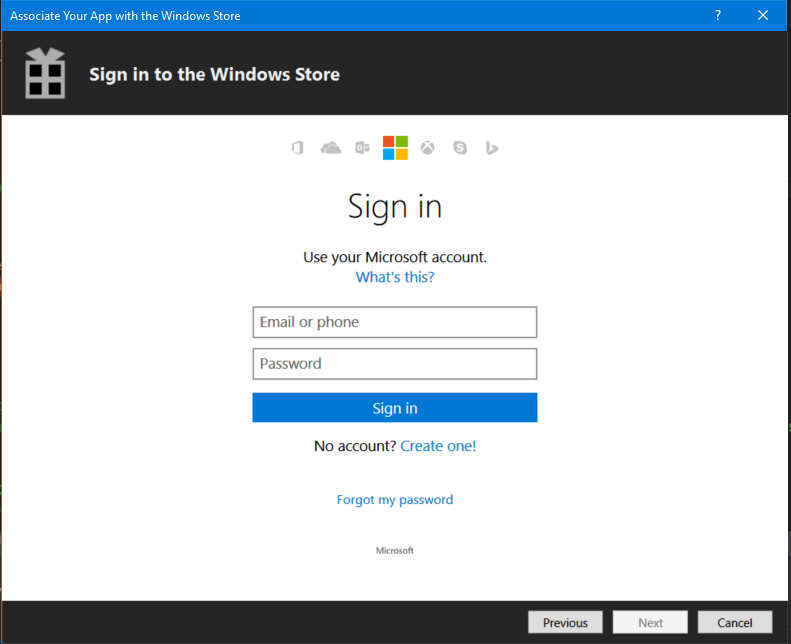
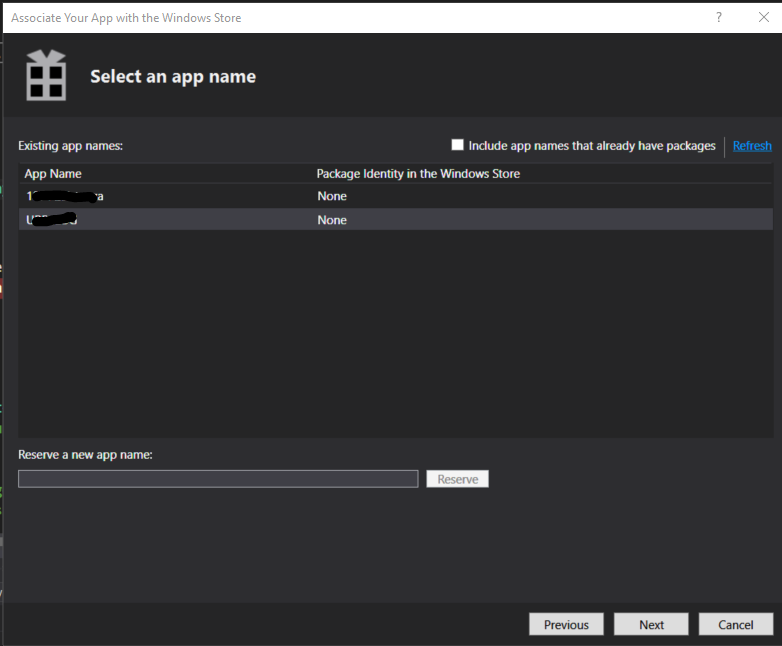
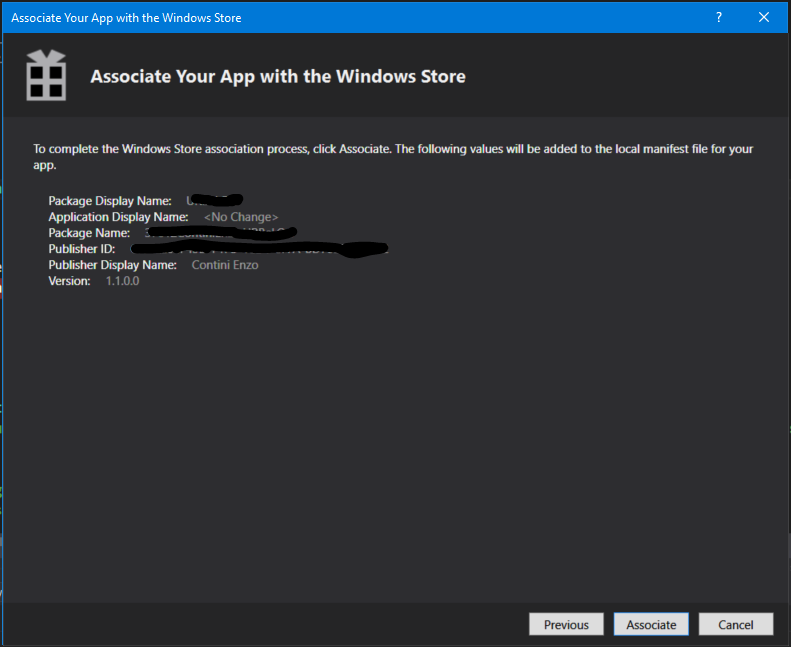
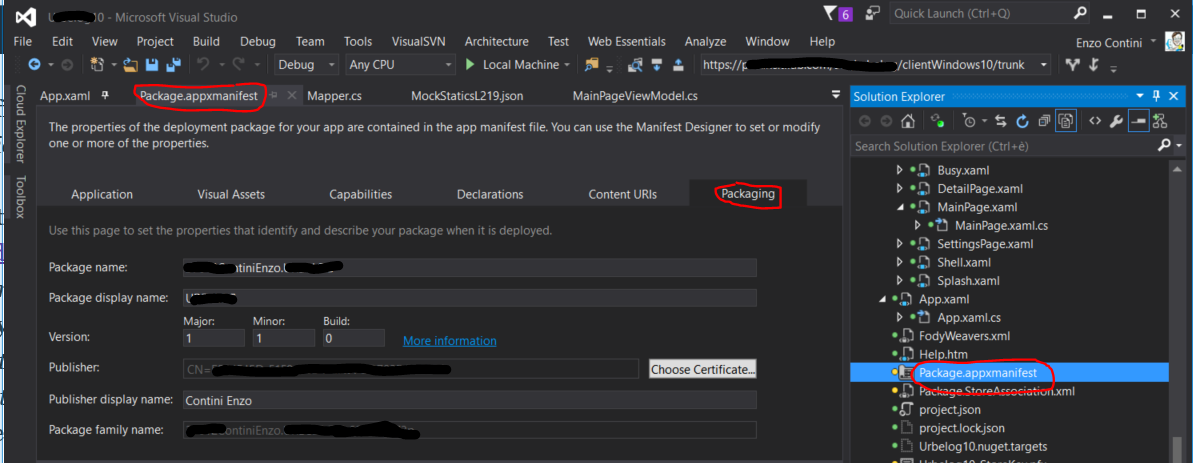
Then remind to associate the project of your client with that one registered in the Store: to do so, right click on the StartUp project of you solution in VS2015’s Solution Explorer window, choose Store -> Associate App with the Store… and then select among your registered apps the proper one. Note that, if then you go now to see the Package.appmanifest file of the project, in its Packaging section you will see that the Package display name will be now the one choose when registered the app in the Store, that is in general completely different to solution/projects names. You can have even more projects associated to the same Package name (doing the previous Associate App with the Store… for both the project, they will have the same attribute’s value in the Packaging section of their own Package.appmanifest file) and this can be useful when you want, for example, to have a test project just to first try this push notification feature, without having to insert your code directly in your real project.

StartUp project – Store -> Associate App with the Store…
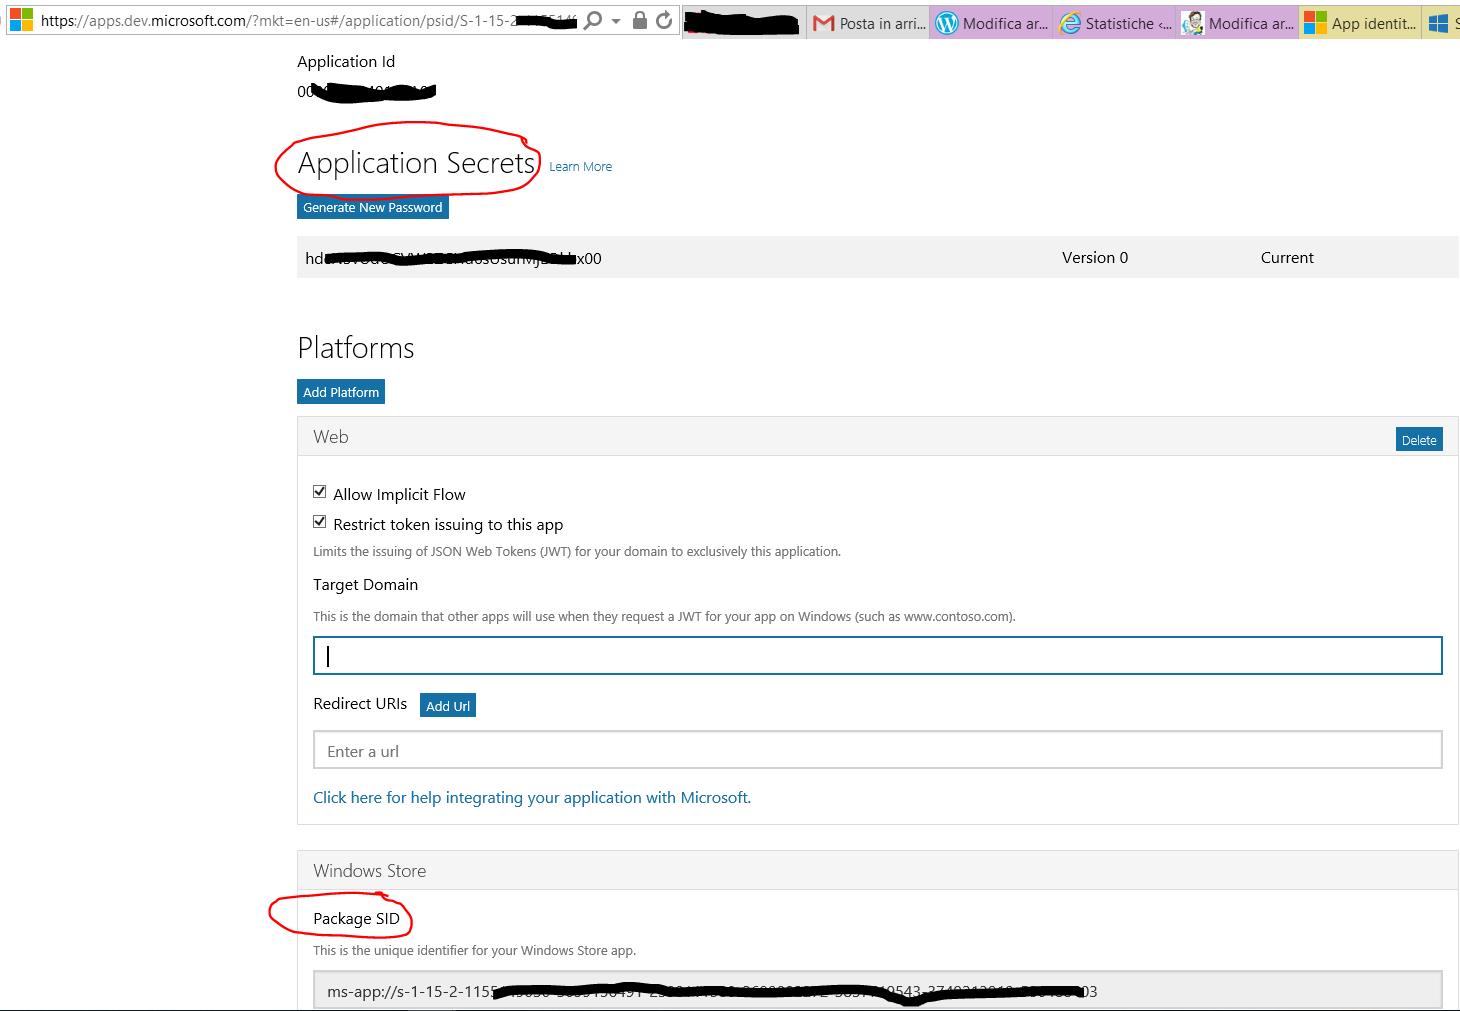
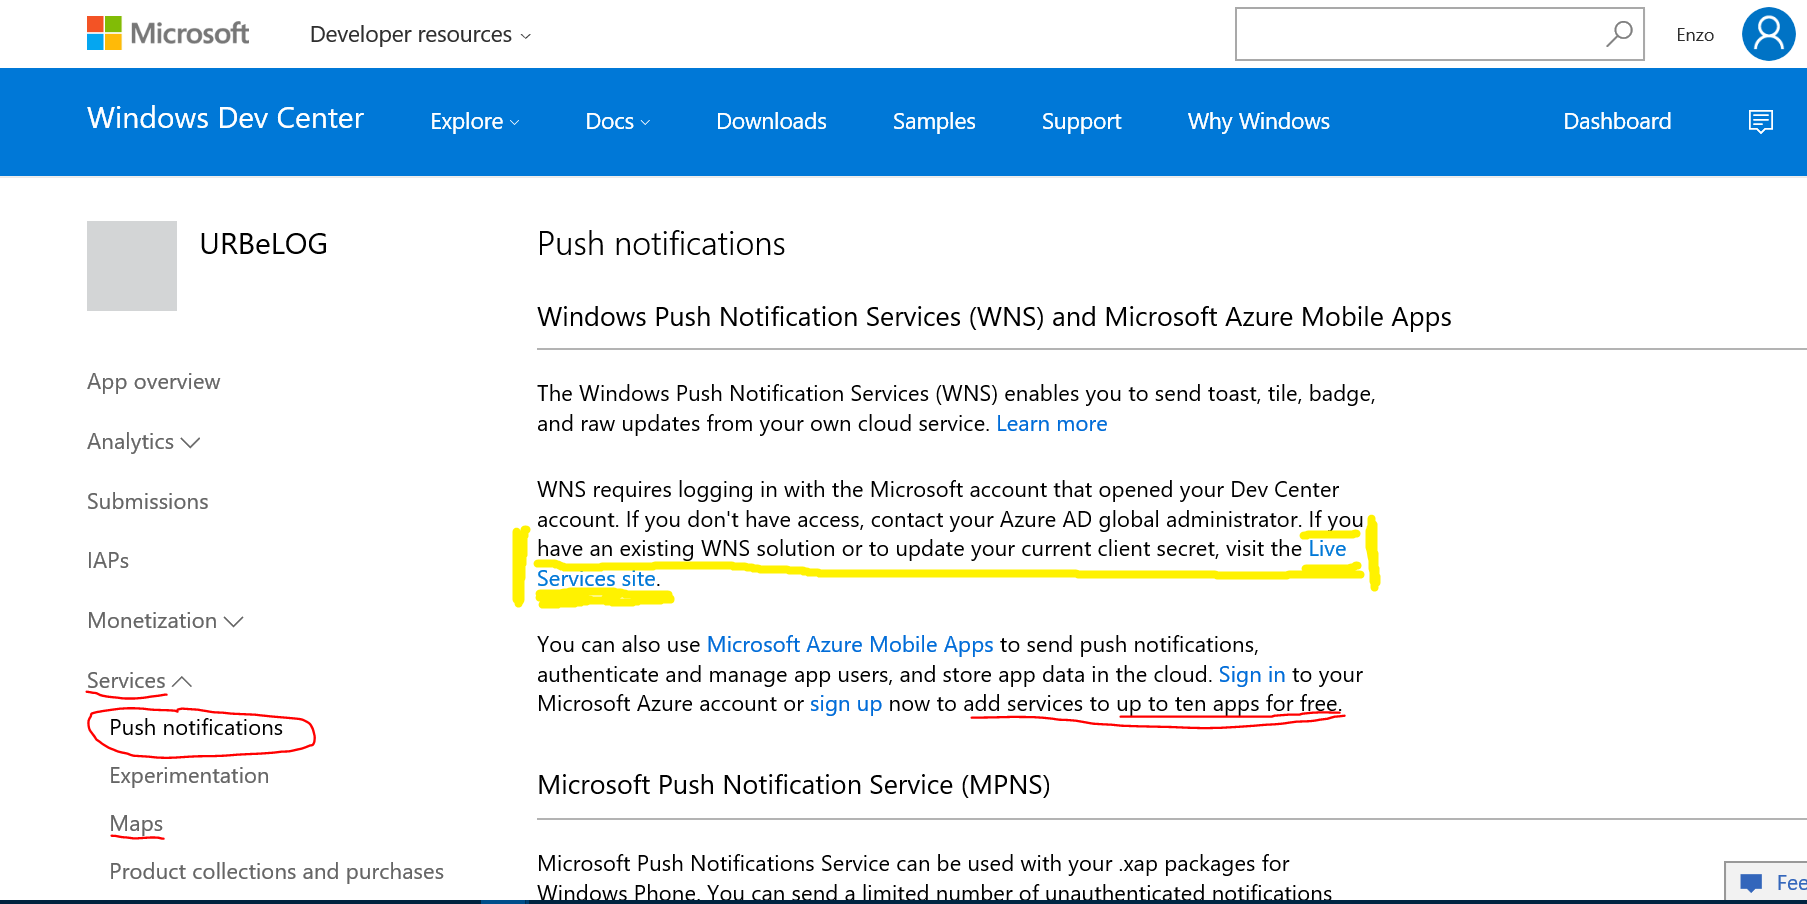
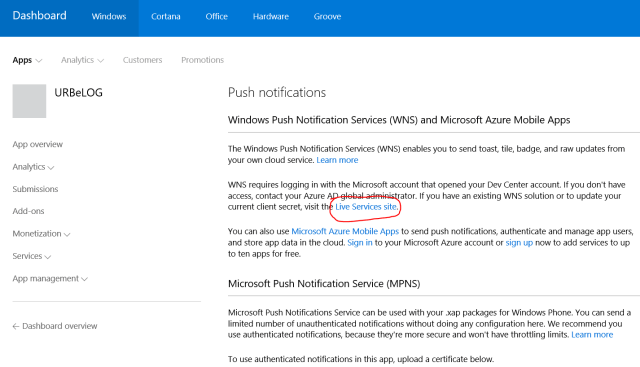
Select Services -> Push Notifications -> WNS/MPNS relativamente al server Microsoft che gestisce le push.

Poi premere su Live Service site per accedere al sito che consente di generare un Application Secret specifico per l’app che intende ricevere le push.

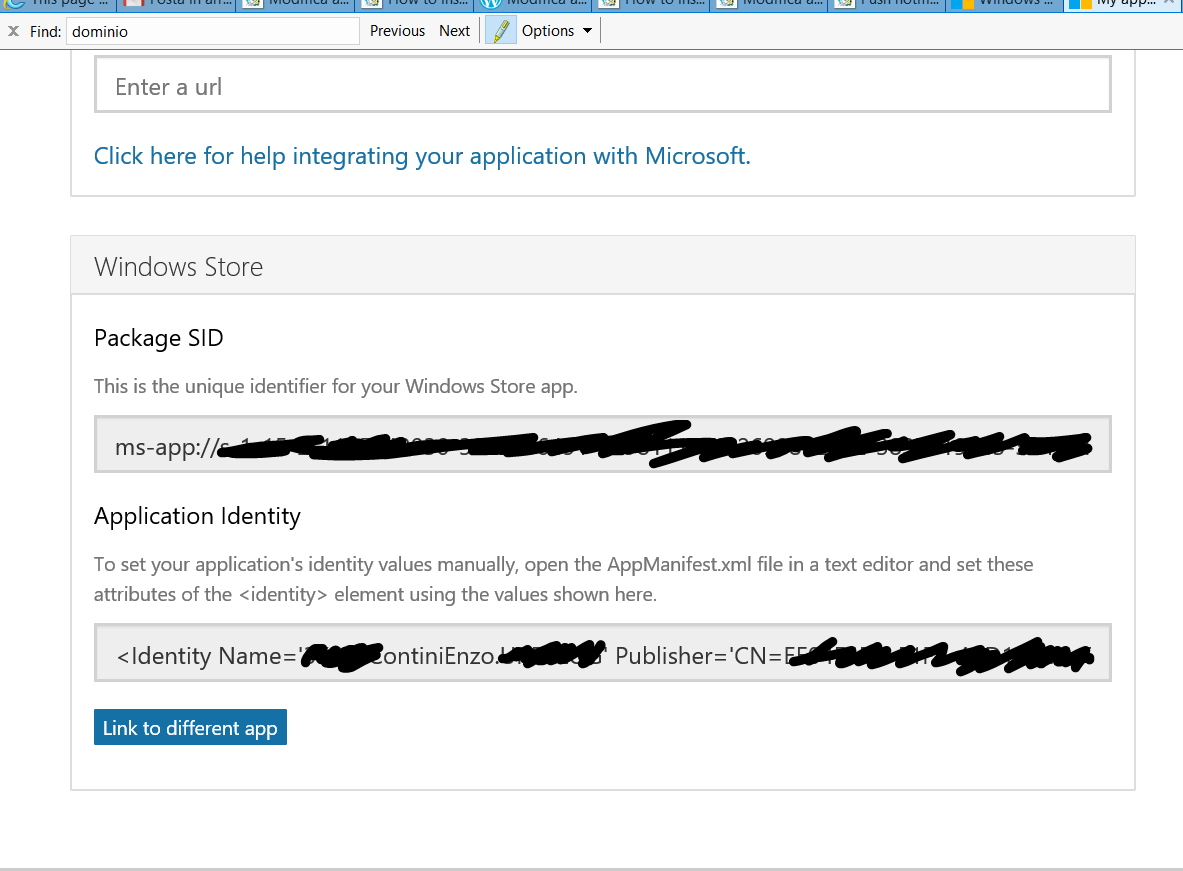
App Registration – Package SID
Even if it out of the scope of this post, the Maps link allows you to get the token for using map services in Windows 10 packages for this application: it has a link to the Bing Maps Dev Center that could be accessed also directly for this purpose.
In the Push notifications page link is available in the second paragraph: “If you have an existing WNS solution or need to update your current client secret, visit the Live Services site “. In that link you will see some identities related to your app: the Package SID, the Application identity, the Client ID and the Client secret. The bold ones are to be used registering that app in the Azure Notification Hub because they are the client credentials where to do it has to push a notification to.

Then you have to go in your Microsoft Azure account to create a new Notification Hub to associate with that client app and get the connection strings needed, respectively, to register each specific instance of my client and to sent the notifications from my server.
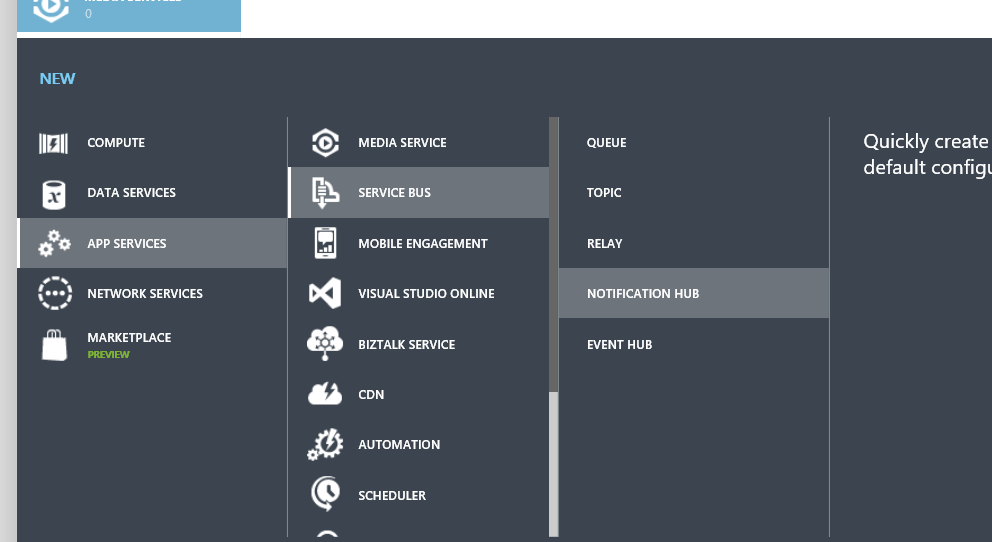
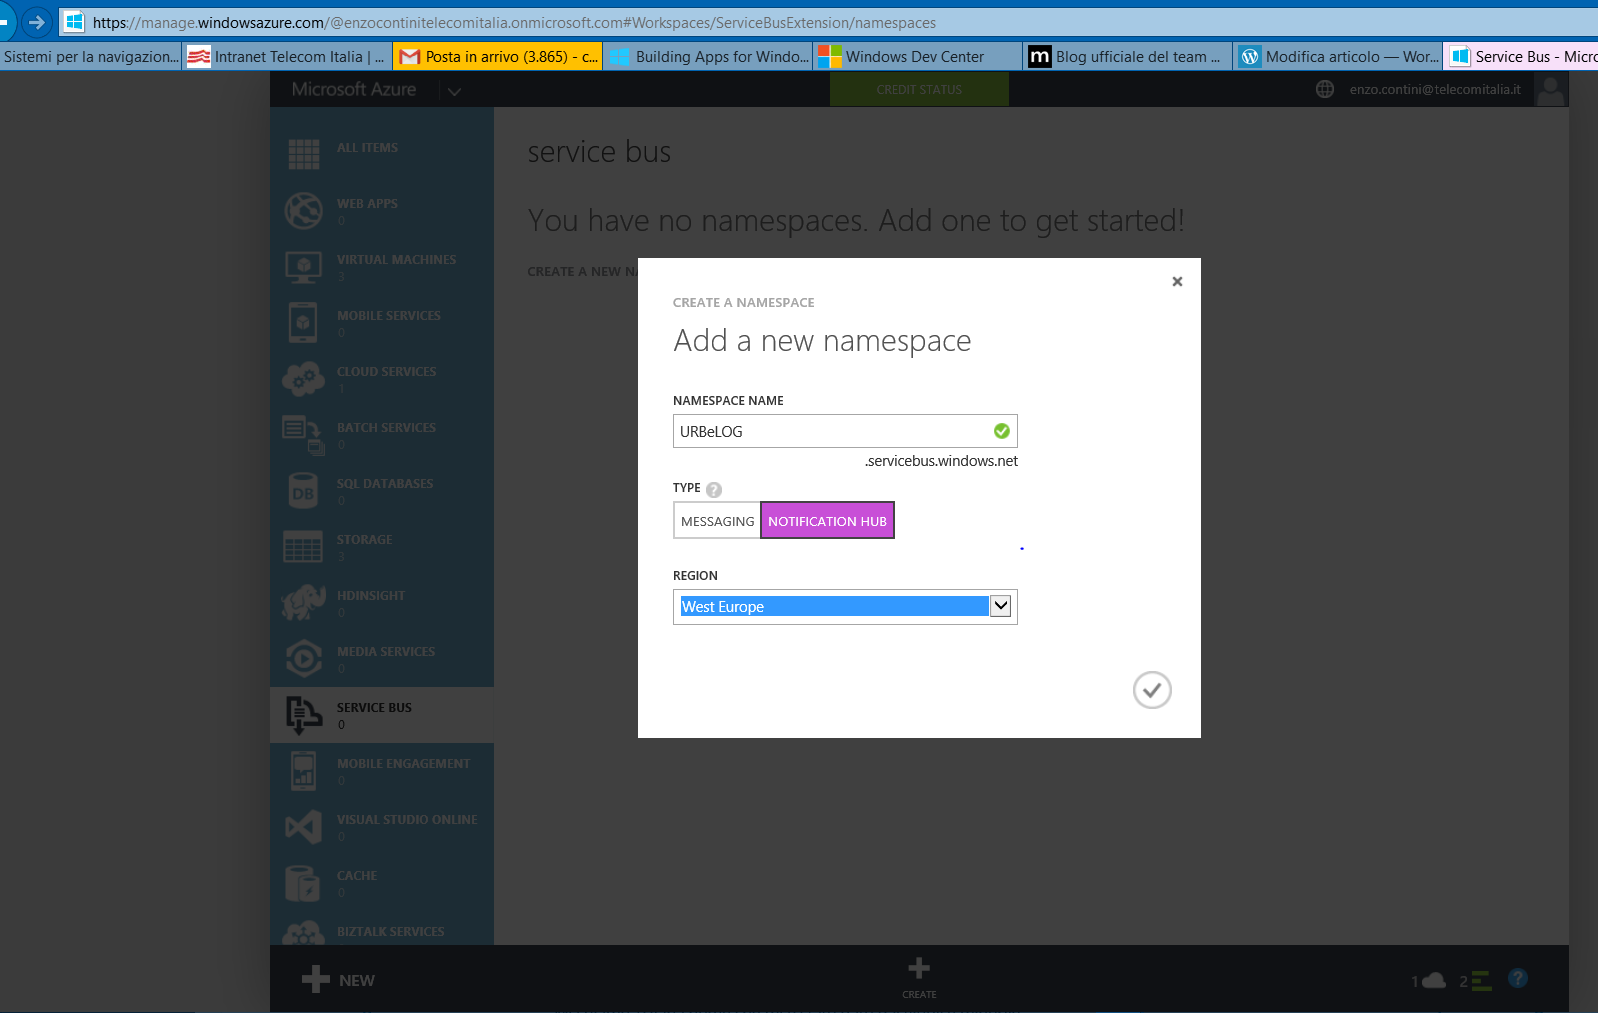
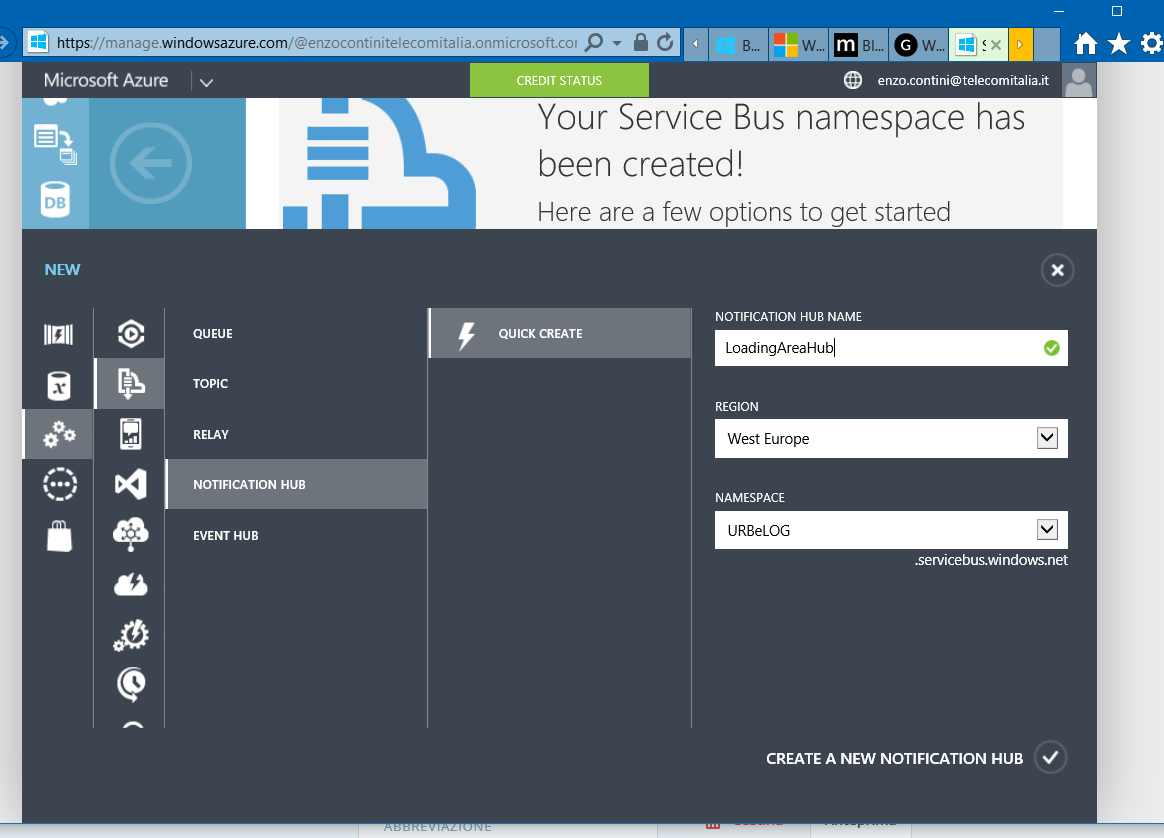
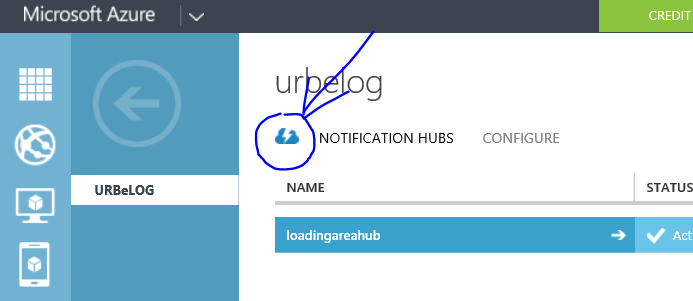
Going in the Microsoft Azure Dashboard and then in the Management portal, you have to create a new Service Bus and then specify to be a Notification Hub. To do so, select in the left menù the icon related to the Service Bus, click + in the bottom menù and select the NOTIFICATION HUB option. Note that what we are going to define is just a service, no care of VMs configuration or whatever : will will be sure that the broadcast of our notifications will be done in the proper way.


Note that the Namespace is the container for one hub or more and the billing will be tight to that namespace and not to each single hub.

For each namespace you can see the list of hubs created.
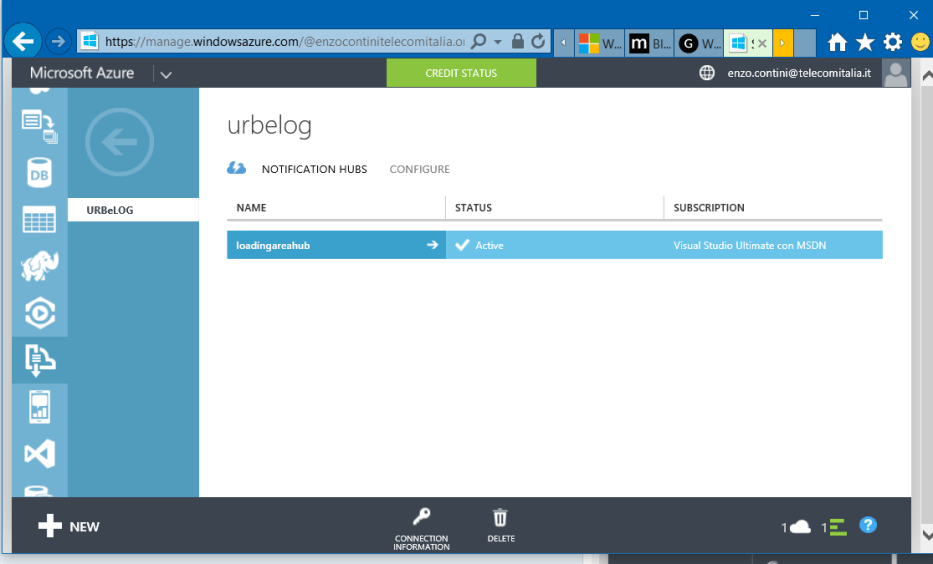
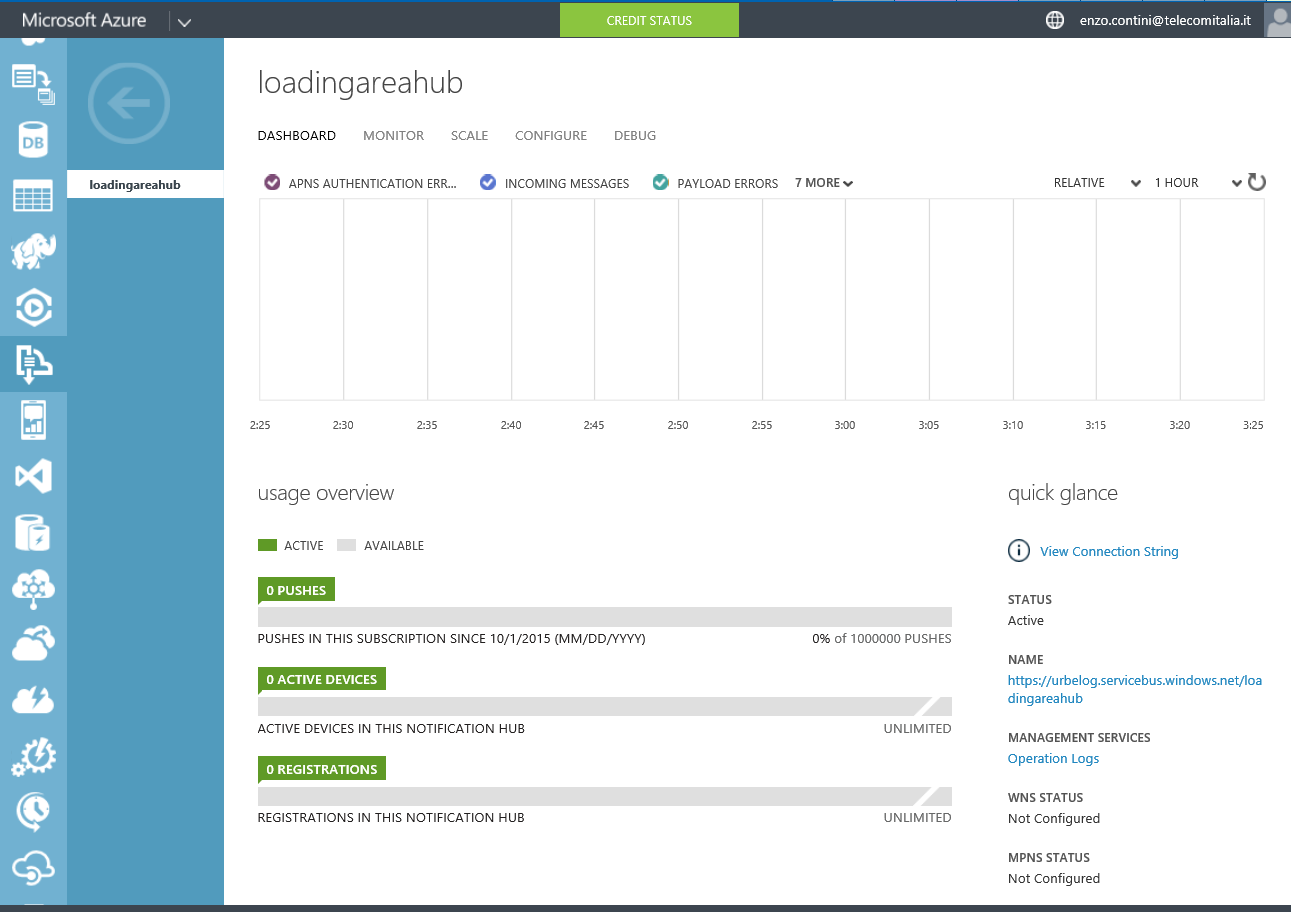
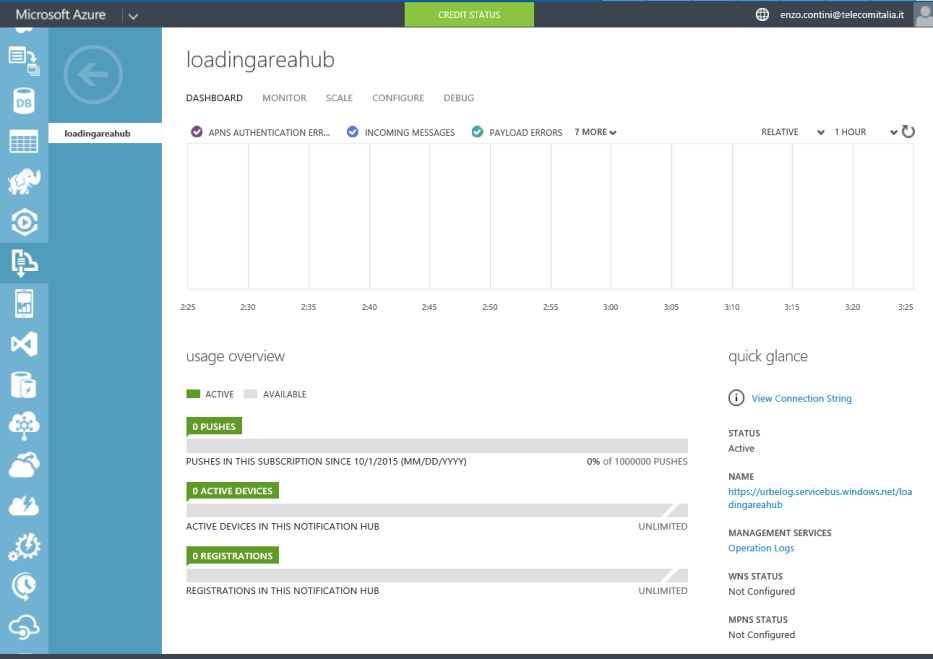
Double clicking on one hub name (e.g. loadingareahub) you can see that hub’s dashboard with all the pushes done, the active devices and registrations, that is you an overview of the usage (e.g. how many notifications, how many clients, … how many successful notifications or not). Every platform (iOS, MS, Google) has its own notification service which is used by that Notification Hub: each one has its own info detail that can be seen on the Monitor tab: the Notification Server to be used (e.g. WNS, GCM, APNS) is specified .
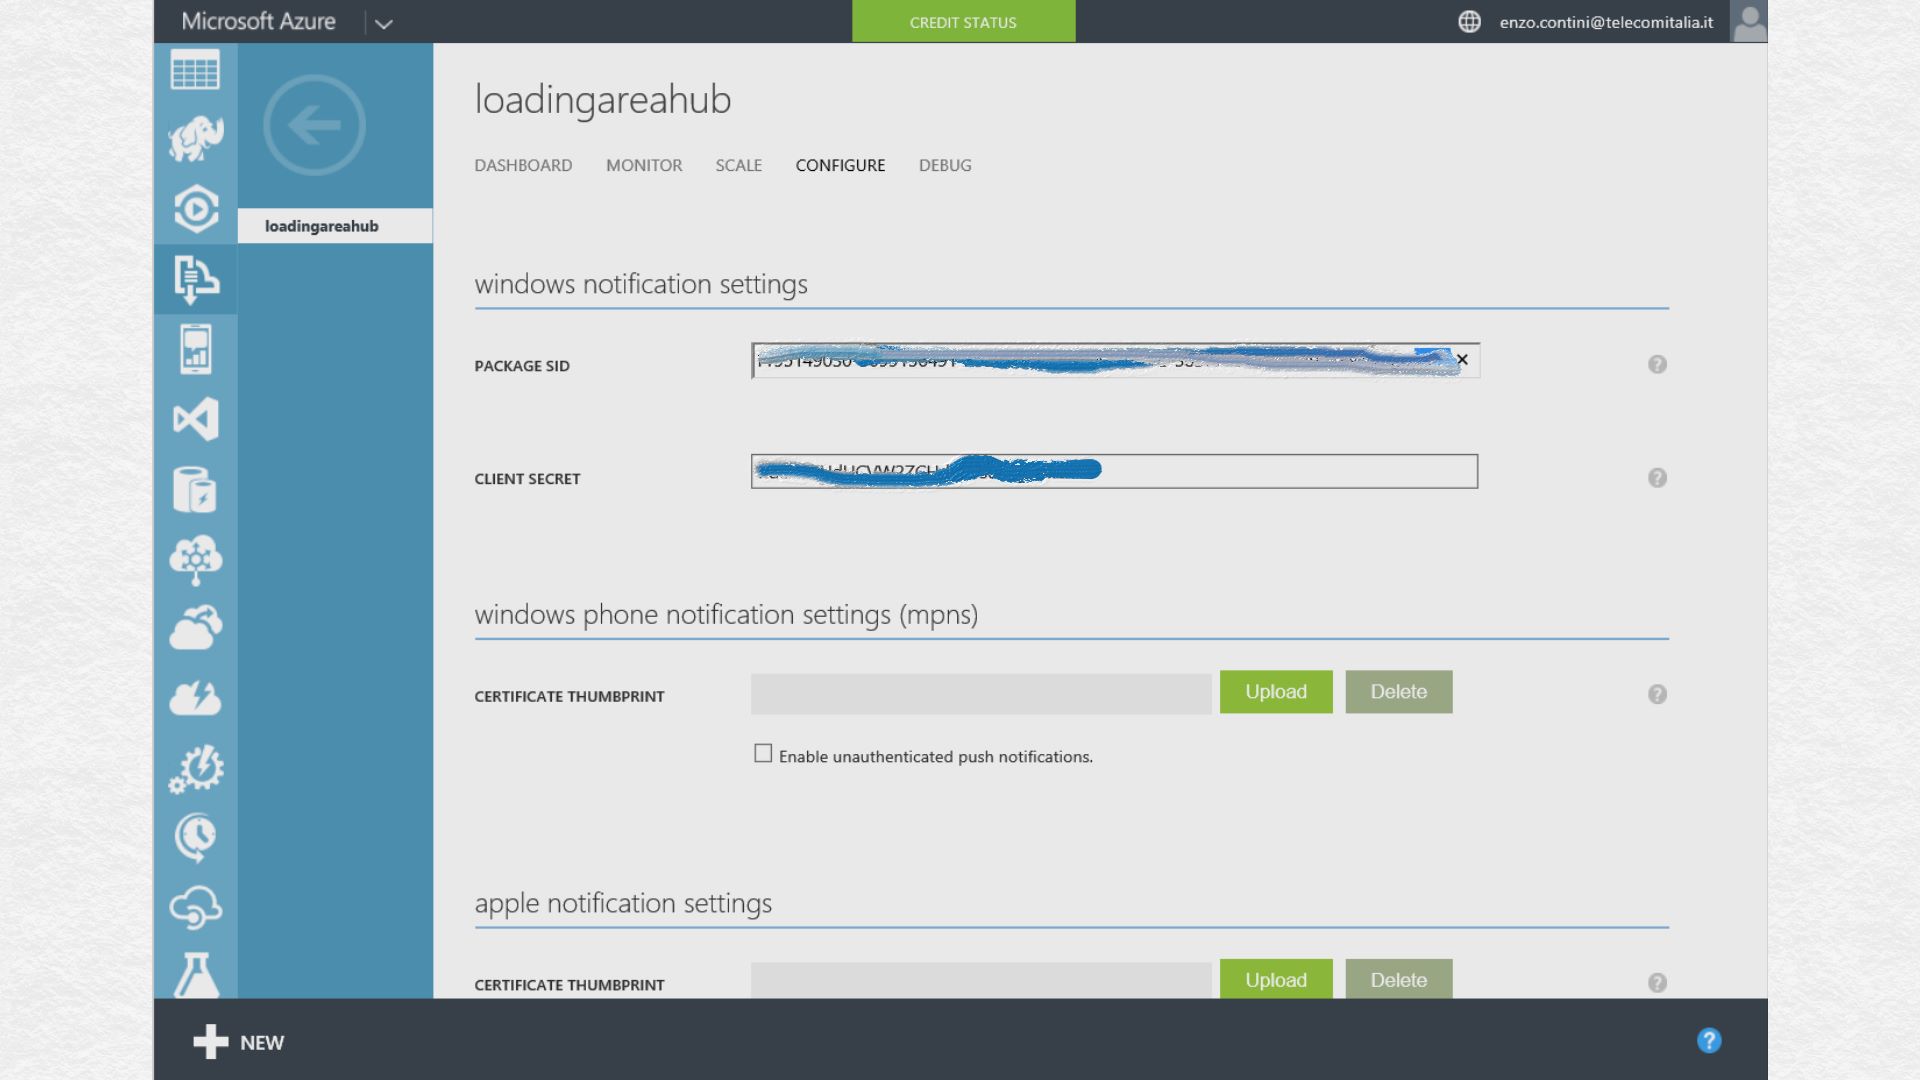
Then, going in the configure tab you have to enter the credentials (Package SID and Client secret) of the client where there is the need to direct the push: both these information can be found on the Microsoft account Developer Center (My applications > YourAppName > App Settings). Note that we do not create a specific channel to your device (as it is done using directly the WNS).

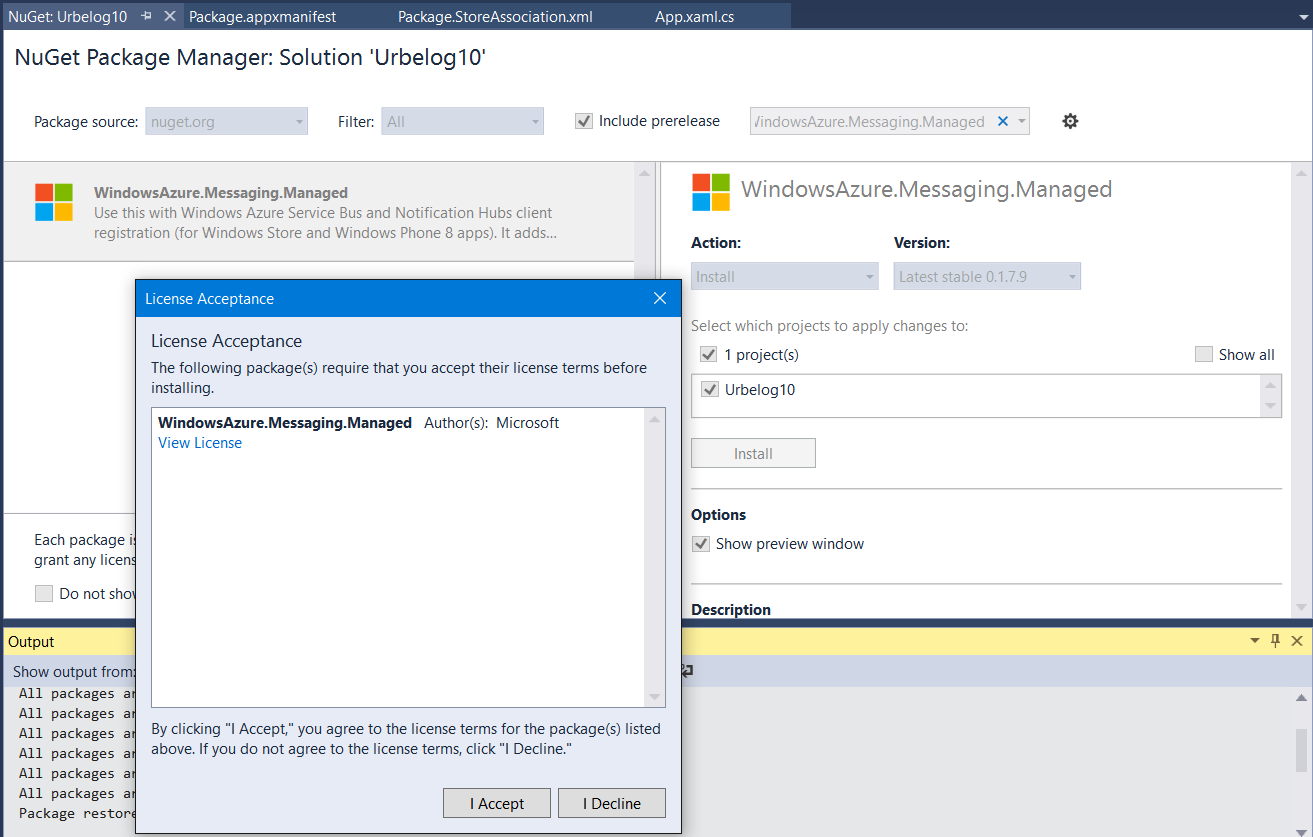
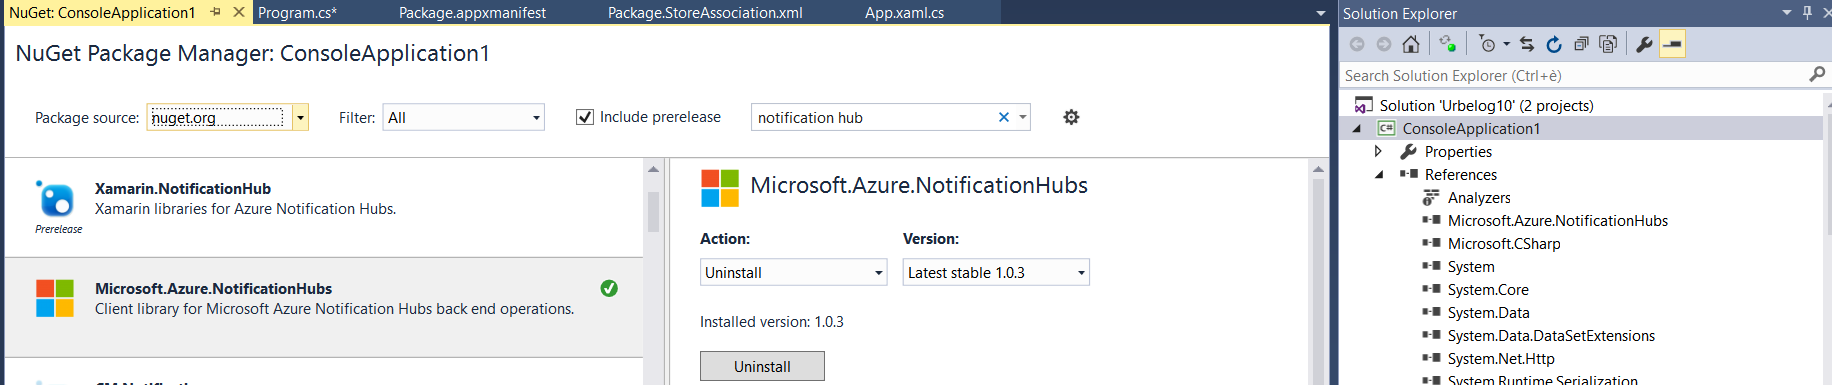
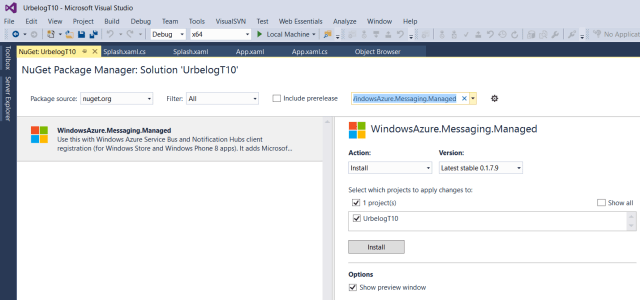
The client app must include, from NuGet (Tools -> NuGet Package Manager -> Manage NuGet Packages for Solution…), the package WindowsAzure.Messaging.Managed that contains the proxy to call the Notification Hub service on Azure.
You have to register the client every time that app starts (because the “channel” it get from WNS can change at any time, and so it needs to be updated


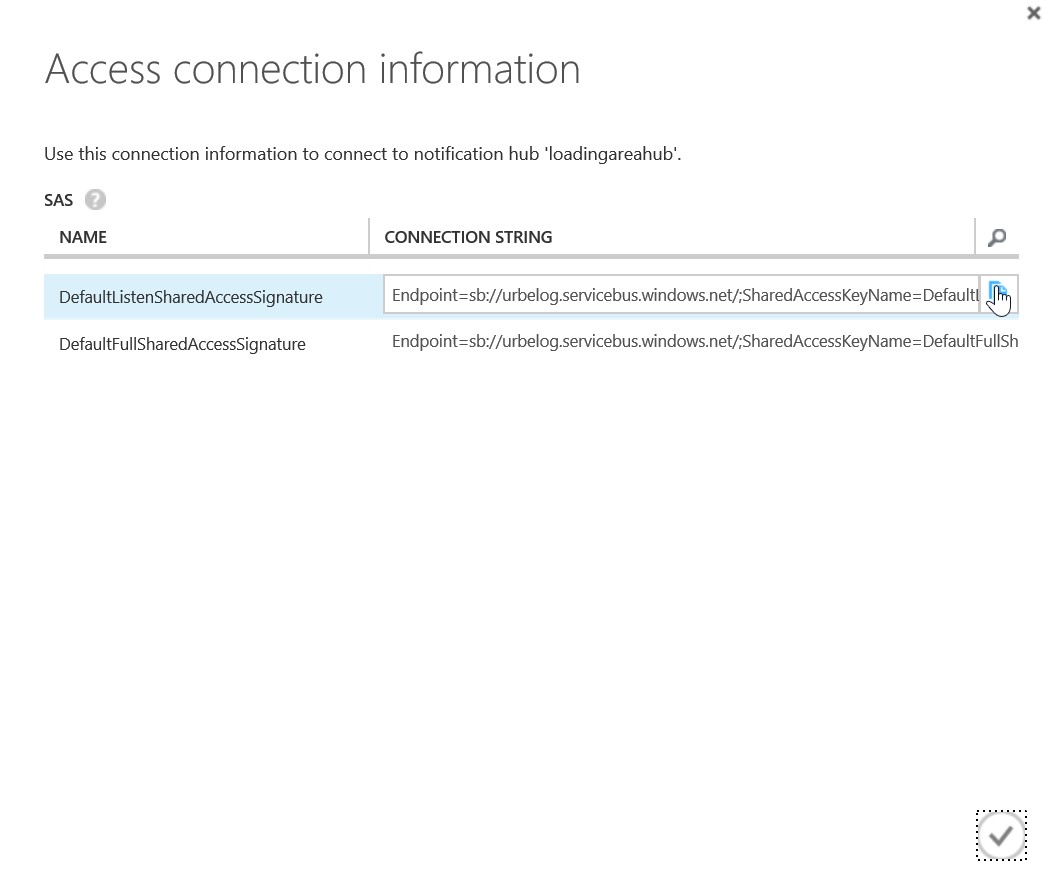
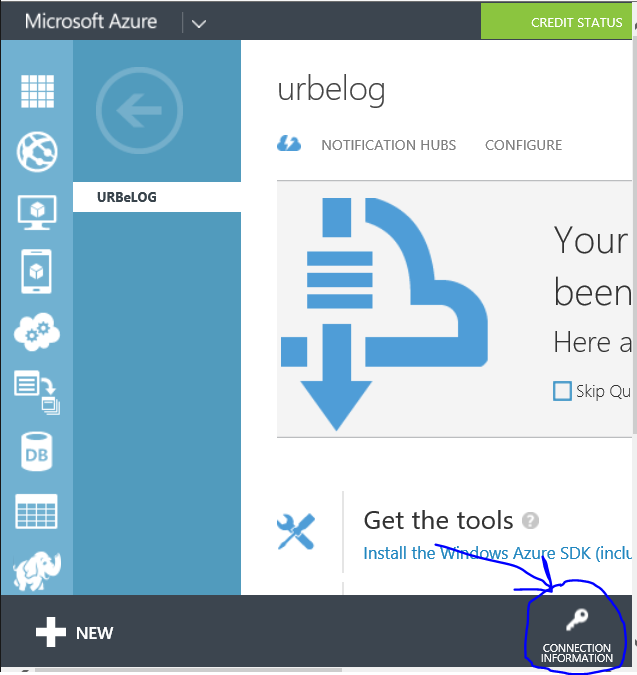
Hub connection information
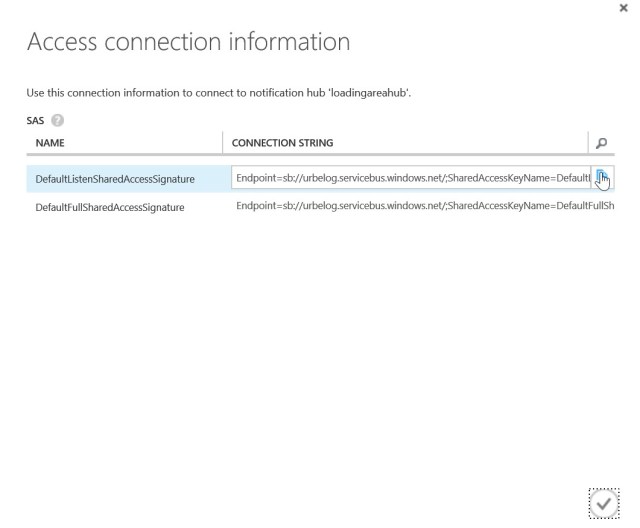
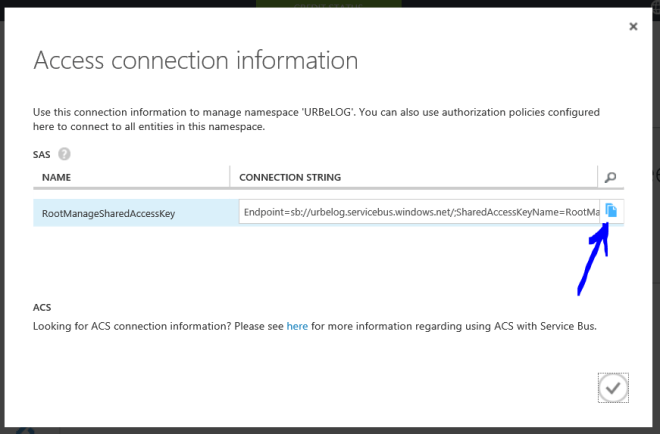
Access Connection Information: copy DefaultListen connection string
Client app side, you have to include in your project from GitHub the WindowsAzure.Messaging.Managed package that allows a client to be registered in that Azure service. To do so, add the following code (e.g. in the OnStartAsync of App.xaml.cs):
const string ConnectionString = "Endpoint=sb://urbelog.servicebus.windows.net/;SharedAccessKeyName=DefaultListenSharedAccessSignature;SharedAccessKey=ABcdefGEjeSXqXXXXPKoI54+XpShSw=";
//ask to WNS for a notification channel
PushNotificationChannel channel = await PushNotificationChannelManager.CreatePushNotificationChannelForApplicationAsync();
if (channel != null) {
Debug.WriteLine($"Debug :Registration successfull: the channel url is {channel.Uri}");
//say to the Notification Hub that now this client, handled by a specific Azure hub and identified by a connectionString, has a channel set from WNS
NotificationHub hub = new NotificationHub("loadingareahub", ConnectionString);
await hub.RegisterNativeAsync(channel.Uri);
}
where:
- the first parameter is the the notificatioHubPath that is the name I assigned to my hub in Azure (inside the namespace URBeLOG that is the charged one),
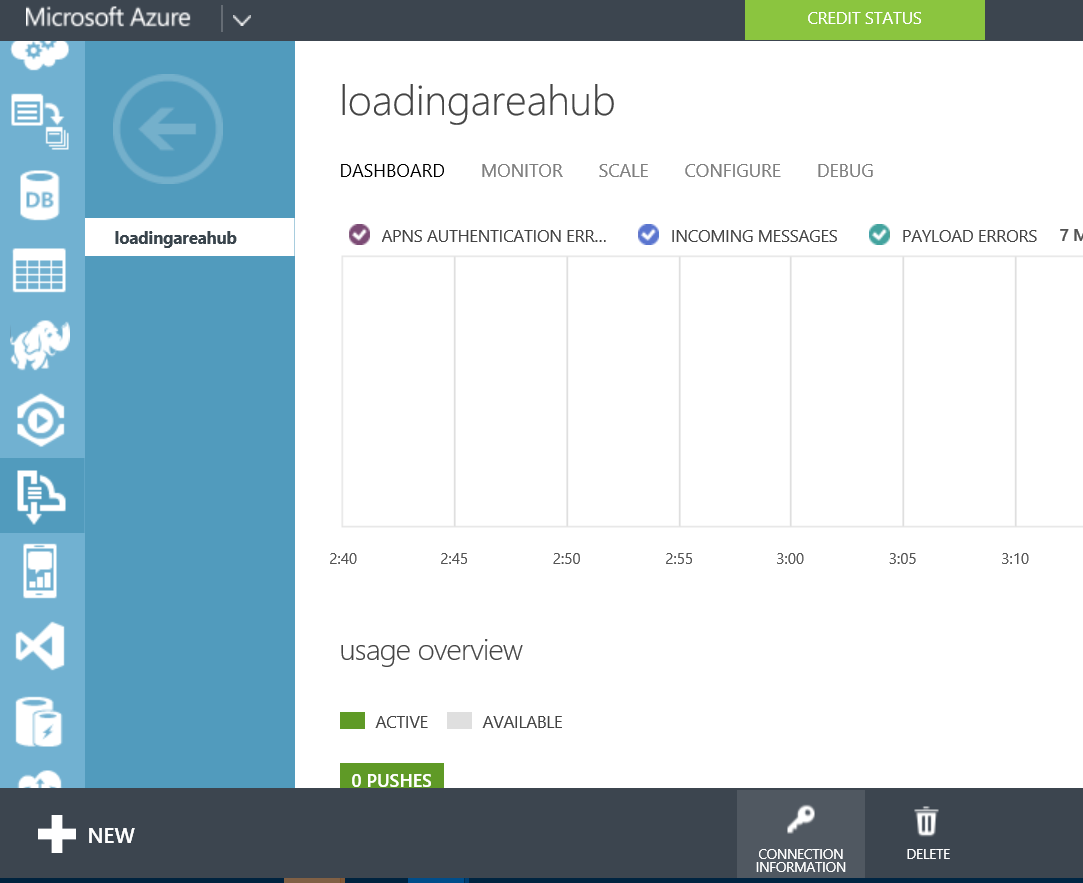
- the second is the connectionString that can be taken in Azure from the Dashboard of that hub (click on the bottom key icon called “CONNECTION INFORMATION” and then copy the DefaultListenSharedAccessSignature connection string [only listen right is needed for the app, the other string will be used by the backend side that sends notifications]: note that to copy all the string you have to click on the copy icon that appears when your mouse is over that string (see screenshot).
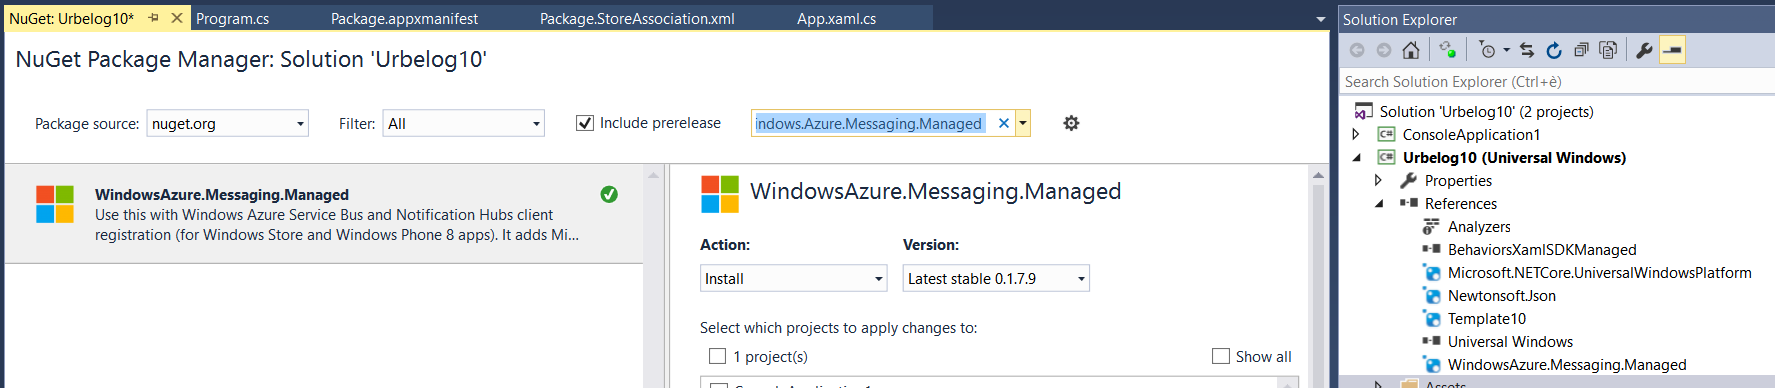
Client app: add in the reference WindowsAzure.Messaging.Manager
Backend side, that sends notifications (and other management thinks, the reference to be added is different and it iwas WindowsAzure.ServiceBus: now the Microsoft.ServiceBus.Notifications namespace is moved to Microsoft.Azure.NotificationHubs, that is the package to be included now in the server side project.
Note that the connection string to be copied from the Access connection information Azure page, is now DefaultFullSharedAccessSignature because the backend has to have a full access to specifica features that allows it to send notifications.
The code to send a notification is (e.g. for a toast notification):
private const string ConnectionString = "Endpoint=sb://urbelog.servicebus.windows.net/;SharedAccessKeyName=DefaultFullSharedAccessSignature;SharedAccessKey=ABDCEFGA70oC23456o/Pytg/Mw=";
static void Main(string[] args) {
NotificationHubClient hubClient = NotificationHubClient.CreateClientFromConnectionString(ConnectionString, "loadingareahub");
//the payload can be whatever: the Azure Notification Hub pass through everything to WNS and possible errore could be returned froew that is not well formed.
var toast = @"From any .NET App!";
hubClient.SendWindowsNativeNotificationAsync(toast).Wait();
}

Backend: add in the reference Microsoft.Azure.NotificationHubs

Backend: add in the reference WindowsAzure.ServiceBus (in the past version)
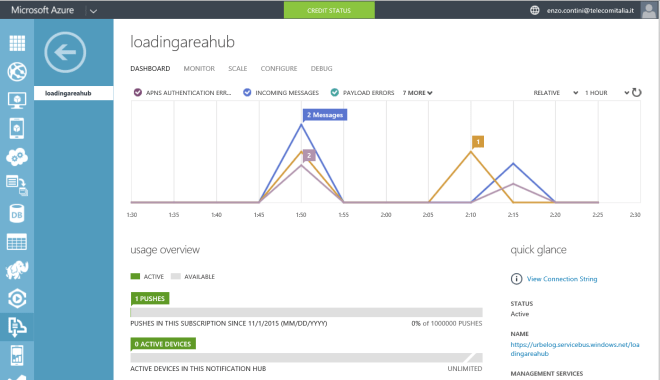
Dashboard: sent notifications
For debugging you can always use the Service Bus Explorer tool or see in the Dashboard of the Hub: in this last case take in mind that the telemetry takes some time to shows notifications (e.g. many minutes: Elio Damaggio said 5 min, … but it seems to me much more).
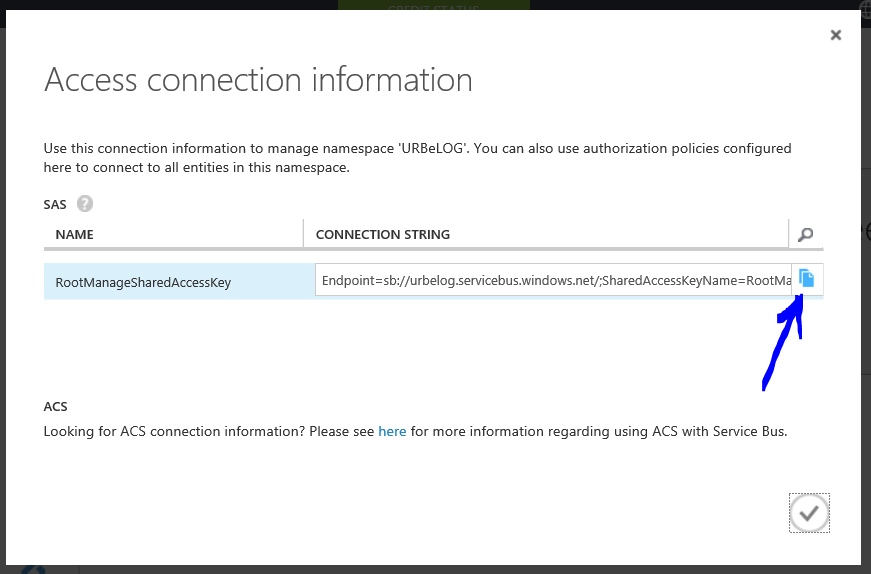
After downloading the Service Bus Explorer tool solution, you have to compile it and run. Then you have to select File -> Connect and choose as shown in the following screenshots (note: the connectionString to consider must be the one defined in the Access connection information page related to the namespace where you created the hub you want to debug.

1) Go to the namespace page
2) Get Connection Information
3) Copy the Connection String
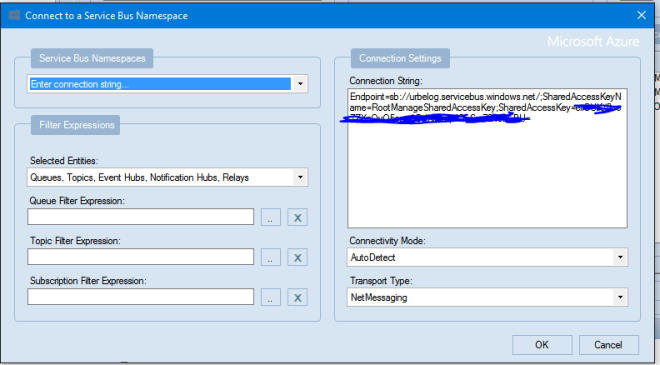
4) ServiceBusExplorer => File->Connection
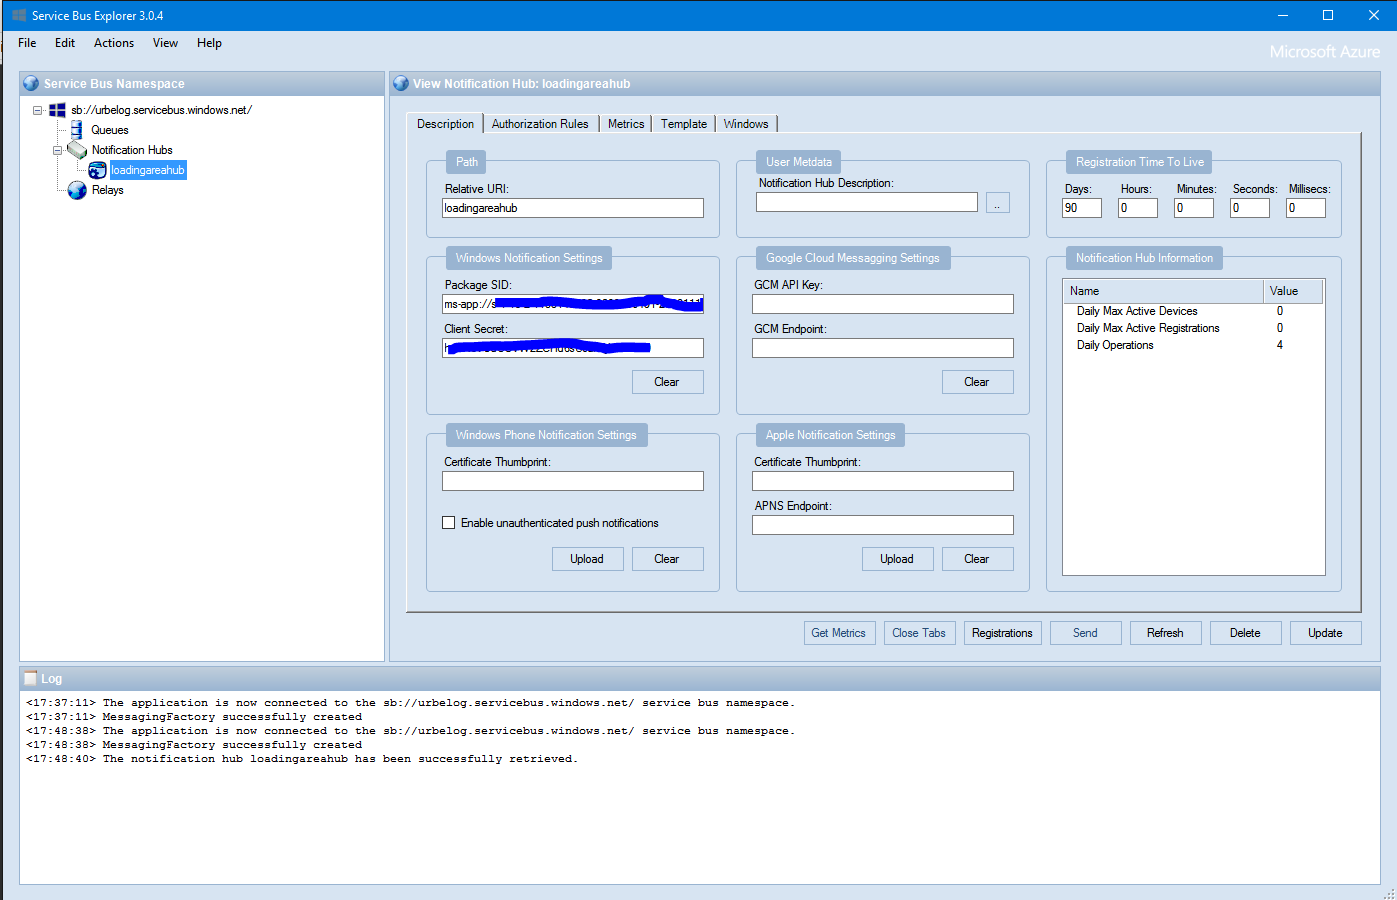
5) ServiceBusExplorer – View Notification Hub info
If you want to have notifications only for some targeted things, you have to subscribe to specific tags, that is strings that identify each interest group (e.g. topic, userId like a GUID that identify a single user, date string). Having tags (few or many) do not imply an additional charge
==================
More documentation related to the Push Notifications can be found in the official Azure site, for example for using tags . In fact, if no specific tags are used, every notification will be forwarded in broadcast to all the actually registered clients: this is not nice if you want to filter messages in some way, in order than each client receives notification only for topics of its interest (e.g. only for a city or some news types). There you can find also a detailed documentation on how to use the Azure Notification Hubs from any platform (e.g. iOS, Android, Windows, Windows Phone), with any language (Java, .NET, PHP, Pyton …) and for every Notification Server (e.g. WNS, GCM, APNS).
In particular see these videos on the Microsoft Azure page site related to Notification Hubs:
Azure Notification Hubs Notify Users
In the project that implement the client, you have to include from NuGet the package WindowsAzure.Messaging.Managed as shown in the following screenshot. After its installation, you will find it among the project References: note that, because the client registration should be done at every new launch of the app (therefore in the OnLaunched in App.xaml), this reference must be inserted in the main UI project where that file is available.
==================
EXAMPLE
Server side (C#):
using Microsoft.Azure.NotificationHubs;
using System;
using System.Collections.Generic;
using System.Linq;
using System.Text;
using System.Threading.Tasks;
//using Microsoft.ServiceBus.Notifications;
namespace ConsoleApplication1 {
class Program {
//DefaultFullSharedAccessSignature
private const string ConnectionString = "Endpoint=sb://urbelog.servicebus.windows.net/;SharedAccessKeyName=DefaultFullSharedAccessSignature;SharedAccessKey=ABDCEFGA70oC23456o/Pytg/Mw=";
private static async void SendNotificationAsync() {
NotificationHubClient hubClient = NotificationHubClient.CreateClientFromConnectionString(ConnectionString, "loadingareahub");
// Microsoft.WindowsAzure.Messaging.NotificationHub hubClient = NotificationHub.CreateClientFromConnectionString(ConnectionString, "loadingareahub");
var toast = @"&lt;toast&gt;&lt;visual&gt;&lt;binding template=""ToastText01""&gt;&lt;text id=""1""&gt;From any .NET App!&lt;/text&gt;&lt;/binding&gt;&lt;/visual&gt;&lt;/toast&gt;";
var rowPayload = "Notification at " + DateTime.Now.ToString(System.Globalization.CultureInfo.CreateSpecificCulture("it-IT"));
#region case 1: broadcasted
/*
//the payload can be whatever: the Azure Notification Hub pass through everything to WNS and possible errore could be returned froew that is not well formed.
await hubClient.SendWindowsNativeNotificationAsync(toast);
*/
#endregion case 1: broadcasted
#region case 2: client subscribed by SubscribeToCategories
/* */
//There is not the pain for a developer to mantain the registry of tags
//If we want a toast notification
// await hubClient.SendWindowsNativeNotificationAsync(toast, "Torino"); // hubClient.SendWindowsNativeNotificationAsync(toast, "Torino").Wait(); //notity to clients subcribed to "World" tag
// //or hubClient.SendWindowsNativeNotificationAsync(toast, "Torino &amp;&amp; !Politics").Wait(); //notify to clients subcribed to "World" tag but not subscribed to the Politics tag too. In expression like this (that can use also parenthesis) it can be used at maximun 6 tags in the expression
//If we want to have a row notification that can be handled by code in the running client app
Notification notification = new WindowsNotification(rowPayload);
notification.Headers = new Dictionary&lt;string, string&gt; {
// {"Content-Type", "application/octet-stream")},
{"X-WNS-TTL","300"}, // e.g. 300 seconds=&gt; 5 minutes - Specifies the TTL (expiration time) for a notification.
{"X-WNS-Type", "wns/raw" },
{"ServiceBusNotification-Format", "windows"}
};
await hubClient.SendNotificationAsync(notification, "Torino");
/* */
#endregion case 2: client subscribed by SubscribeToCategories
#region case 3: client SubscribeToCategoriesWithCustomTemplate
/*
//the template and internalization is own by the client that registes to have notifications
//template back to the mobile app: it is the client that knows the format he will receive
//you can put any property and payload you whant; you can personalize the notification, depending to the registration
//we do not use anymore the var toast but a dictionary: the server code is agnostic of the type of client (IOS, Android, Windows) that has to define a similar template related to News_locale
var notification = new Dictionary&lt;string, string&gt;() {
{"News_English", "World news in English"},
{"News_Italian", "Notizie dal mondo in italiano"}
};
//send then a template notification not a Windows one
await hubClient.SendTemplateNotificationAsync(notification, "World");
*/
#endregion case 3: client SubscribeToCategoriesWithCustomTemplate
}
static void Main(string[] args) {
SendNotificationAsync();
Console.ReadLine();
NotificationHubClient hubClient = NotificationHubClient.CreateClientFromConnectionString(ConnectionString, "loadingareahub");
//await CollectionQueryResult&lt;RegistrationDescription&gt; results = hubClient.GetAllRegistrationsAsync(0);
//var devicesList = results.Select(x =&gt; new DeviceRegistration {
// RegistrationId = x.RegistrationId,
// ExpirationTime = x.ExpirationTime.Value,
// Tags = RetrieveTags(x.Tags)
//});
//devices = new ObservableCollection&lt;DeviceRegistration&gt;(devicesList);
//Devices.ItemsSource = devices;
}
}
}
Client side (for example inserted in the OnInitializeAsync method of App.xaml.cs)
public override Task OnInitializeAsync(IActivatedEventArgs args) {
// setup hamburger shell
var nav = NavigationServiceFactory(BackButton.Attach, ExistingContent.Include);
Window.Current.Content = new Views.Shell(nav);
return Task.FromResult&lt;object&gt;(null);
}
#region Case 1 broadcast
public async Task SubscribeTo() {
const string ConnectionString = "Endpoint=sb://urbelog.servicebus.windows.net/;SharedAccessKeyName=DefaultListenSharedAccessSignature;SharedAccessKey=ABDCEFGA70oC23456o/Pytg/Mw=";
//ask to WNS for a notification channel
PushNotificationChannel channel = await PushNotificationChannelManager.CreatePushNotificationChannelForApplicationAsync();
if (channel != null) {
Debug.WriteLine($"Debug :Registration successfull: the channel url is {channel.Uri}");
//I register to the event in order to revover the content ot the push inside the app when running
channel.PushNotificationReceived += Channel_PushNotificationReceived;
//say to the Notification Hub that now this client, handled by a specific Azure hub and identified by a connectionString, has a channel set from WNS
NotificationHub hub = new NotificationHub("loadingareahub", ConnectionString);
await hub.RegisterNativeAsync(channel.Uri);
}
}
#endregion
#region Case 2
public async Task SubscribeToCategories(IEnumerable&lt;string&gt; categories) {
const string ConnectionString = "Endpoint=sb://urbelog.servicebus.windows.net/;SharedAccessKeyName=DefaultListenSharedAccessSignature;SharedAccessKey=ABDCEFGA70oC23456o/Pytg/Mw=";
PushNotificationChannel channel = await PushNotificationChannelManager.CreatePushNotificationChannelForApplicationAsync();
if (channel != null) {
Debug.WriteLine($"Debug :Registration successfull to categories {categories.ToString()}: the channel url is {channel.Uri}");
//I register to the event in order to revover the content ot the push inside the app when running
channel.PushNotificationReceived += Channel_PushNotificationReceived;
//say to the Notification Hub that now this client, handled by a specific Azure hub and identified by a connectionString, has a channel set from WNS
NotificationHub hub = new NotificationHub("loadingareahub", ConnectionString);
await hub.RegisterNativeAsync(channel.Uri, categories);
}
else {
Debug.WriteLine("Channel not created!!");
}
}
private void Channel_PushNotificationReceived(PushNotificationChannel sender, PushNotificationReceivedEventArgs args) {
string content;
switch (args.NotificationType) {
case PushNotificationType.Raw:
Debug.WriteLine(args.RawNotification.Content);
break;
case PushNotificationType.Toast:
break;
case PushNotificationType.Tile:
break;
case PushNotificationType.Badge:
break;
case PushNotificationType.TileFlyout:
break;
default:
break;
}
}
#endregion
#region Case 3
public async Task SubscribeToCategoriesWithCustomTemplate(String locale, IEnumerable&lt;string&gt; categories) {
ApplicationData.Current.LocalSettings.Values["categories"] = string.Join(",", categories);
ApplicationData.Current.LocalSettings.Values["locale"] = locale;
const string ConnectionString = "Endpoint=sb://urbelog.servicebus.windows.net/;SharedAccessKeyName=DefaultListenSharedAccessSignature;SharedAccessKey=ABDCEFGA70oC23456o/Pytg/Mw=";
PushNotificationChannel channel = await PushNotificationChannelManager.CreatePushNotificationChannelForApplicationAsync();
if (channel != null) {
Debug.WriteLine($"Debug :Registration successfull to categories {categories.ToString()}: the channel url is {channel.Uri}");
// the template is own by the mobile app
//when I send my notification in the back I don't have to know the specific of my xml, I just need to sent a property that is News_myLocale:
//I tokenize my notification template
//You provide the xml that you want to receive
var template = String.Format(@"&lt;toast&gt;&lt;visual&gt;&lt;binding template=""ToastText01""&gt;&lt;text id=""1""&gt;$(News_{0})&lt;/text&gt;&lt;/binding&gt;&lt;/visual&gt;&lt;/toast&gt;", locale);
//if the client would be an IOS one, it had have to define another template (a json one) calling in the same way the body "News_Italian" and the server code is agnostic of the type of client (IOS, Android, Windows)
//say to the Notification Hub that now this client, handled by a specific Azure hub and identified by a connectionString, has a channel set from WNS
NotificationHub hub = new NotificationHub("loadingareahub", ConnectionString);
//I provide the channnel URI, the format of the template (in Windows an XML), that template name (e.g. newsTemplate) [I might wont to have multiple template at presentation for multiple thinks],
//and the categories that is the tags (e.g. World, Politics, Sports, Science)
await hub.RegisterTemplateAsync(channel.Uri, template, "newsTemplate", categories);
}
}
#endregion
// runs only when not restored from state
public override async Task OnStartAsync(StartKind startKind, IActivatedEventArgs args) {
#region case 1
/*
await SubscribeTo();
*/
#endregion case 1
#region case 2
IEnumerable&lt;string&gt; categories = new List&lt;string&gt;() { "Torino", "Sport" };
await SubscribeToCategories(categories);
#endregion case 2
#region case 3
/*
//the template and internalization is own by the client that registers to have notifications
string locale = "Italian";
IEnumerable&lt;string&gt; categories = new List&lt;string&gt;() { "World" };
await SubscribeToCategoriesWithCustomTemplate(locale, categories);
//await SubscribeToLocalCategories(locale, categories);
*/
#endregion case 3
// const string ConnectionString = "Endpoint=sb://urbelog.servicebus.windows.net/;SharedAccessKeyName=DefaultListenSharedAccessSignature;SharedAccessKey=ABDCEFGA70oC23456o/Pytg/Mw=";
////ask to WNS for a notification channel
//PushNotificationChannel channel = await PushNotificationChannelManager.CreatePushNotificationChannelForApplicationAsync();
//if (channel != null) {
// Debug.WriteLine($"Debug :Registration successfull: the channel url is {channel.Uri}");
// //say to the Notification Hub that now this client, handled by a specific Azure hub and identified by a connectionString, has a channel set from WNS
// NotificationHub hub = new NotificationHub("loadingareahub", ConnectionString);
// await hub.RegisterNativeAsync(channel.Uri);
//}
//await Task.Delay(50);
//NavigationService.Navigate(typeof(Views.MainPage));
await Task.Delay(TimeSpan.FromSeconds(5));
//per gestire la attivazione di tile secondarie:
//abbiamo ipotizzato che la tile secondaria dia la possibilità di aprire l'applicazione direttamente sul
//dettaglio di un elemento: ci limitiamo, perciò, a recuperare gli argomenti della tile (contenuti nella proprietà Arguments dei parametri di attivazione)
//e a portare l'utente verso la pagina predisposta della nostra applicazione, chiamata DetailPage
AdditionalKinds cause = DetermineStartCause(args);
//per gestire tutti gli altri scenari di attivazione (da notifica toast, da Uri, da contratto di sharing, ecc.)
//il metodo DetermineStartCause() vi restituirà il valore Other dell'enumeratore AdditionalKinds:
//dovremo perciò sfruttare la proprietà Kind del parametro di attivazione di tipo IActivatedEventArgs per determinare lo scenario di utilizzo.
if (cause == AdditionalKinds.SecondaryTile) { //
LaunchActivatedEventArgs eventArgs = args as LaunchActivatedEventArgs;
NavigationService.Navigate(typeof(Views.DetailPage), eventArgs.Arguments);
}
else {
NavigationService.Navigate(typeof(Views.MainPage));
}
}
==============
Server side (Java): example of Client code for both toast and raw notifications from a java server [setting also the “time to live” (TTL) parameter]
package pushNotification;

import java.sql.Timestamp;
import java.util.HashMap;
import java.util.Map;

import com.windowsazure.messaging.NamespaceManager;
import com.windowsazure.messaging.Notification;
import com.windowsazure.messaging.NotificationHub;
import com.windowsazure.messaging.NotificationHubDescription;

public class Test {
	public static void main(String a []){
		String connectionString = "Endpoint=sb://urbelog.servicebus.windows.net/;SharedAccessKeyName=DefaultFullSharedAccessSignature;SharedAccessKey=ABDCEFGA70oC23456o/Pytg/Mw=";

// 1)Send of a Toast notification
		//NotificationHub hub = new NotificationHub(connectionString, "loadingareahub");
		//String toast = "<toast><visual><binding template=\"ToastText01\"><text id=\"1\">From any .NET App!</text></binding></visual></toast>";
		//Notification n = new Notification();
		//n.setBody(toast);
		//hub.sendNotification(n);


// 2) Send of a raw notification with a specific tag (e.g. "Torino") and a body with
        NotificationHub hub = new NotificationHub(connectionString, "loadingareahub");
   	 	java.util.Date date= new java.util.Date();
   	 	Notification n = new Notification();
   	 	Map<String, String> headers = new HashMap<String, String>();
   	 	headers.put("X-WNS-TTL","120");
   	 	headers.put("X-WNS-Type", "wns/raw");
   	 	headers.put("Content-Type", "application/octet-stream");
   	 	headers.put("ServiceBusNotification-Format","windows");
   	 	n.setHeaders(headers);
   	 	n.setBody("Notifica: "+(new Timestamp(date.getTime())));
   	 	hub.sendNotification(n, "Torino");

//   	 Notification notification = Notification.createWindowsRawNotification("ciao");
//   	 System.out.println(notofication.getHeaders());
//
	}
}
===================================================
More useful links
=============


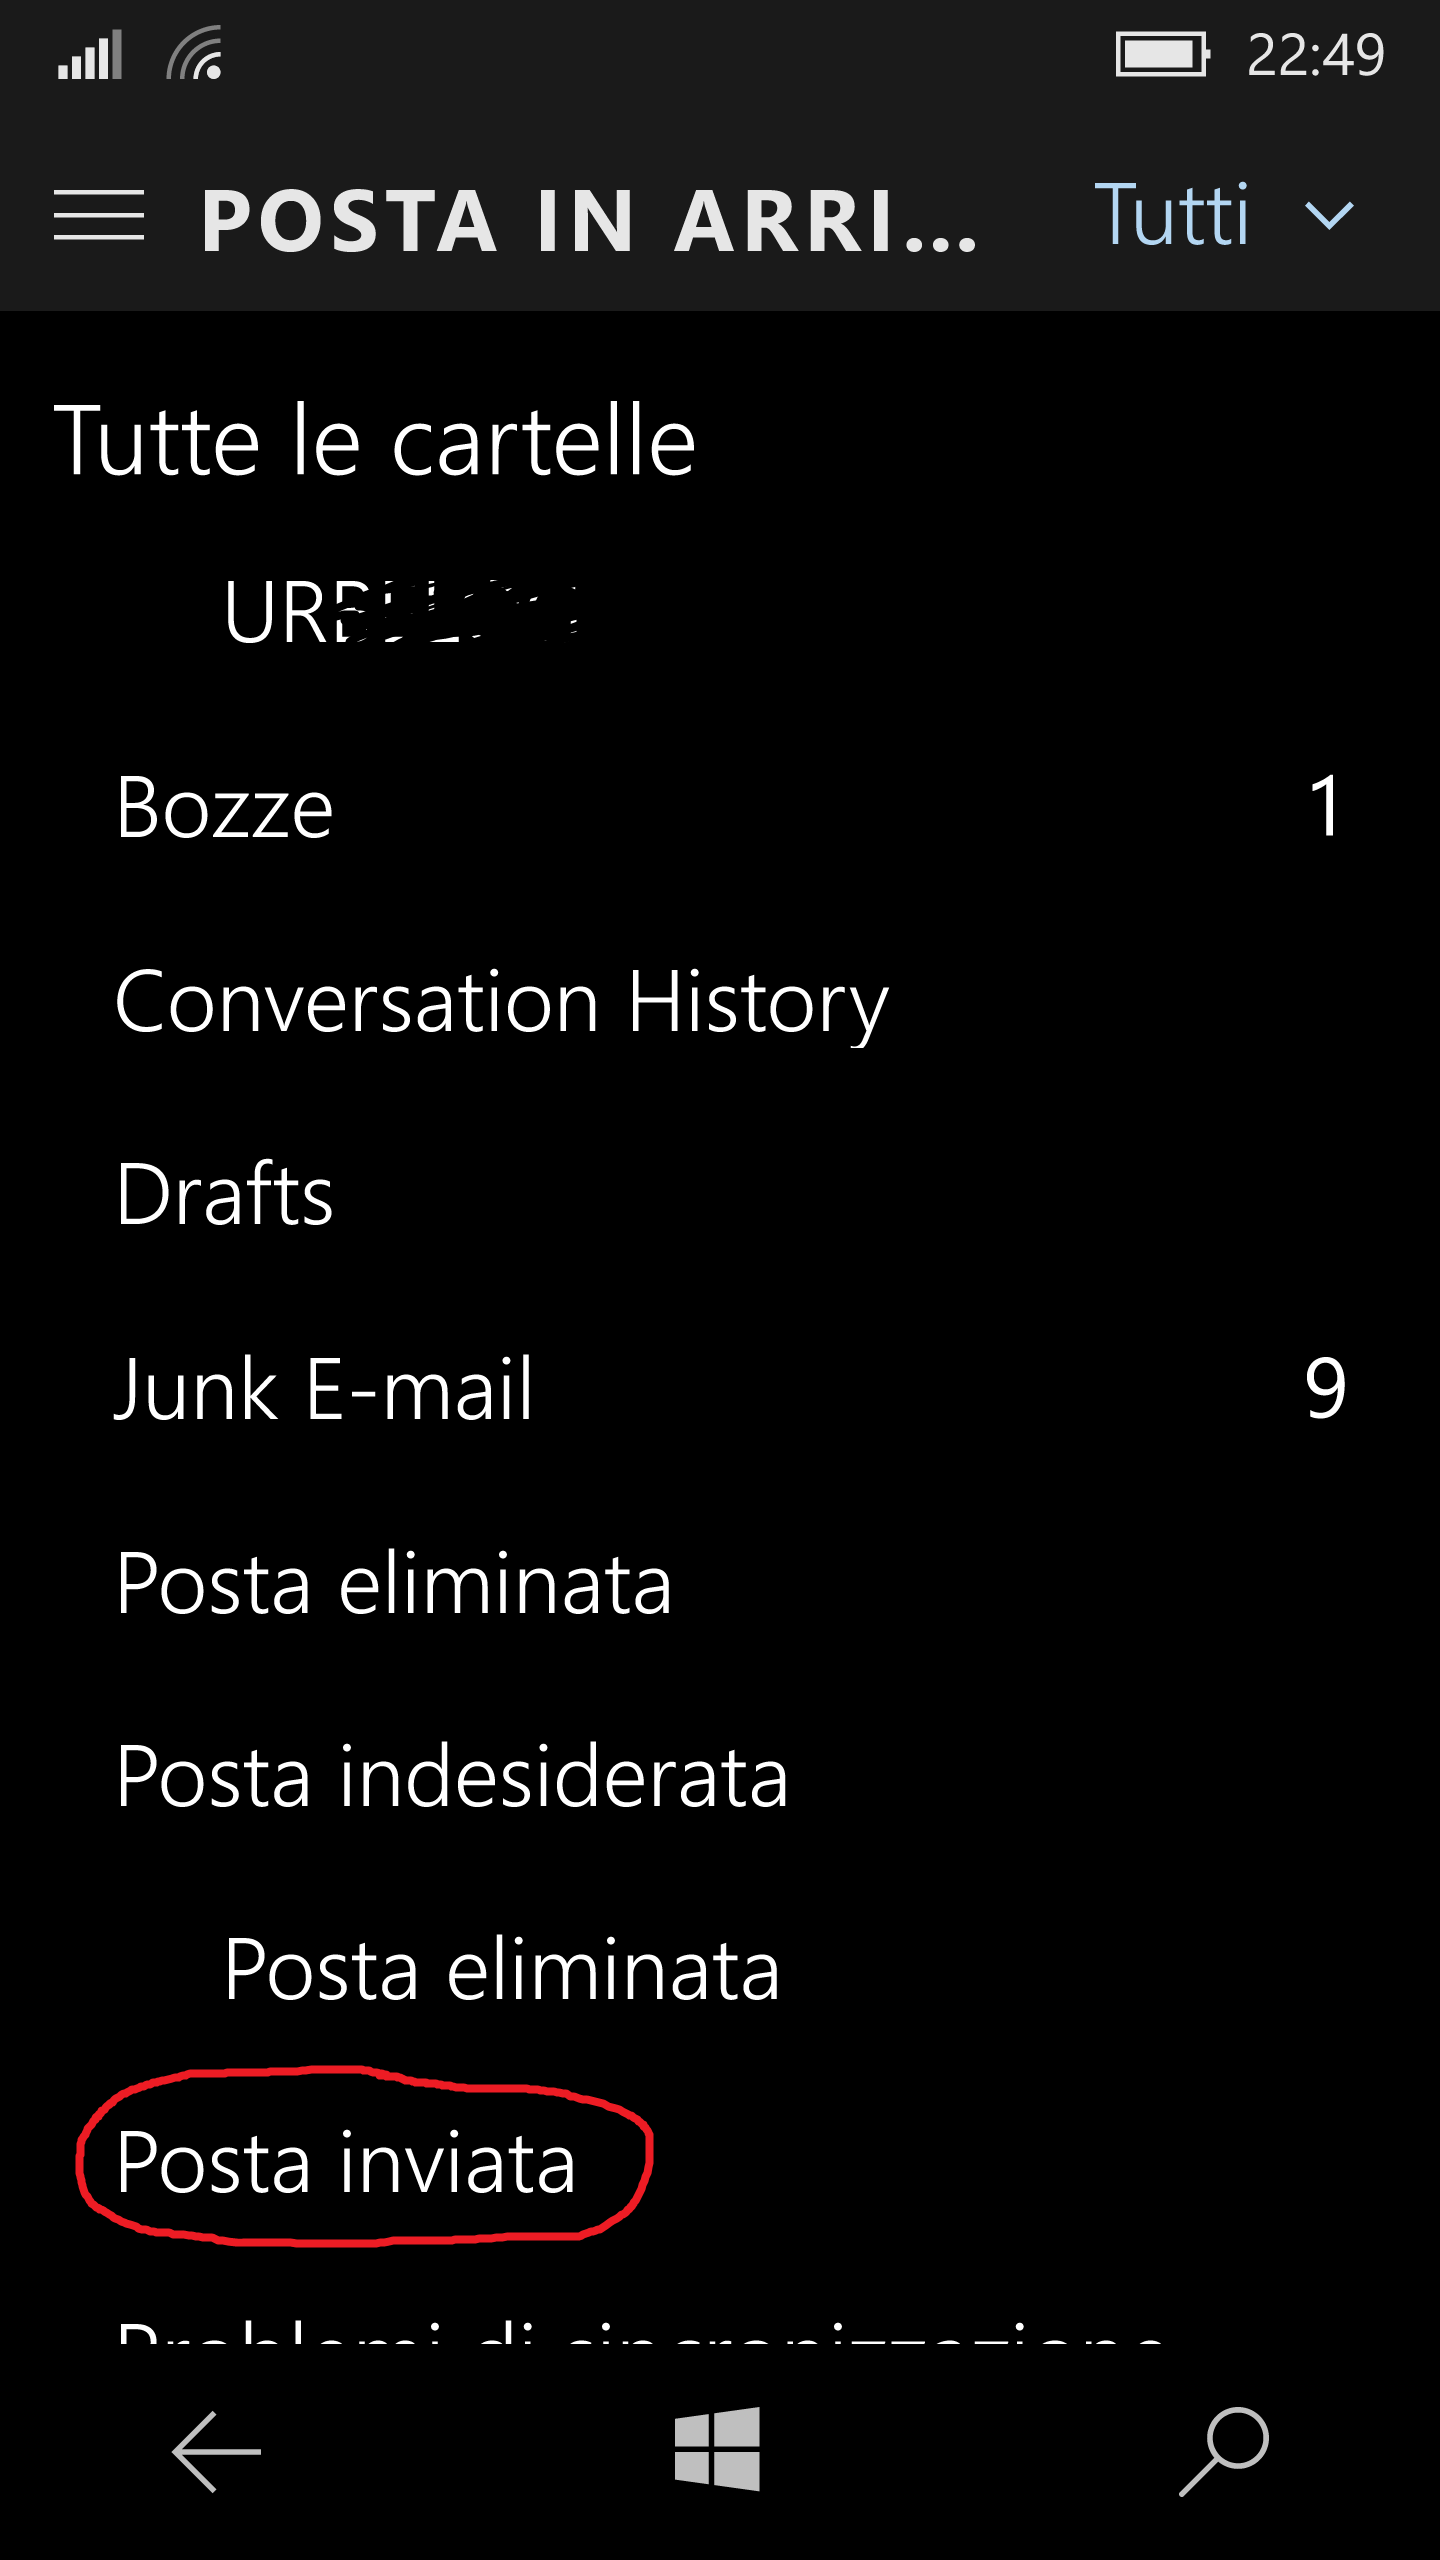
![If the folders are a lot, More [Altro] item must be selected](https://enzocontini.blog/wp-content/uploads/2016/01/wp_ss_20160103_0015.png)